
Midnight Glow Baby Quilt Tutorial & Pattern
This post may contain affiliate links which won’t change your price but will share a commission.
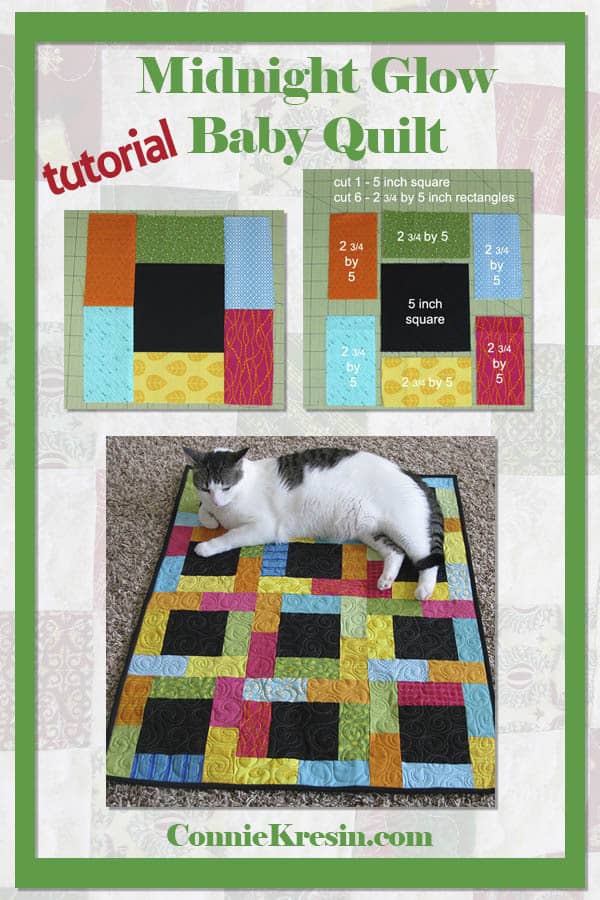
Today I am sharing the Midnight Glow Baby Quilt Tutorial & Pattern. This is another one of my fast and easy quilts to make! The bright, bold colors make this a perfect baby quilt.
Midnight Glow Baby Quilt Tutorial & Pattern
26″ x 34″

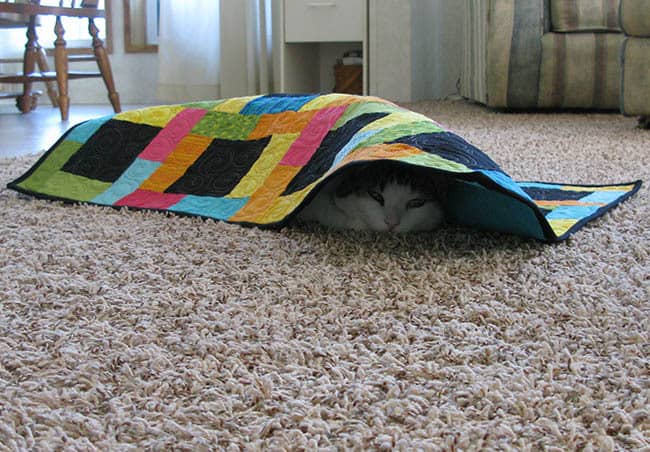
Keep reading for the tutorial for the quilt. I finally got it back from Simon, I guess it is cat approved!. Cat hairs are gone….it has been washed for that crinkly soft look I love.
The finished size of this was 26″ x 34″ before I washed it and now it is 24″ x 32″ as I washed it in warm water and dried it to take care of any shrinkage.
I used a bundle of fat quarters when I made the Midnight Glow quilt. Here is a beautiful fat quarter bundle that would look great in this pattern!

This quilt was made using 12 – 9-inch blocks.
Each square is made with:
- 1 – 5 inch square in black for the block center
- 6 – 2 3/4 by 5-inch rectangles in assorted colors for each block
To make 12 blocks
Cut the following:
- 12 black 5-inch squares
- 72 rectangles 2-3/4 inch x 5 inches in assorted colors
You will also need:
- 30-inch by 40-inch backing
- 30-inch by 40-inch batting
- 3 – 2 1/2 strips width of fabric for the binding


Each block will use one center block and six rectangles in colors of your choice. I have a diagram below for different sizes.
- Use a 1/4″ seam allowance. Simply sew 2 rectangles together.
- Add a rectangle to two sides of the square.
- Sew the sections together.
Finished block – make 9

This is a block that has many names……..but I can’t remember even one of them. This was a flimsy I did last winter and I thought it would be perfect to try a different FMQ stitch on. The fabrics were a sampler pack I had bought from Connecting Threads and also used on my Kaleidoscope quilt.
Are you interested in making the blocks in other sizes? Here is a chart to help you with that.
This diagram shows you 3 different block sizes.


You could make an 8-inch block using charm squares or jelly roll strips. Lots of possibilities and also a great scrap quilt!
I will definitely be making this one again! Here is a closeup of the quilting, I used a tan thread and used a teal solid fabric for the backing. The quilting was done on my vintage 15-91 Singer sewing machine and the batting was Warm & Natural.

I just had to include one more photo of Simon on the quilt, I think this is his favorite!
Get the Midnight Glow quilt pattern in my shop. It now includes a table runner, placemats and bonus sizes of blocks!
Here are some other posts that will inspire you:
- Batik String Summer Table Runner
- Midnight Glow Table Runner
- Midnight Glow Placemats
- Strippy Basket Tutorial
- Strippy Batik Table Runner
Please note this post contains affiliate links, which means I’ll earn a small commission if you purchase through my link at no extra cost to you. Please see full disclosure here. As an Amazon Associate, I earn from qualifying purchases.
Great deals for you!
Looking for great buys on fabric and things? Check out these links
- Connecting Threads
- AccuQuilt Deals
- Fat Quarter Shop Daily Deals
- Green Fairy Quilts – Daily Deals
- Missouri Star Quilt Co – Daily Deals
- Scrapbooking
- The Quilt Keeper
- SewingMachinesPlus
- Electric Quilt
- My Amazon Store for all the quilting things I use and more
Grab this free Musical Pillow pattern that I designed!

Love this quilt. As I have a lot of scraps, it will be easy to make. I look forward to starting this, maybe several.
Thanks. From Canada.
The quilt is lovely!
Simon is beautiful! I don’t believe I’ve seen Simon. I didn’t find your blog until you adopted Rusty.
Oh the quilts are absolutely gorgeous
I love this pattern. Our church has a quilting group that uses donated fabric to make quilts for a charity. We have always just cut out squares and sewn them back together mixing up the fabrics. This is a wonderful alternative. That you so much for sharing.
Thanks for the great tutorial. I always enjoy reading your posts.
Thanks for this tutorial! I will use 2 1/2 inch strips for the quilt. Due to arthritis, I try to adapt every quilt to use my Accuquilt. The 5″ square and 2 1/2″ dies are the first two that I bought.
What a great pattern -super fast and love the kitchen pictures. Love that you let the fur family test out the quilts!
My cat always adds a few black hairs to everything I make fay
Your kitty has the Right idea💕. It’s still snowing here- everyday… Very beautiful pattern. Thank you for sharing.
Thanks for sharing this pattern. It is very quick to piece together and I am happy to be giving it to a friend for her first grandchild. I decided to make it a little bigger and with my free motion quilting, I wrote the little girl’s name in the bottom right-side black square. Very satisfied.
Hi Connie! Your pretty quilt came up in my Pinterest feed email today. It looks like an easy quilt to make and the fabrics and colors you chose make it a happy project to work on. I hope you are doing well. Stay healthy and safe. ~smile~ Roseanne
Ready for bright colors and fun sewing, thank you.
Thanks very much! Just the easy project I need.
Wow! This is great as it can be enlarged and the black squares can be a cute child’s print. Fast, easy and fun. Thanks ever so much.
here in australia we are bushfire ravaged and this should be a quick quilt or many of, in different colours to donate to those who are in need as so many hundreds of people have LOST EVERYTHING, some even their lives
elissa
What a fun little quilt! This pattern is a keeper, thank you.
Wonderful tutorial, not to mention the clear photography. Thank you for sharing!. Came across your site from Pinterest. So happy I clicked on your quilt image and landed on your blog. Thanks again, Brenda in Texas.
Beautiful quilt and tutorial. Definitely on my to-do list.
Love it. Simple, bright, fun!
I really like it, especially the combination of colors. The swirly quilting is terrific.
Great tutorial that produces a fabulous quilt. Thanks for linking to Applique Thursday and leaving such great eye candy.
wow..gorgeous piece of work…thank you for the picture tut..
Very cute quilt, love the pops of color. I think Simon is a great model as well 😉
Amanda
Great tute, Connie. Thank you. The black sure gets the colors to pop.
Love the pic of Simon. His facial expression almost says, "ok, so I am on the quilt. Whatcha gonna do about it?". I love your kitty! So cute.
Beautiful quilt Connie!! and another great tutorial from you. Thank you 🙂 Seems like Simon has reclaimed the quilt though, LOL.. He is gorgeous too. Elly
Simon is the perfect accent for your quilt! I love this quilt, I'm going to pin for later reference.
This is really pretty. I love how the colors stand out with the black squares. Seems like Simon agrees. LOL Thanks for sharing.
quilting dash lady at comcast dot net
What a beautie, love the colors and the quilt too! Simon must be King of all your quilts 😉 Thanks for the tutorial. I really would like to give this one a try.
You make it look EASY! Lovely bright colors (lovely kitty, too!).
Thanks for sharing the instructions & measurements for we who are math-challenged!
Beautiful! Simply beautiful! I love the quilting on it! You did such a good job! Obviously, Simon thinks so, too! 🙂 Thanks for the tutorial!
I love this. And, I have stacks of precut 2.5" x 4.5" scraps. This one would go together so easy. Thanks for the tutorial.
Thanks for the tutorial! That looks like a quilt you can use up scraps. I love that idea. I put a flower on a lil twister today. I got the idea from you. Thanks so much. I will try and send a picture when it is done.
Love it!
Love that colorful little quilt and your quilting Connie..and Simon makes the perfect 'accessory' on it! Thanks for the great tutorial :o)
Hi Connie…do you use basting spray when you quilt your quilts or do you just pin?
Love the black in your quilt….goes great with the bright colors.
Very pretty quilt! Thanks so much for the tutorial!
Thanks for the tutorial. I see Simon approves.
Connie it is lovely. I would love to have you make a quilt for Aurora Colorado. If you think you would like to, please contact me. We need 300 lap sized or a bit larger and so far have around 20 or so. Nothing fancy and something quick. Your work is beautiful!
Great fabrics and fabulous quilting!
Thanks for the tutorial,very nice!
Sara
Hi Connie! That is really great block and pattern! Thank you for sharing! Beautiful quilt and the photo with your sweet cat! x Teje
Great for a baby quilt, maybe make it 4 blocks x 4 blocks. Will print this one off, good for scraps.
Simon looks very comfortable on that very pretty quilt.
Connie, everything thing about this quilt I love…the brights, the black center, it's simplicity and I can even store this pattern in my bitty brain! Thanks for sharing, I see lots of quilts using this pattern…my new stash buster and donation quilt pattern. Thanks again and have a wonderful Wednesday!!
I like the pattern – lots of possibilities. Thank you! I think Simon has claimed that quilt for his own, though. 😀
thankyou Connie this is so lovely,well done.xx
This is a lovely quilt. It certainly coils be adapted to a variety of fabric "themes"
Barb@Witsend
I really like this and am bookmarking it to use next month. Our quilt guild is doing 100 Quilts for Kids and this would be perfect for charms. Thanks!
Great tutorial Connie and I really like the bright colors. Very nice FMQ too my friend!!
Nice simple pattern. Good instructions. Just what you need for a fast quilt.
Love the brightness of this quilt. Simon did a good job of posing.
Beautiful quilt! Thanks for the tutorial. I see that Simon got it back 🙂 I can also see it is the purrrfect size for him. He knew it was his! He is so smart!
How simple – very striking and I can see more blocks to make a cute baby quilt or even a 'big boy/girl' quilt. Thank you.
Great Tutorial Connie! I love that you included the measurements for the 3 different sized blocks. And Simon really does look like he owns that quilt – the expression on his face is priceless!
Hi! Connie thanks for the instructions.Your quilt looks great.I always love your FMQ. I am going to make this asap I have some nice bright fabric for it.See how you motivate me!!
This is really cute. I love the bright colors.