
Angled Strips Mug Rug Tutorial
This post may contain affiliate links which won’t change your price but will share a commission.
Mug rugs – I think I could make a new one every day as they are such a fun way to use up scraps from my other quilt projects.
This is another fast and easy quilted mug rug that I made using some of my batik collection from Island Batik.
I actually made the mug rug shown below – two years ago and showed it during a blog hop I was doing at the time.
Of course I said I was going to share a tutorial and didn’t get that done. Last week I decided it would be a good time to do it and looked through my stash of mug rugs but couldn’t find it.
I looked all over the house and even pulled out my box of Christmas quilt table runners and projects (why would it be in with Christmas quilts??) but still couldn’t find it so I decided to make another one based on the photos I had of it.

Angled Strips Mug Rug Tutorial
Here is the original angled strips mug rug which was made with leftover scraps from a 5-inch charm pack that I had used for some applique pieces.
This could easily be made with any quilt scraps or leftover charm squares. I am using batiks but you could use any quilt fabrics.
If you are new to piecing, this could be a good time to practice sewing a precise 1/4″ seam allowance. Otherwise don’t worry as seams don’t have to be perfect for this project, you could even sew a smaller seam allowance.
- Cut strips that are 1-1/4″ wide and 1-1/2″ wide – mine are 5″ long since I used charm squares.
- Sew them together to create a striped fabric piece.
- I would recommend sewing at least 8 pieces together, I only did 6 and more would have made a longer angled strip.
- Cut diagonal strips about 1-1/4″ wide

Use a neutral fabric to separate the angled strips, cut strips about 1-1/2″ wide.

I cut a couple of pieces on the diagonal and then others just in strips. This is a mug rug that is just made with whatever is on hand. I love working on little impulse projects with no rules!
You can see in the next photo how my angled strips were easier to work with when I used 8 instead of 6 strips.

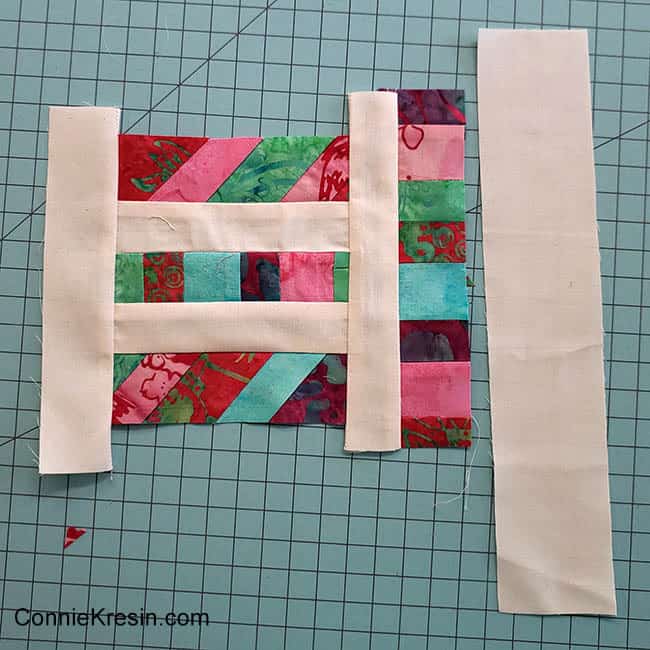
Square up the piece and add a 1-1/2″ neutral strip to the strip of straight cuts. Sew this to one side of your mug rug. Add some 2″ strips of the neutral fabric to the ends to get the width for the mug rug.

Add another 2″ neutral strip to the top and then to the bottom of your mug rug.
Trim the mug rug up, there isn’t much left of the scraps!

Measure your angled strip mug rug and cut a backing piece and batting just a little bit bigger and then quilt as desired.

I am using my vintage 15-91 Singer and a darning foot to free motion quilt some wiggle lines on the neutral strips.

Then I switched to just a small twirling meander to finish the edges.

Use a ruler to square up the mug rug after you are finished quilting it.
I found a batik that was very close in color that I could use for my binding.
Cut 1 strip 2-1/4″ by the width of the fabric for the binding and sew on.
Angled Strips Mug Rug Tutorial

Guess what happened when I got all done making this little mug rug? I found the first one I had made, can you guess where it was? It was hanging on the wall right next to my sewing machine…..where I had been sitting all day! Can you see it?

If you don’t want to use it as a mug rug – hang it on a wall! Just don’t forget where it is like I did.

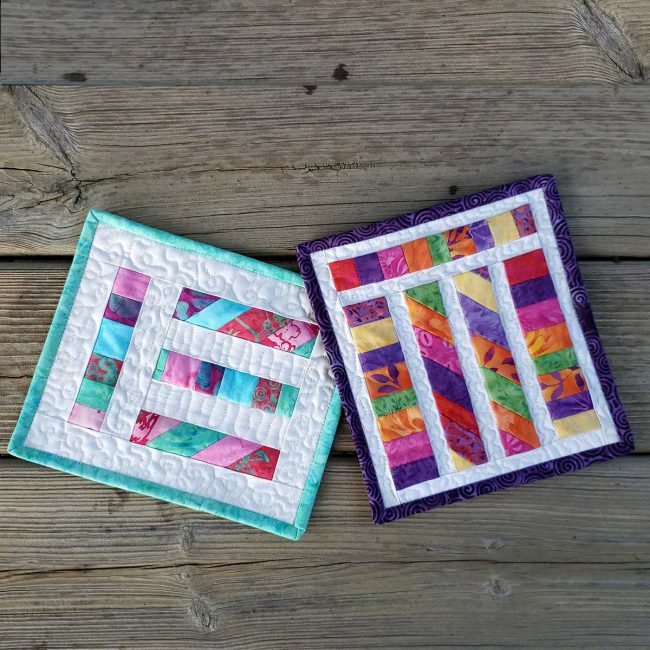
The size of the little angled strips mug rug is 7″ x 9″. There is no standard size for a mug rug, just make a size that you like or that works with the scraps you are using. My original mug rug was just a little bit smaller.

It was interesting to see how different the 2 mug rugs look when placed side by side. I used narrower neutral strips in my original one and more strips.
I hope this gives you some ideas on making mug rugs.

Here are some other posts that will inspire you:
- Scrappy Mug Rugs
- Scrappy Christmas Mug Rug Tutorial
- Selvage Mug Rugs
- Happy Galentine’s Day Mug Rug Tutorial and more Fabric Baskets!
Great deals for you!
Looking for great buys on fabric and things? Check out these links
- Connecting Threads
- AccuQuilt Deals
- Fat Quarter Shop Daily Deals
- Green Fairy Quilts – Daily Deals
- Missouri Star Quilt Co – Daily Deals
- Scrapbooking
- The Quilt Keeper
- SewingMachinesPlus
- Electric Quilt
- My Amazon Store for all the quilting things I use and more


About Connie
Hi, I’m Connie Kresin Campbell, the quilter, writer, and photographer behind Freemotion By the River. I enjoy inspiring others with my quilt tutorials and patterns. You’ll also see my sweet adopted dogs from time to time.
Be sure and subscribe to my newsletter for more free tutorials and printables.
You make such beautiful things! I love them. I am new to quilting and you have so many patterns that I want to try, I can’t decide where to start. Thank you for sharing your talents.
Shirley Sweeney
Won’t it be hard to leave your lovely sewing space. Love seeing all you do.
How cute! And how funny you couldn’t find it at first!!
Just found your blog, following the bees ; ) I have made sure to bookmark it to keep coming back and read your updated blog and admire your beautiful work. I’m in a dry spell with sewing of any form lately but have some projects for quilt presents rumbling around my head. Thanks for sharing your lovely work!
Love this mug rug, Connie! AND your sewing room is awesome!
Love this mug rug! Thank you for sharing your tutorial ❣️ Glad you found the original, lol…. that’s sort of thing happens to me all the time.
Hiding in plain sight! Lovely mug rugs and excellent tutorial. Thank you very much dear for sharing your Creative Bliss with us. <3
Really a great tute.
Hello Connie; Both Mug Rugs are wonderful and a fabulous way to use up any type of scrap fabric! I enjoy all of the variety of projects that you share because one never knows what one needs inspiration for and a great tutorial on how to make it! You always provide both in which I know helps me big time! Sorry I have not been around, this past week or more, I have been having some awful times and just not accomplishing much at all. Thank you for sharing your fantastic skills and fabric usage also! I always learn from you! Have a fantastic day!
I love your sewing room and that cute mug rug on the wall! As I scrolled through your great tutorial, I was thinking just what said about how different they look in different fabrics and strips. Love them both!