
Fabric Box Tutorial Update
This post may contain affiliate links which won’t change your price but will share a commission.
Fabric Box Tutorial Update
This post just shows how I did the sides, you can check out the original post for more information.
You can put the enclosed seam on the outside…..or on the inside.
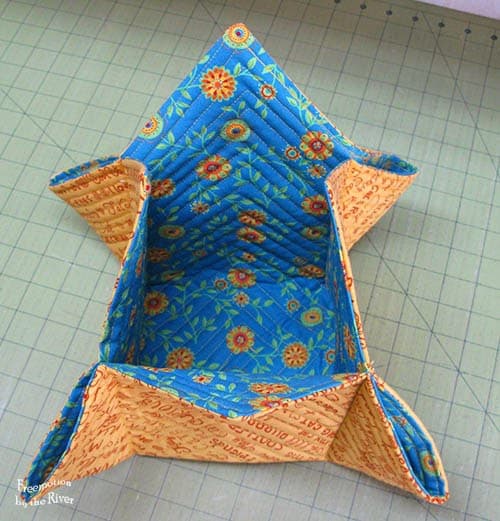
Right away you will notice that this box is……tall! I love to experiment.
Here I am marking the corner…..yes, I did 4 inches……less would have made a shorter box. Stitch on the marked line. Do all four corners.
The original Fabric Box post was here and I had quite a few questions about how I did my seams, several people were no-reply bloggers….if you didn’t get a email from me….that is you, so I decided to make another one and take some photos.

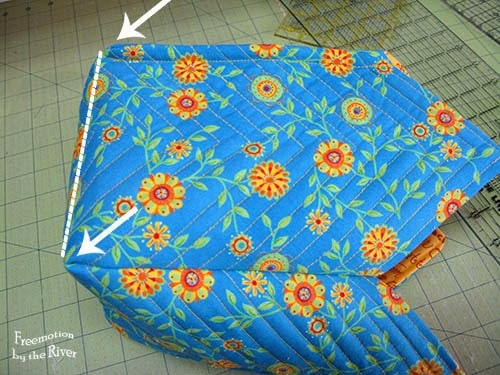
Here is the box before trimming off the corners.
Scant ¼ inch seam
After stitching the seam you will cut off the corner. I trim it a SCANT 1/4 inch from the stitching so it will be easier to encase.

Here is what the box looks like so far.

Now I have turned the box right side out.

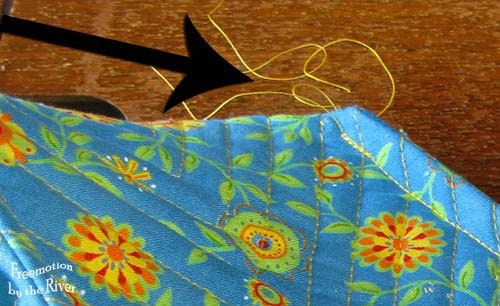
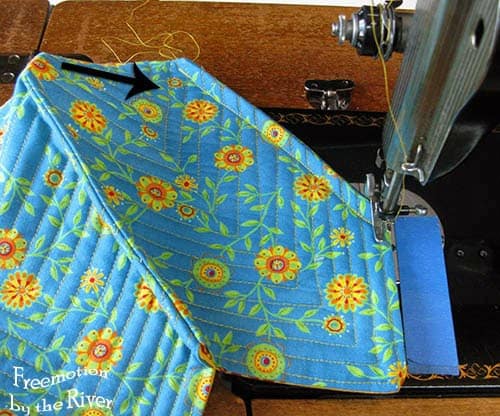
We are going to sew a seam on each side.
Note: the white line I drew is NOT the stitching line, that just shows the bottom of the box.
Looking at the photo above you can see that I just kind of started sewing the seam where I thought the bottom of the box would be. I used a little bit larger than a 1/4 inch seam to make sure I enclosed the raw edges of the seam.
Sewing the seam, ( I turned the piece so you could see the stitching better).
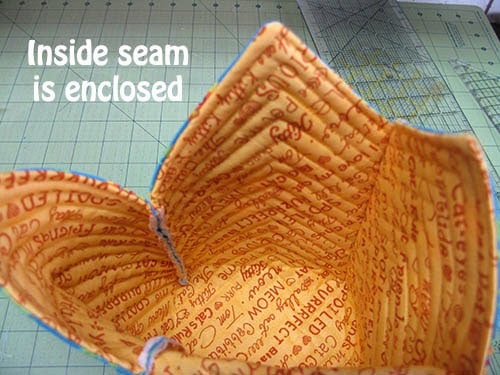
Here you can see the inside seam is enclosed on the right. The left seam hasn’t been stitched yet.
Now you just sew down the sides and add a button. I hope this really helps you see how I changed the fabric boxes and if you still have questions just ask.
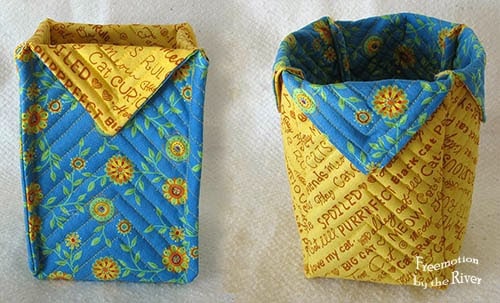
Here are a couple new fabric baskets that I have made. One even holds my Aurifil thread!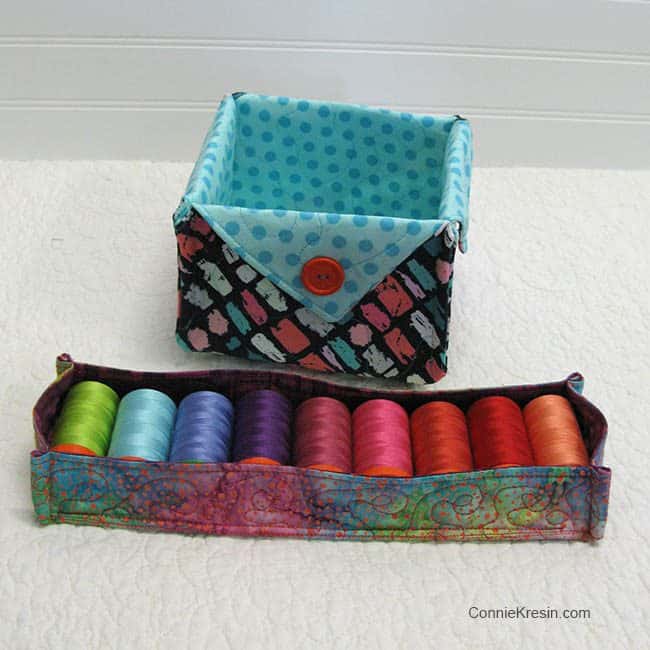
Pin this for later! Fabric Basket Tutorial
This post may contain affiliate links. Please see my full disclosure policy for details.
Connie, I know this tutorial has been posted for a while and I am glad it is here. That said, how do you decide what the initial size of the fabric should be given the (footprint) size of the finished product? Say for instance, I want to create a fabric box to hold a tissue box, the tall one not the flat rectangle one. Is it just trial and error, or do you have size suggestions available?
Hello, thank you for giving such awesome directions and photo’s. I have made one of the boxes and love it, I actually made it as a gift. I have a question, have you made these boxes for the square tissue box covers? If so what size did you cut the square out and how far did you sew up the sides? Thanks so much for any feedback you can give,
Sincerely,
Melissa 🙂
How do you finish corners that were cut off???? Please explain, maybe. Video?
Thank you,Connie, for this very easy to follow tutorial of the boxes! They look fun to make and an excellent idea for presents as well as handy little boxes in my sewing room! Thinking about Carla Christmas, not too far away, I canmake a few in Christmas-sy fabrics, for my dining table and fill with baubles, or Bread rolls,ofcourse!
I’m so glad you enjoyed it Carla! They make wonderful Christmas gifts!
Hello, Connie, greetings from across the miles, NTH QLD, Australia. Connie, I would like to thank you so much for all my beautiful inspiring posts. Compliments of the Season. Stay blessed. 🙏🏾🌺🌿🦋🎊🎉🎄✨️🎆💓💓🌴🌴
Thank you for your tutorial, i love them and they are handy for my sewing bits and bobs, although they are taking over my home, luckily my friends like them as well x
Gracias por compartir tus ideas, don muy lindas todas, seré una seguidora puntual de tu página
You are so welcome Judith! Google translated this for me “Thank you for sharing your ideas, they are all very nice, I will be a timely follower of your page”
Thanks for your tutorial can’t wait to make some for my sewing room
Beautiful project and gift. Thank you for Sharing AND for have a PDF file to use.
Thank you, thank you thank you. I haven’t even made a box yet because I wanted to avoid the triangles. Now I can finally make a box! Again thank you! Mary Ellen
Just came across your tute, love it. Made two boxes thus far but would like to make a slightly bigger one with a 12″ square, what would you recommend for the corner seam. 2 1/2 or larger?
Thank you!
So what is the size of the fabrics you start with? I can’t find the very beginning of the process.
https://conniekresin.com/2014/12/fabric-baskets-tutorial.html
Hi Connie, thank you for the great tutorial. I’m working on my second fabric basket now..
So to make it taller or wider, all that matters is the size of the triangle?
Thank you once again..
I don’t understand, I just finished my first one took me forever didn’t have the right angle, I ran across your site helped me a lot. 11 inch square and 2 1/2 corners, would like to make bigger ones but don’t understand the corners, tia.
Great Tutorial and was wondering the same thing. I Love the Tall fabric box have an idea how to use that one wonder how big the fabric was to start with. Thank You!
I love it. Can you share the dimensions you used to get the taller box. I have so much trouble with how much of a corner to sew and end up with so many boxes I didn’t want.
Anxious to attempt fabric boxes, think they’re adorable, great directions an pics!
Connie,
I would like to request permission to use your Fabric Basket Tutorial and pictures to teach a 4-H Sewing Class between now and the end of the year.
Thanks – Sue J.
Hi Connie, Somehow I was directed to this page. I have been making fabric boxes and really don't like the triangles inside so THANK YOU for a great alternative!!
Sue
You always have the best tutorials Connie! So easy, and inspirational! Thanks and Merry Christmas!
Ah hah!! Now I ca-peesh!!!! :o)
Thank you so much for your detailed explanation.
[I had my SIL take a picture of my "mistake" . . . I will be sending it to you as soon as he emails it to me.]
Amazing and so simple!!! You are a genius 🙂 Thank you for the tutorial and the excellent pictures!!!
I made a box that was out of an 12 inch square and the corners were cut at the two-inch mark. What size is your original square? I like your idea about a taller box. Thanks!
These are so cute! I love fabric boxes and keep telling myself I'm going to make some soon. This is giving me some motivation. Really need some in my sewing room. Thank you for sharing this tutorial. Happy New Year!
That French seam is a good idea. I like the seams on the outside. Thanks for the instructions and Happy New Year!
What a fabulous tutorial to finish off the year with! I have done enclosed seams once before on a pillow case! Your fabric boxes are really cute. I would like to ask if you would be willing to link up to TGIFF tomorrow? I am hosting for my first time ever at http://sewfreshquilts.blogspot.com
Those are really cute and so practical.
Love it!! Thanks!
Thanks Connie and Merry Christmas to you and yours!
Cute cute Connie… Merry Christmas and Thank You!
I love the cat fabric you used, thank you for the tutorial! Have a merry Christmas!
Connie, thanks for the pictures. I get it now!
Thanks for the tutorial—I'm a knitter, and I want to make a few of these deeper boxes to store my sock yarn scraps. I can also see making one of these for the living room to keep my remotes in, and another to keep my car keys in so they aren't always going missing. Merry Christmas and a Happy, Healthy New Year.
THAT's how you did it! You are brilliant! Merry Christmas to you and your family.