
Fabric Baskets Tutorial
This post may contain affiliate links which won’t change your price but will share a commission.Are you looking for a fast and easy gift to make? This fabric basket tutorial is a lot of fun to make! The baskets take no time at all to make.
Sometimes I get carried away and just keep making more and more baskets. There are so many different ways you can make these.

Enjoy my Fabric Baskets Tutorial, try some different sizes and I would love to see what you make!

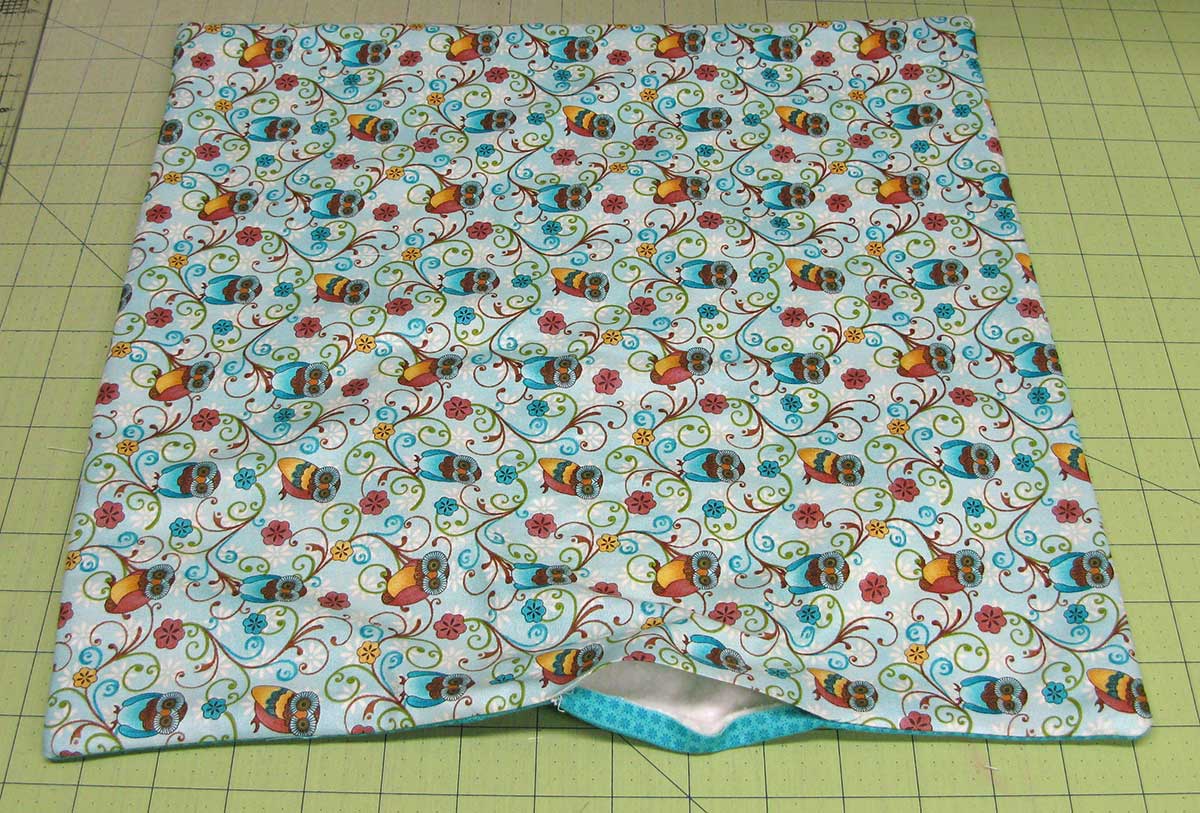
I had this cute piece of owl fabric that was perfect for a basket. Let’s make one!
Using coordinating fabrics makes it easy to create your own special basket. You can find some great deals on fabric here also.
How to make the basket:
- Cut two 16 inch squares of fabric.
- Cut one piece of batting the same size.
- Put the 2 fabrics right sides together on top of the batting.
- Sew a 1/4 inch seam around the outside leaving an opening of about 3-4 inches on one side.

Sew around the outside and leave an opening for turning the fabrics inside out.
Start the seam in the center of one side. I like to back-stitch at the beginning and end so it won’t pull apart when I turn it.
Notice that I also stitched to the edge of the fabric – when you turn the piece right side out this will make it easier to fold the fabric in the opening.
Leave about a four-inch opening so it will be easy to turn it right side out.

Turn the piece and press. Just sew the opening closed…..that section will actually get cut off but I prefer to sew it closed before I do the top-stitching and quilting.
Quilt the fabric
Quilting the fabric gives a little stability to the basket. This is a good place to try out some free-motion quilting. You could also just do some straight stitching.

Create the basket
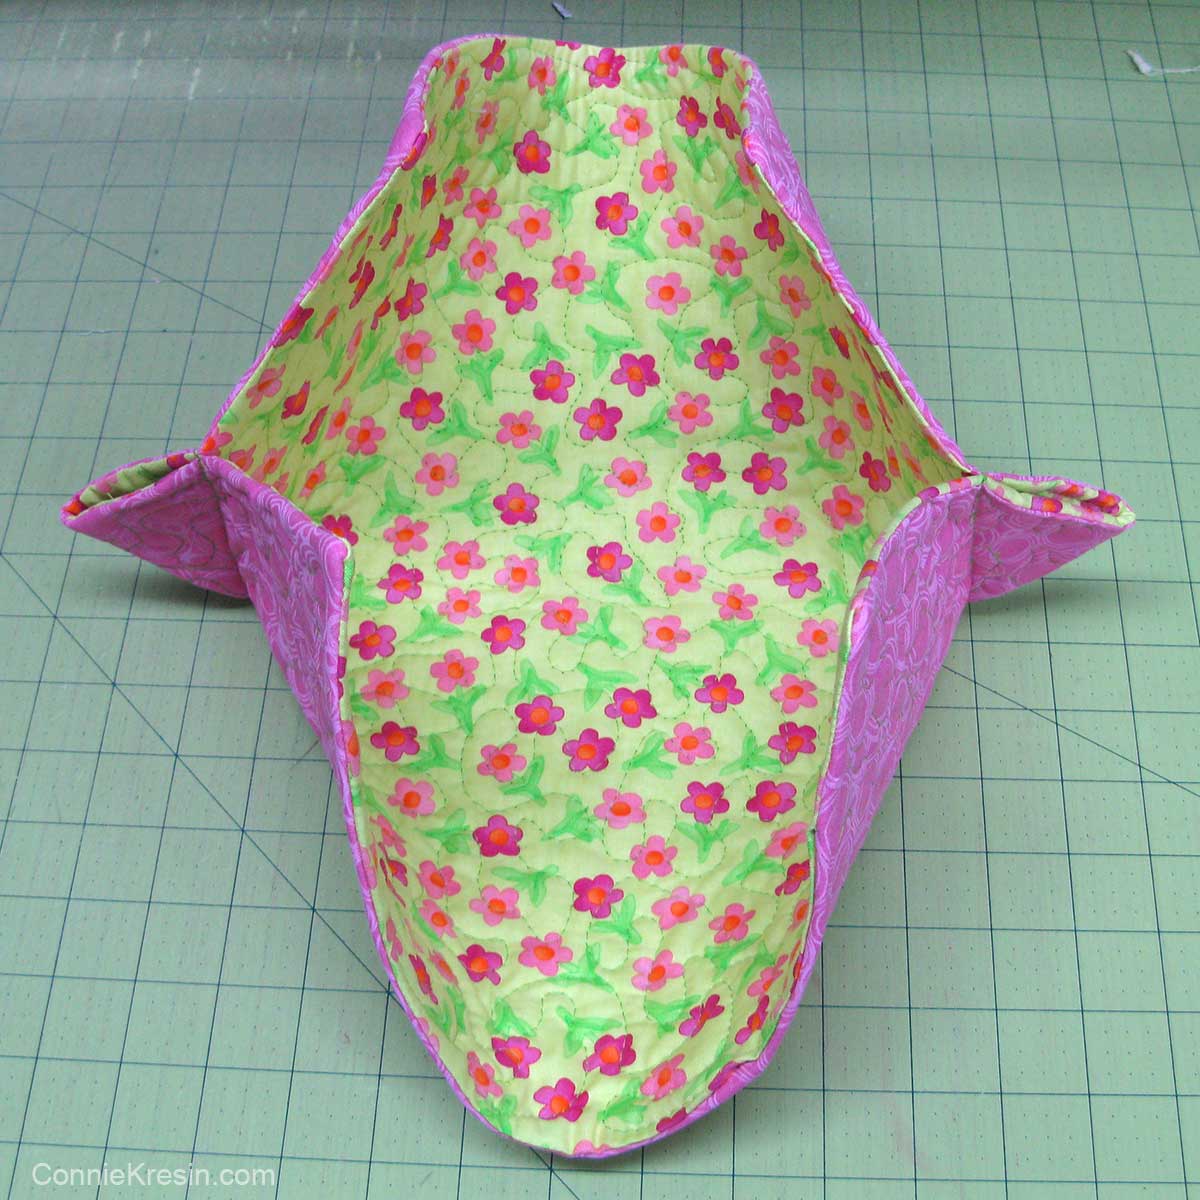
I forgot to take photos of marking the corners on the teal basket so now I’ll show you the pink/lime green basket. The fabrics were cut 16 inches square also but I made this basket a little shorter by marking 3-inch corners instead of 2½ inches.
- Fold the quilted fabric piece in half.
- Whatever fabric you would like to show on the inside of your basket when finished is the side we will mark the corners on.

For this basket, I am marking the corners at 3 inches. Stitch along the line you marked. I like to start in about a 1/2″ inch and back-stitch because of the fabric bulk.
Here you can see that I have sewn 2 of the corners. I hope the photos make it easier to see what I am doing.
Now fold and mark the other two corners.


Once you have all four corners sewn you could just turn it right side out and finish your basket.

I prefer to clip off the corners and then sew the sides of the basket.
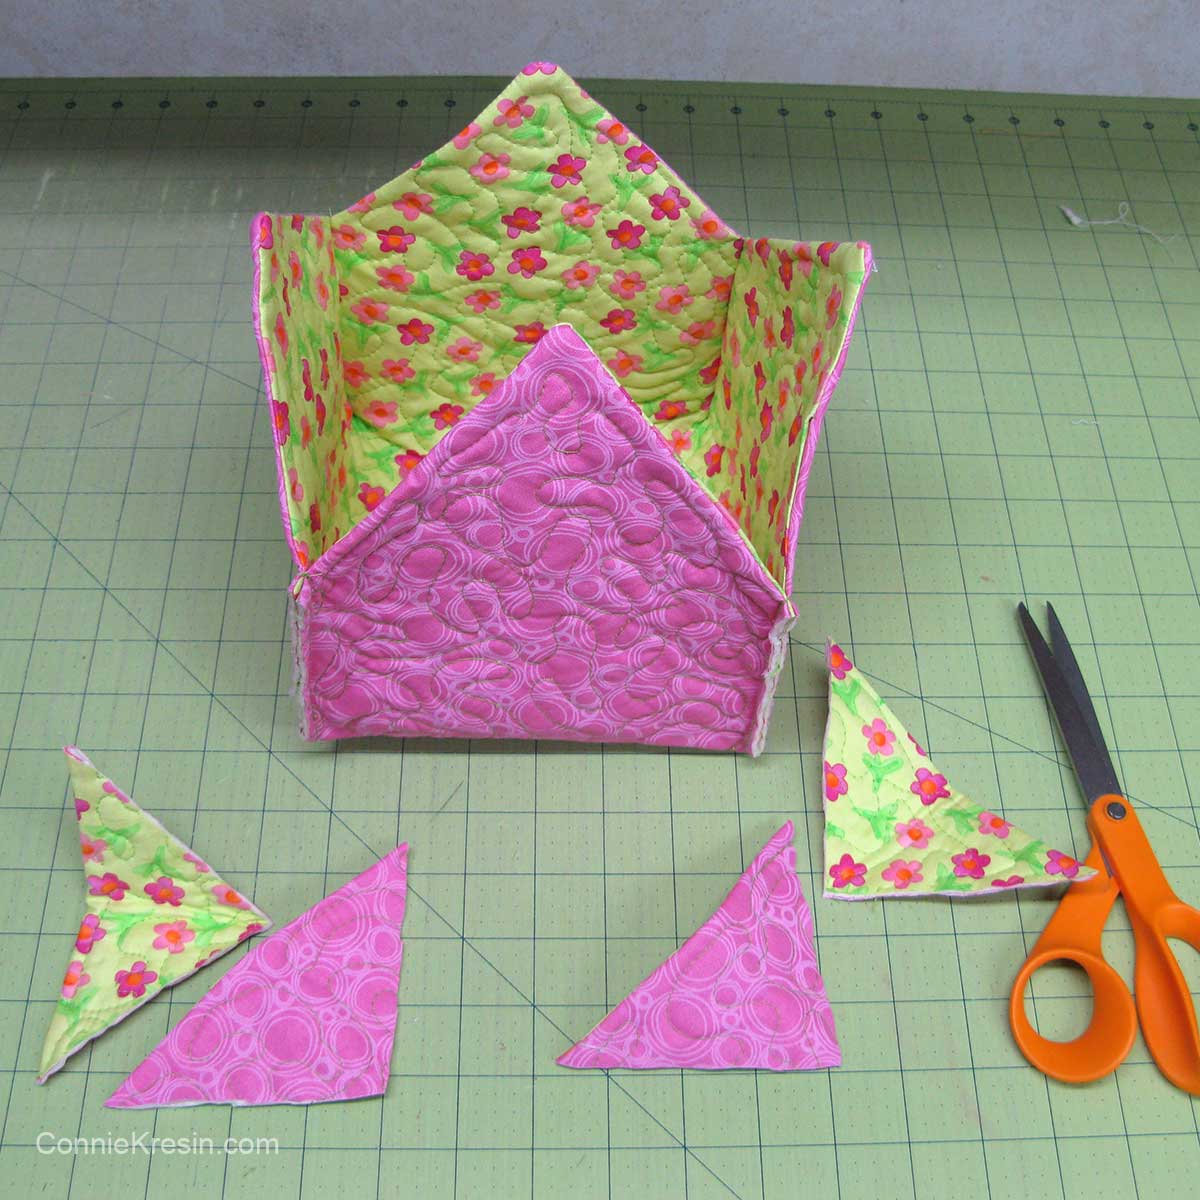
Here is the fabric basket with the corners stitched down after clipping and ready for buttons.

Enclosed seams
I have another post that shows the way I enclosed the seams – Fabric Baskets Enclosed Seams or keep reading for some more information.
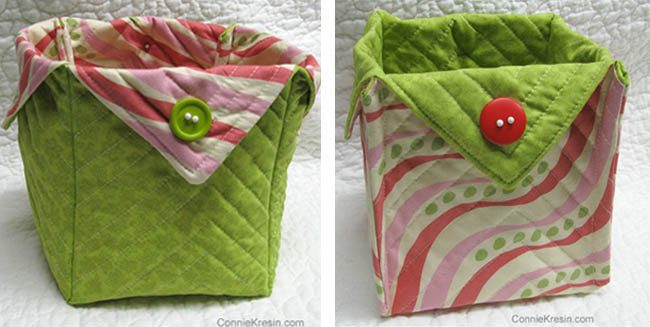
Here you can see how the basket would look if you have the seam showing on the outside or….put the seam inside. Either way is nice and these are fast and easy to make. A perfect last-minute gift.
At this point, if you turned your basket right side out you would have the little flaps just like the baskets that Tina from Seaside Stitches showed in her tutorial.
Cut off the corners
I cut the corners off of my fabric basket. Flip your basket wrong side out again and cut off corners.
Flip the basket right side out. You can see the exposed seams, we are now going to enclose them.
Fold each corner as shown and stitch about a 1/2 inch seam. This will enclose the edges. I like to back-stitch at the beginning and end.
Sorry, once again I forgot to continue taking photos, one of these days I’ll redo this and show one basket in all of the photos.
Notice how I stitch the line at the bottom. It might be easier to see a photo of it.
- Stop at the end of the seam
- Stitch slowly, you are going through a lot of thicknesses
- You might want to change to a 90 or 10 needle


Now just fold over the flaps and hand stitch the flaps down. I tried doing it on my sewing machine……you know I don’t like hand sewing…..but I didn’t like the way it looked. Add a cute button to one side and you are done!
All of the following baskets are made with 16-inch squares of fabric.
Basket sizes
The difference is in what size you cut the corner triangles.
- 2-inch corners: basket is 4 1/2 inches tall and 6 inches inside
- 2½-inch corners: Basket is 5 inches tall and a little over 5 inches inside
- 3-inch corners: Basket is 6 inches tall and 5 inches inside

What do you think of this size? This is a skinny mini! Maybe I can put a skinny bottle of wine in it! Notice this was an 18-inch piece, to begin with, by changing the size of the corners I got this tall fabric basket.

Another basket size
- The basket on the left is an 18-inch square with 3-inch corners and is about 6-inches tall and 5½-inch inside.
- The basket on the right is a 16 inch square with 3-inch corners.
- The basket in the center is another 16-inch square with 2½-inch corners.

Notice the blue basket has the cute little owls on it……tutorial coming soon for a wall hanging made with this fabric……..anyway…….beware of using a directional fabric. My little owls are upside down on one side and sideways on two sides. It isn’t that noticeable with this fabric.
I could just keep making them but……I’d better stop.
Using coordinating fabrics makes it easy to create your own special basket. You can find some great deals on fabric here also.
Already get my newsletters? Go to my Resource Library and download the pdf of this tutorial.
Subscribe (free!) to my newsletter and get instant access to my resource library. Once subscribed, I will send you a newsletter once or twice a week.
Here are some other posts that will inspire you:
- Strippy Basket Tutorial with Somerset
- Batik Strippy Baskets
- Coasters from the corners
- Somerset Coasters
Please note this post contains affiliate links, which means I’ll earn a small commission if you purchase through my link at no extra cost to you. Please see full disclosure here. As an Amazon Associate, I earn from qualifying purchases.
Great deals for you!
Looking for great buys on fabric and things? Check out these links
- Connecting Threads
- AccuQuilt Deals
- Fat Quarter Shop Daily Deals
- Green Fairy Quilts – Daily Deals
- Missouri Star Quilt Co – Daily Deals
- Scrapbooking
- The Quilt Keeper
- SewingMachinesPlus
- Electric Quilt
- My Amazon Store for all the quilting things I use and more

About Connie
Hi, I’m Connie Kresin Campbell, the quilter, writer, and photographer behind Freemotion By the River. I enjoy inspiring others with my quilt tutorials and patterns. You’ll also see my sweet adopted dogs from time to time.
Be sure and subscribe to my newsletter for more free tutorials and printables.
You asked people to tell you if they had ever made a crazy quilt. I am 81 and crazy quilts were my first quilts. I did not have a sewing machine and would baste scrap fabrics by hand and embroider the seams learning the stitches from an embroidery book my mother gave me. I made them for my children and my friend’s children.
My daughter’s quilt was very threadbear as she has used it for 55 years. She finally asked me to “repair” it. It looked like a hopeless task. She begged so I saved all that I could, but some was just too far gone. I essentially made her a new quilt with the remaining pieces she still loved. She is happy again and that’s what matters.
love your tutorials
I love your boxes. I have a longarm quilting machine so I sew 17″ squares together and sandwich them for quilting. I use a neutral back. After quilting I cut the 17″ squares apart and cut to the 16″ squares. I can make a bunch and use either side as the outside
I found your baskets on Pinterest
very nice
How can I get a pattern we’re I can print in off of the fabric basket
Rebecca, for my pattern I just cut a bunch of 16″ (0r 17″ if using longarm for quilting). As for the assemble instructions, I watch her video a bazillion times. LOL I would pause the video until I had complete that part of the pattern.
These are just delightful little baskets to make. I made them for my great nieces and they just LOVED them. They’re just the beautiful to fill with little goodies as gifts. Thank you Connie for sharing fabulous & easy to follow tutorials.
I love your basket! I’m wondering how to enlarge the size; (circumference) because I want it to fit regular full size paper napkins. thank you for your blog and patterns. I appreciate that you share them with us.
This is best laid out tutorial I have seen yet for this style of basket! Thank you!
I have been making a lot of small quilts this years – new grand nieces and nephews – and have a pile of “too good to put in the rag bag” just the right size for these. I think these are perfect for the holidays, candy for Halloween, candy corn for Thanksgiving….thanks
With the first pattern, the corners are dealt with very similarly to that of a French Seam – I like that style.
Thanks for these patterns – they are much appreciated.
I am excited to try to make some of these cute baskets. I was wondering if medium weight stabilizer would work in place of the batting? I have quite a bit of it for my embroidery/sewing machine.
Thanks for sharing an awesome tutorial.
I’ve made some of these. They are easy and great fun. The only problem is …. I have no idea what to do with them. Serious lack of space in my tiny bedroom. I can’t afford to have baskets of stuff lying around. We have recently downsized but my mindset is still firmly stuck in “big house” mode!
I’ll get there eventually.
Love your baskets but don’t understand how to make corners. Do you use a triangle to measure? And then sew across the line you draw? Thanks
You can use a triangle or just mark the same distance on both sides and then sew on that line.
Hi Connie, thanks for the pattern & no problems with the download.
Worked fine, no warning. Thank you for the great pattern.
If you know the finished size of the box you want to make, how do you determine the size square to start with?
I think that these would be cute for the homemade Christmas ornaments that use folded fabric, I am making those now, and needed something to put them in for gifts and these are perfect. Thank you.
I’ll be using your fabric basket tutorial very soon. I made some years ago, but need 6 for a quick gift for my quilting group. Thanks for the easy pattern and directions. I just need to pick out my fabric and I can get started.
These are so cute and easy to make! Thank you for the tutorial. Since these are so easy to adjust for dimensions just by changing the corner sizes I know I will be making more of these. Wish I could post a photo here of my basket for flannel fat quarters. This will not be hidden in a drawer. It will go on display! Just wanted you to know Connie I love this versatile idea.
I have made other fabric bowl and basket tutes before but yours (w/pics) so much faster and easier, not to mention taller.
Thanks for doing this.
Pegeth
What do you use to get it to keep its shape I’m in England & for example no one here seems to know what Pellon is. Will look forward to having a go at these
Lovely fabric baskets.
So sorry you lost your gorgeous little dog.
Thank you
Carol
Thank you sooo much for the tutorial!!
Very easy to follow – made my first basket today!! 😊
The first basket I made I used my seam ripper a lot. I didn’t understand the corners. I was cutting on the open side of the fabric instead of the folded side. Duh. Maybe that should be mentionef in the tutorial.
I have a really cute basket now. I definitely will.be getting my Christmas gifts started with them. Thank you for such a fun sewing prpject.
Karlyn
Thanks for the easy instructions and for sharing your creativity. ….I love the baskets and have some cute fabrics to. ….Bridget
I love the look of these baskets. My Grandchildren are older teenagers so this year their Easter baskets will be these. Reusable once candy has disappeared to use for whatever. As two are young men I will use some manly fabric for them.
Thank you for such a wonderful project.
Kathy
Thanks Kathy, I’m so glad you like them! Have fun!
these are so cute. thank you for the tutorial.
You are so welcome Lori and Happy Galentine’s Day!
What cute little baskets! And an excellent project to test my free motion skills on. I am going to make some of these for sure!
Love your fabric baskets, I’ve been meaning to make some but need to find some time!
Connie these are great – another winner!
Connie, thank you very much for tutorial! I made one, but I didn't cut the corners, because it was too thick for my sewing machine 🙂
Rosemary B here:
These are soooo cute, Connie!
I want to make them
Yes I have not been around blog land much at all. I am caring for my 91 year old parents… and now mom is sick with the flu- even though she got a flu shot, drats
I am going ot save this tutorial
Adorable baskets, Connie.
Thanks for this. I'm new to freemotion quilting and I feel guilty making (really bad!) practice sandwiches. This is a great way to make something practical from my ugly practice!
In fact, I made one last night using 18 inch squares with 2 inch corners. It turned out great and only took about a hour and half start to finish (from pressing the fabric to taking pics of the finished item).
I'm sharing your tutorial on my blog.
Thank you remaining me about the fabric boxes, I have done some of them in the last year, but I havn´t done like you in the corner, I will do so next time. I am following your blog and I like it very much! I wish you a Merry Christmas!
Oh thank you for this tutorial! I am going to bookmark the page and try one in the new year. Happy Holiday's
These are really cute. Sadly, I think my sewing is done for the year. Maybe I'll tackle some next year.
Thanks for this great tutorial Connie! Love seeing all your baskets. I may need to give this a try.
Thanks for the great tutorial!! Have you found that it is easier to stitch multiple layers with a walking foot rather then with a regular foot?
I love every fabric box you have created. I made some and they make wonderful gifts all year long. I also made some very short seamed ones that were more like trays. Batik Blessings…
Thanks for the great tutorial, Connie. I love having your pictures showing each step! I'm so much better at doing if I see how someone else does it! I guess you took these pictures with your new phone!
Awesome tutorial!! Thank you so much for all the detail.
Thanks for the tute Connie! I make a modified version of these for my little trash baskets. It's great to have these different sizes and styles 🙂 And I can certainly see why you are drooling over those batiks! Can't wait to see what they become in your creative hands!
Oh how fun and I can see an addiction starting! LOL!!
These are lovely! A matched set in different sizes would make a nice gift. And they would look great in my family room, too! Merry Christmas!
Great tutorial, Bonnie. Baskets always seem harder than they really are! Your are so cute!
What a great post! The details about how each basket can look depending on how big you make the corners is so helpful. And the cautionary tip about using a directional print. I love the boxes with the seams on the outside!
This is brilliant! I have to make these!
Thanks for the great tutorial, Connie. I so enjoy the beautiful one you gave to me. Merry Christmas!
Cute, Connie. I have made these in a triangle shape, and the square is a nice variation.
We have Friday Night PJ Parties on a quilting forum that I belong to and these boxes are always requested for one week. The ladies love them.
Love the different sizes in them. The tall one would be perfect to hold supplies… scissors, pens, rulers and such.
Ohhhh I forgot about these baskets! they are SEW cute…..