
Winter Greens Easy Christmas Table Runner Tutorial
This post may contain affiliate links which won’t change your price but will share a commission.I finished up a quick little table runner for Christmas using the same pattern from the Winter Blues table runner.
Winter Greens Easy Christmas Table Runner Tutorial
Many of you asked for rotary cutting directions and I couldn’t wait to make the Winter Greens easy Christmas table runner tutorial for you!

Need a fast table runner for your holiday table? This one will take no time at all to make!

Winter Greens Christmas Table Runner
This is made the same way as the Winter Blues table runner other than I just used two blocks instead of three and remember this can be made with the Accuquilt GO and dies.
I wanted a little smaller table runner to put out at Christmas. I have also updated the Winter Blues table runner post with the rotary cutting directions for you.

Winter Greens Christmas Table Runner Tutorial
14″ x 26″
I always love using my Island Batik fabrics like this Check It Out batik that I used in my Wonky mug rug and placemat. I always hang on to every little piece of my batiks and pulled out my box of Christmas fabrics from Island Batik. I had three different greens that worked perfectly!
Directions:
Sew with a ¼” seam allowance
You will use 4 different green fabrics and a neutral fabric – scraps will probably work other than having one of the green fabrics for your border and binding so possibly ¼” yard of that.
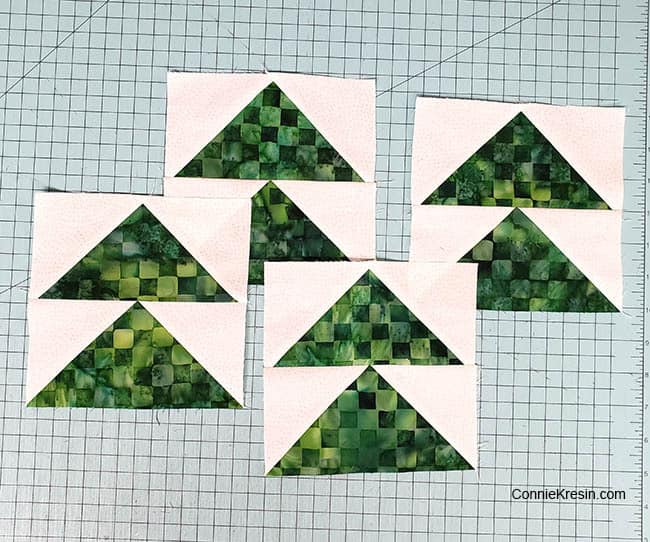
Flying Geese blocks – make 8
- Cut four – 3½” x 6½” rectangles – green check.
- Cut eight – 3½” x 3½” squares – white.
- Mark a diagonal line of each of the squares and add the squares to the rectangles as shown.

Trim off the corner, I was able to cut little 1½” x 1½” squares to add to my batik scraps. I like to cut my scraps up right away.

Sew two of the flying geese blocks together so you end up with four – double flying geese. Make sure they are all pointing the same direction.
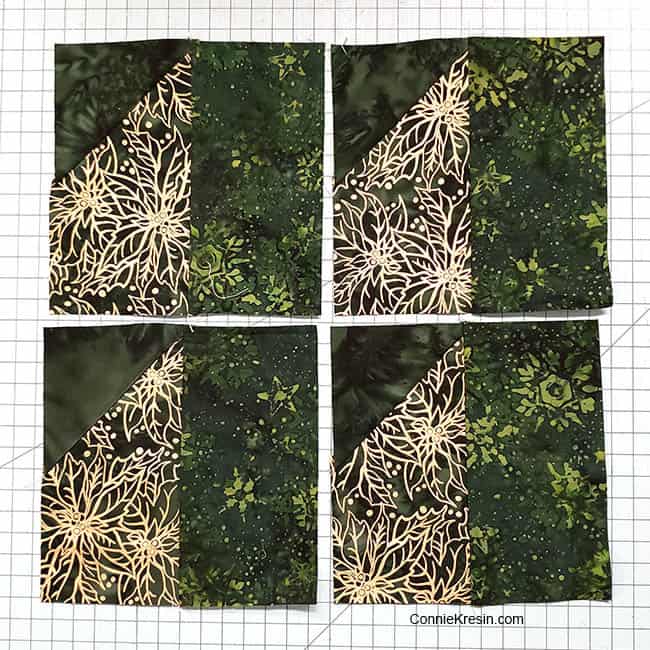
Winter Greens Chisel blocks – make 4
- Cut four – 3½” x 6½” rectangles – green print.
- Cut four – 3½” x 3½” squares – solid green.
- Cut four – 3½” x 6½” rectangles – second green print.
- Mark a diagonal line of each of the squares and add the squares to the rectangles as shown.


I used the gold poinsettia batiks for my chisel blocks.
Trim the corners the same way you did the flying geese blocks.

Add the rectangle pieces to the chisel blocks.
Arrange your blocks like this and sew together.

Make two blocks like this.

Sew them together to make the Winter Greens table runner.

I decided I wanted to make my table runner just a little bigger and I had just enough of one of the green batiks to make my binding and add a small one-inch border. You don’t have to add this or you could add a bigger border.
Many times the size of my quilt projects is determined by the fabrics I have in my stash.

Go ahead and add your batting and backing and quilt. I’m using my vintage 15-91 Singer sewing machine.

I couldn’t get little Sadie to sit by the Winter Greens table runner so I had this cute little reindeer stand-in.

If you make a table runner using this tutorial, I would love it if you would send me a photo!

How to make a Winter Greens Easy Christmas Table Runner with this easy Tutorial
Get the pdf
Please note that this post contains affiliate links, which means I’ll earn a small commission if you purchase through my link at no extra cost to you. Please see the full disclosure here. As an Amazon Associate, I earn from qualifying purchases.
Great deals for you!
Looking for great buys on fabric and things? Check out these links
- Connecting Threads
- AccuQuilt Deals
- Fat Quarter Shop Daily Deals
- Green Fairy Quilts – Daily Deals
- Missouri Star Quilt Co – Daily Deals
- Scrapbooking
- The Quilt Keeper
- SewingMachinesPlus
- Electric Quilt
- My Amazon Store for all the quilting things I use and more


About Connie
Hi, I’m Connie Kresin Campbell, the quilter, writer, and photographer behind Freemotion By the River. I enjoy inspiring others with my quilt tutorials and patterns. You’ll also see my sweet adopted dogs from time to time.
Be sure and subscribe to my newsletter for more free tutorials and printables.
Connie – this Christmas table runner in shades of green in another exquisite example of your expertise and imagination. It will have lasting appeal when gracing a table during the festive season for many years to come.
As always – thank you for sharing you lovely designs.
All the best for the festive season and much happiness as we move into 2024.
Connie, Love the runner, the colors look beautiful for Christmas. Will have to make that. Wishing you and your family a Merry Christmas and a blessed New Year!!
Connie,
Another great pattern and yes, this would be good for anytime of the year using different fabrics.
Wishing you,Builder Bob, Rusty and your family a very blessed and Merry Christmas!
I had not seen this tutorial before; it’s so beautiful!
Connie – all your creations are wonderful- and I think the green color is perfect for Christmas.
Hi Connie, I started following Jo’s blog recently, and fell in love with Rusty when she got him to foster and now I am so glad he’s going to live with you and Mr. Mickey! He deserves a loving home like you will give him. Have fun with your new family member!
How do you do it! So avant garde! Really love the green with the gold. Simple, simply fantastic. Thanks! (So excited about the new arrival!)
So excited to meet Rusty!
I generally do not post or send emails, I had to today. I follow you all the time.
The reason for this post today is to congratulate you on your new pet. I have been following Jo’s blog and have seen Rusty from the first time she brought him home. You and your husband have a lot of love for animals, and I am sure he will fit right in. Congrats again.
You have the cutest patterns. I really enjoy making them. Thank you so much for your talents.
Dear Connie, I have been following you for some time now but I never post any pictures or e-mails. However I wanted to tell you how glad I am that you and your husband are o.k. I have made some of your patterns und enjoy reading your blogs. All my quilt supplies are in my beautiful basement and I cannot access them at this time due to bone cancer in my femur. I am going through chemotherapy now and healing from my second surgery in a year. It is hard not to quilt, I used to teach and work in a quilt shop. Pushing forward with God!
I’ll keep you in my prayers Christine. I’m sure things aren’t easy for you. May you soon be back to quilting and feeling better. I follow both Connie and Jo’s blog. God keep you in His care
June
Connie, another great tutorial! Your batiks are beautiful — I will definitely have to make one for myself!
Thanks again for sharing!
The greens are lovely too, Connie. Thanks for remaking it with the rotary cut directions.
I hope you have a nice visit at your daughters. I’ll bet you dread the thought of all the packing and moving ahead in the new year. ;-(
Thank you so much for the directions to make this beautiful table runner with a rotary cutter!! It is great!!
Pretty table runner! Sadie is turning into quite the little diva isn’t she? 🙂
Hello Connie, This table runner is lovely! I always admire your choice in fabrics, These greens all work together wonderfully and with the way you designed the table runner, each fabric supports the other. I sure wish all of my fabric choices worked together brilliantly the way your choices always do! Thank you for sharing this pattern and tutorial! It will be fun to make! Your reindeer is adorable and Sadie might want to rethink her decision. LOL. Have a splendid day!
Your little table runner is adorable. I like the gold poinsettia fabric, it gives the piece that shine you need at Christmas. Your little reindeer model is so cute.
Very cute runner, but since I like flying geese so much it immediately caught my eye. Your house so festive.
Super cute table runner and great tutorial.
This is such a beautiful table runner in Island Batik Greens. Thank you for once again sharing your techniques and tutorials so generously. Sadie didn’t want to pose? The Reinndeer is pretty cute though. December Blessings and Bliss Dear…xo