
Wonky Christmas Tree Quilt Project Tutorials
This post may contain affiliate links which won’t change your price but will share a commission.
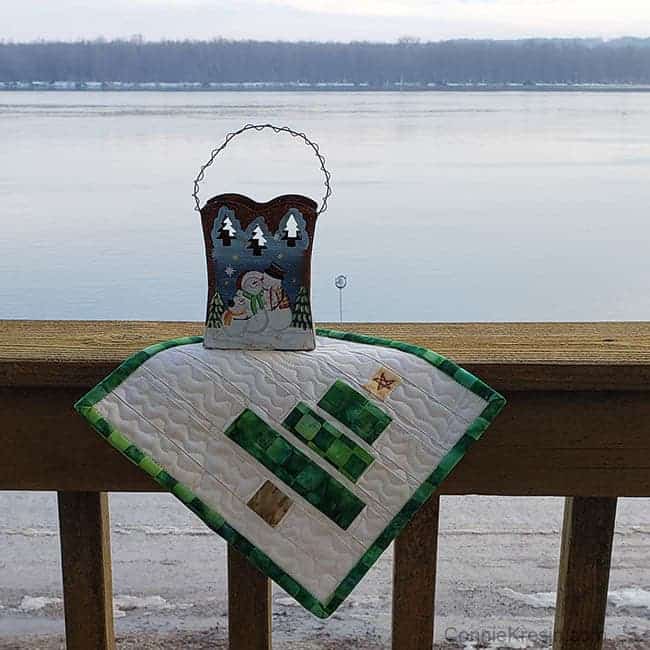
Are you looking for some last-minute gifts for Christmas? These Wonky Christmas Tree Quilt projects are great for that special teacher or friend. Make several to decorate your home also.

I made several of these cute little mug rugs several years ago and when I searched my blog, I realized that I have never shared the tutorial for them.


For our December Island Batik project as an ambassador, we were to make something that is a little whimsical and wonky. I’m not sure if this counts but I whipped up one mug rug and one placemat using the new Check it Out batik collection so I could share the tutorial with you.
Wonky Christmas Tree Quilt Project Tutorial
This will be one of the easiest quilt tutorials to make! Measurements will be given but you’ll soon see how easy it would be to change the size a little bit.
Purchase an ad-free printable version of the Wonky Mug Rug and Placemat tutorial here
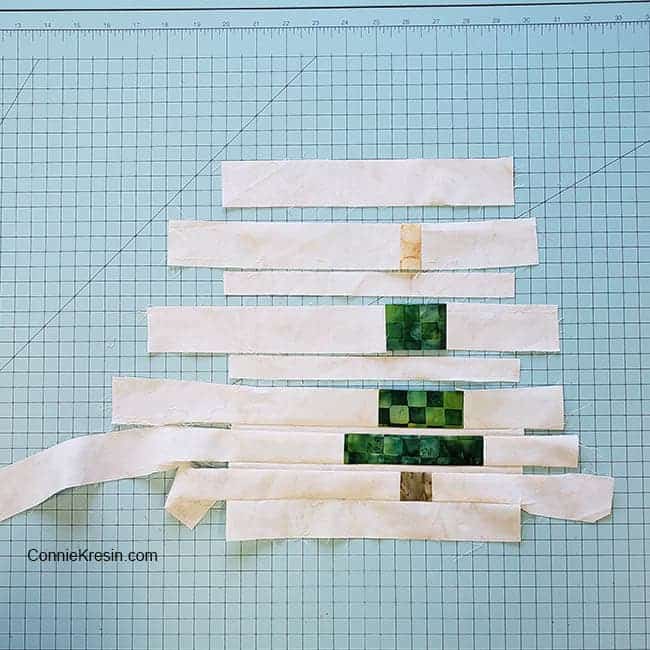
Let’s start with the Mug Rug – 8½” x 9″
Background fabric:
- Cut one strip the width of the fabric by ¾” – sub-cut four – ¾” x 9½” pieces
- Cut two strips the width of the fabric by 1½” – sub-cut two 1½” x 9½” pieces – use the rest of the strips for the pieces on the sides of the tree pieces.
Wonky Christmas Tree pieces:
- Yellow – cut one – 1¼” x 1½” piece
- Green – cut one – 1½” x 2½” piece
- Green – cut one – 1½” x 3¼” piece
- Green – cut one – 1½” x 5″ piece
- Brown – cut one – 1½” x 1½” piece
Seam allowance: try to do a ¼” seam but don’t worry if you are off a little as this is a whimsical and wonky quilt project.
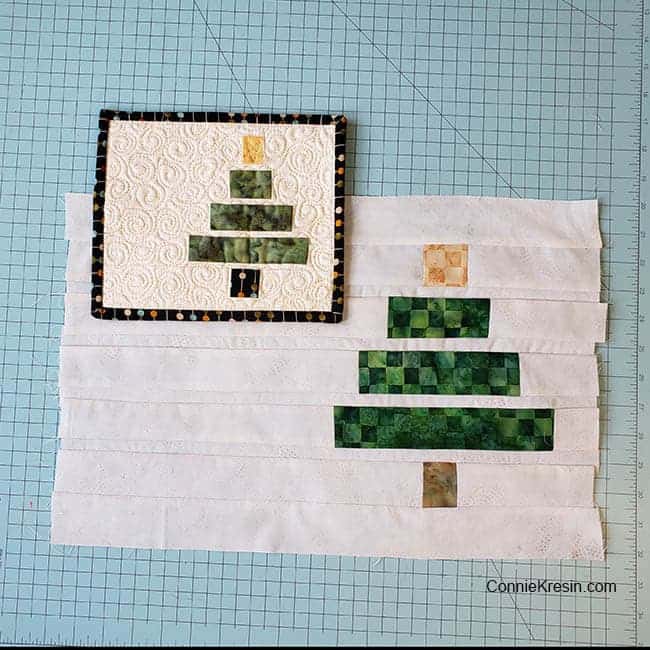
You can see in the photo below that I didn’t cut exact pieces of the background fabric that I sewed the tree pieces. All I did was try and make sure that the tree wouldn’t be centered in the mug rug. It is off to the right a bit.

The following measurements can be used to cut the background pieces, I prefer to just use the strips of fabric and then trim.
Background fabric for the tree sections:
- Row 2 – cut one – 1½” x 6″ piece white for left side, 1½” x 3″ for right side
- Row 4 – cut one – 1½” x 5½” piece white for the left side, 1½” x 2½” for the right side
- Row 6 – cut one – 1½” x 5″ piece white for left side, 1½” x 2″ for right side
- Row 8 – cut one – 1½” x 4″ piece white for the left side, 1½” x 1½” for the right side
- Row 10 – cut one – 1½” x 5¾” piece white for the left side, 1½” x 3″ for the right side
Finishing:
- Press your rows to the dark pieces and then trim if needed.
- Cut your batting and backing a little bigger than your quilt piece.
- Quilt as desired, I added a little free-motion star to the top of the Christmas tree.
- Add your binding – one 2½” x 40″ strip will work.

If you liked making the fast and easy little Wonky Christmas tree mug rug, how about making some place-mats!
Place-mat – 12½” x 18½”
Background fabric:
- Cut two strips the width of the fabric by 1″ – sub-cut four – 1″ x 18½” pieces
- Cut two strips the width of the fabric 2″ – sub-cut two 2″ x 18½” pieces – use the rest of the strips for the pieces on the sides of the tree pieces.
Wonky Christmas Tree pieces:
- Yellow – cut one – 2″ x 2″ piece
- Green – cut one – 2″ x 4″ piece
- Green – cut one – 2″ x 6″ piece
- Green – cut one – 2″ x 8″ piece
- Brown – cut one – 2″ x 1¾” piece
The following measurements can be used to cut the background pieces, I prefer to just use the strips of fabric and then trim.
Background fabric for the tree sections:
- Row 2 – cut one – 2″ x 12½” piece white for left side, 2″ x 5″ for right side
- Row 4 – cut one – 2″ x 11½” piece white for left side, 2″ x 4″ for right side
- Row 6 – cut one – 2″ x 10½” piece white for left side, 2″ x 3″ for right side
- Row 8 – cut one – 2″ x 9¾” piece white for left side, 2″ x 2″ for right side
- Row 10 – cut one – 2″ x 13″ piece white for left side, 2″ x 5″ for right side
Sew this together the same way you sewed the mug rug together.
Finishing:
- Press your rows to the dark pieces and then trim if needed.
- Cut your batting and backing a little bigger than your quilt piece.
- Quilt as desired, I added a little free-motion star to the top of the Christmas tree.
- Add your binding – two 2½” x 40″ strips will work.
- Repeat the steps for each place-mat.

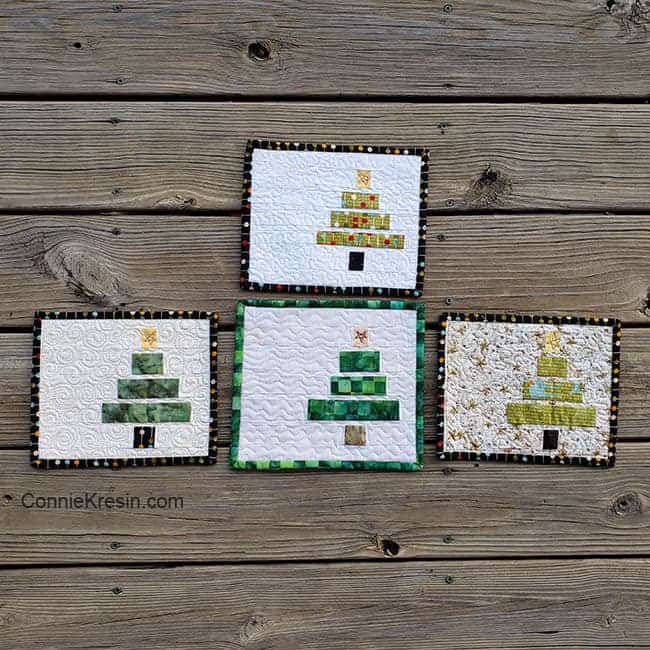
So far I have made four little wonky Christmas Tree mug rugs. I really don’t worry about the size. Go to the Dollar Tree and pick up some coffee mugs, make some cookies and you have a great gift idea for a holiday gift basket!
How about a pillow?
You can use the tree size from the place-mat and just add the same size of background strips to the right side so you can get a centered wonky Christmas tree for a pillow and add a border to make the pillow any size you would like.

I always like putting out Christmas pillows for the holidays!

I can’t remember how big I made the pillow. I pulled out the Christmas decorations yesterday and will find it.

I hope you enjoyed this tutorial. It has been converted to an optional PDF that’s optimized for printing.
Purchase an ad-free printable version of the Wonky Mug Rug and Placemat tutorial here
Here are some more Christmas tutorials that I have done!
Great deals for you!
Looking for great buys on fabric and things? Check out these links
- Connecting Threads
- AccuQuilt Deals
- Fat Quarter Shop Daily Deals
- Green Fairy Quilts – Daily Deals
- Missouri Star Quilt Co – Daily Deals
- Scrapbooking
- The Quilt Keeper
- SewingMachinesPlus
- Electric Quilt
- My Amazon Store for all the quilting things I use and more
Grab this free Wild in Northwoods pattern that I designed!


Connie,
So glad your tests came out OK. Preventative health is the best way to keep from having serious health problems. Prayers for continued good reports.
Love the Wonky pattern…another great one I had purchased from you.
I had previously downloaded the Northwoods pattern from Accuquilt. I have had the Northwoods die for sometime, but had not used it yet. Your Northwoods quilt is a great design.
Give Rusty a few pats for me.
So cute and easy!!!!! This would be fun for a Christmas Tree Skirt too! A tree, your truck, another tree, the cat with a wreath wround her neck, another tree……..lots of your patterns would fit in nicely as a panel for a tree skirt! Thanks!
So simply yet so effective Thank you Connie
Adorei, obrigada pelas instruções. Feliz Natal
This is really cute! Thank you!!
Hi Connie,
Please let me know where to find the PDF file for this project. Thanking you in advance. Cheers,
How do you find time to get everything done! You are so inspiring!
Thanks for including my placemats!
Such a fun little wonky project! I am still thinking about mine, but now you have me thinking about my checked out fabrics. Great tutorial and so much fun.
Great trees! Love your different versions!
Very fun and wonderful gift idea. Thank you Connie for always sharing your easy to follow tutorials. December Joy and Magic…xo
Love these trees! Just finished some that were much harder! Will be making foe gifts? Could they be applied on instead of cutting the white strips?
Of course they could Pat!
This is perfect. I needed a quick gift for my neighbor and also something for a raffle. Can’t wait to get the pdf so I can print out. I recently had my external drive “crash” and lost a lot of my patterns and ideas that I had not printed off.
I recently joined and love all the patterns posted so far. I just need more time to get into my sewing studio.Thanks again and keep creating.
Hi Susan, the tutorial is now a pdf that you can download! Sorry to hear about your external drive crash, I have 3 but am now putting everything in the “cloud”.
Hello Connie, Thank you for sharing so many project ideas with this fun pattern! All of your patterns and posts are always presented fabulously, plus your offers to make PDF files or anything that will help your readers is appreciated! Have a wonderful day!
Really cute -especially as a pillow! Thanks for sharing the instructions.
Connie these are great!! Thank you so much for your generosity!! I think your brain never sleeps;)
Connie, you always come up with the cutest ideas! The little wonky tree is adorable. Well done and so generous of you to share the instructions.
Thanks Lesley, good to see you again!
Would love this in PDF form. I’m fairly new to quilting, but this looks like I may be able to make this before Christmas
This would be a great beginner quilt project and a great way to practice your 1/4″ seam allowance. Perfection isn’t needed for this! Good luck!
These are adorable. I’d love the PDF file. Thank you for sharing.
Thanks Brenda and it will be up soon!
Adorable! I’d like your notes in PDF form too! Thank you, Connie!
Thank you Connie, is love that too
I love your designs 🌈💐
Thanks so much Babs! Comments like this make my day!
I would also like the PDF format. The tree is really cute.
Thanks Keitha and I’ll get that up this afternoon!
Connie, this surely complies with whimsical and wonky in my book! I always love modern, fresh designs…especially when one can use up pretty scraps. I have a sweet friend whose birthday is on Christmas Day and I know she’d love a set of wonky tree placemats like this. Maybe if I make one each year for 5 years, I’d get them done! Thank you….and yes, I’d love a pdf!
LOL Kathy, I really got a laugh out of your comment to finish one place-mat a year for 5 years! Be there, done that! PDF is in the works, thanks!
A PDF would be grand!
Thanks Pat, I’ll get that up soon!
Connie, I would love a PDF. Thank you for this pattern. I was just looking for something to make my neighbor
Thanks Betsy, this would be a perfect gift for your neighbor! The PDF will up later today.