
River Whirls Baby Quilt Tutorial
This post may contain affiliate links which won’t change your price but will share a commission.

Are you looking for another fast and easy baby quilt to make? This tutorial can be made with a charm pack and a background fabric.
River Whirls Quilt Tutorial
The weather was beautiful yesterday and I was able to take this quilt outside for some pictures.

Would you like to make a quilt like this? It is so simple.
You will need:
- 15 pairs of 5-inch blocks (total of 30 blocks)
- 30 – 5 inch blocks of muslin
- 1 yard of muslin for borders
- 1/2 yd of stripe for binding
Grab a charm pack or cut up some of your stash into 5-inch squares. Most charm packs have 2 of each print like this charm pack of Lily & Loom Butterfly Blooms. I just bought this and will remake this quilt with this fun collection.
I used 2 charm packs of Spirograph by Benartex which only had 22 blocks – one of each print. I needed 2 blocks of each print.

Cut your blocks at the angle shown above.
Take your ruler and measure over 2 inches on the bottom and 3 inches on the top, then cut all of your blocks. (in the photo I removed the muslin off the left side so you could see the cutting line better.
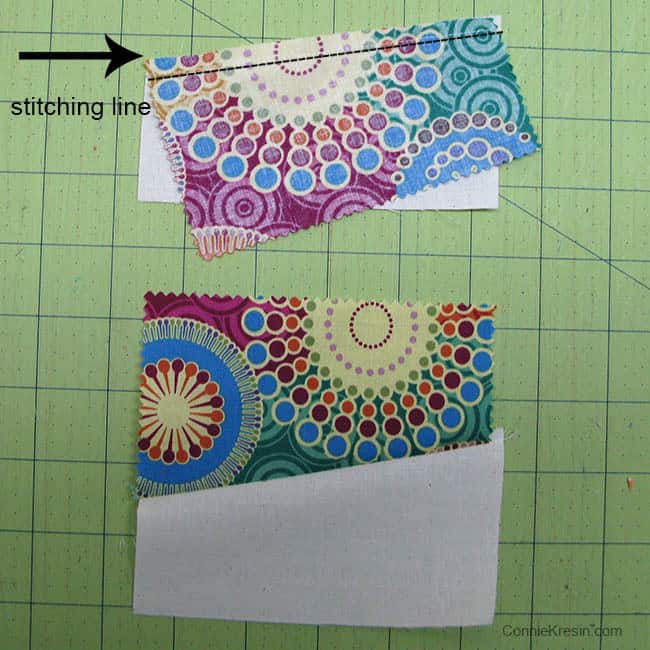
Sew your pieces together as shown using a 1/4 inch seam allowance.

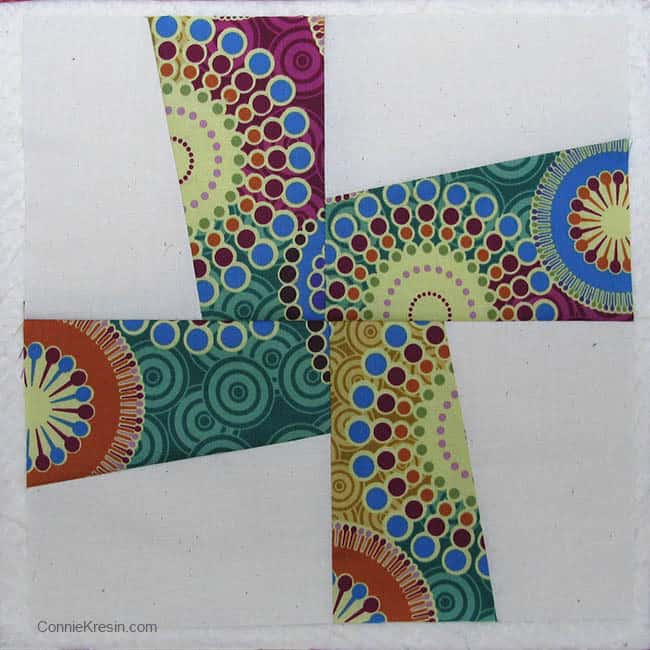
Press your block and then trim it to a 4½-inch square, using a 4½-inch square ruler makes it very easy to do.

Here are 4 blocks ready to be sewn together.

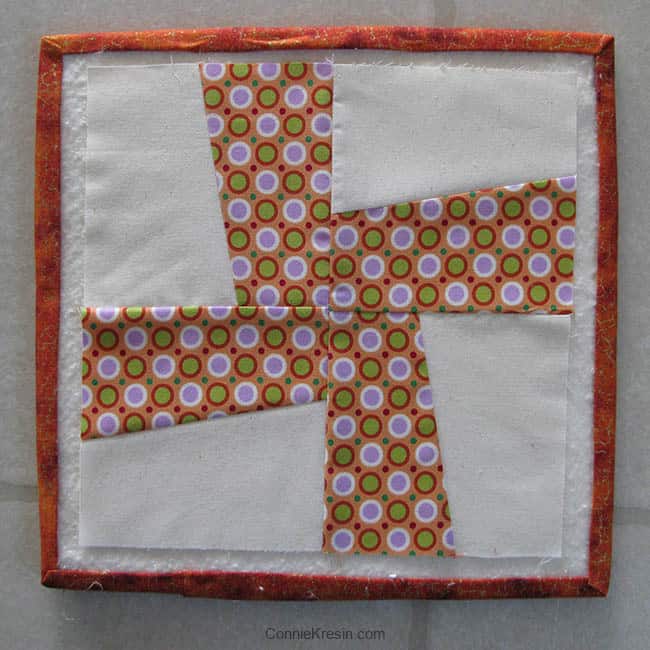
One block done – 14 more to go.
Another block done.
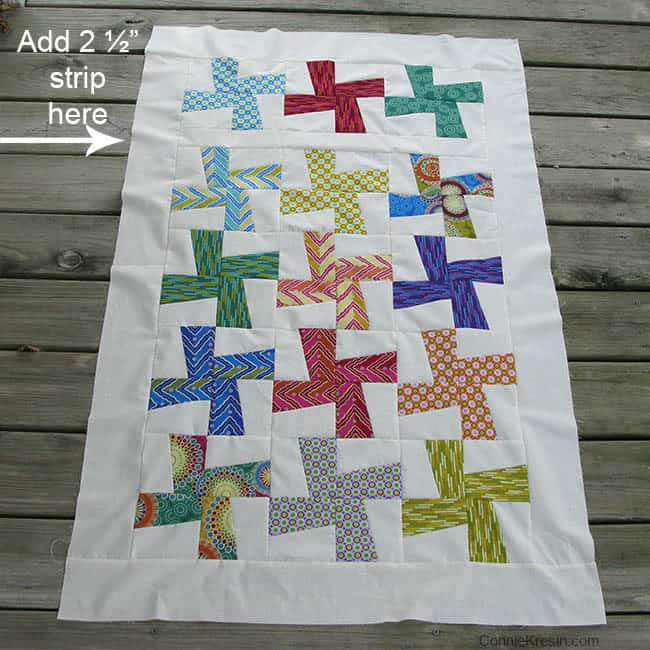
Layout your blocks in the following pattern.

Start sewing the rows together.

I wanted to make the baby quilt longer so I added a 2 ½” strip at the top and added another row of blocks.
I made 4 rows of 3 blocks then added a 2.5-inch strip and then the last row.
Then I added a 4-inch border add the long sides first.
The quilt was finished at 30 x 46.
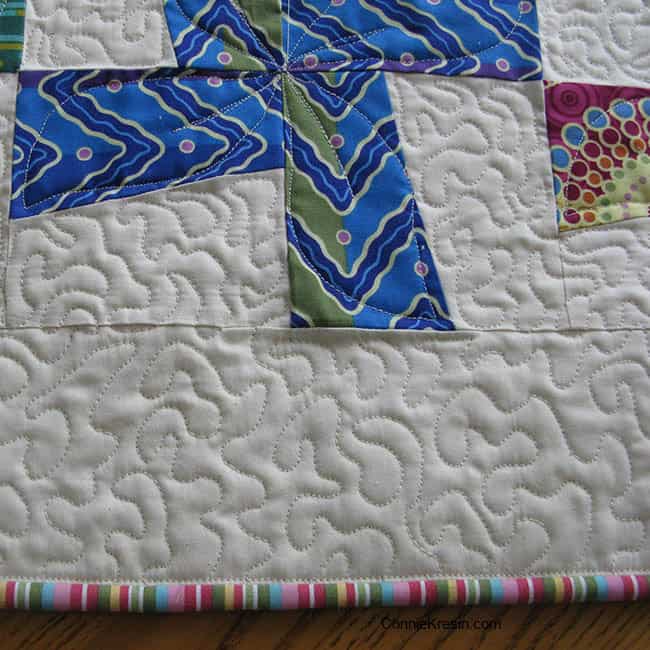
I did my free motion quilting on my vintage 15-91 Singer sewing machine.
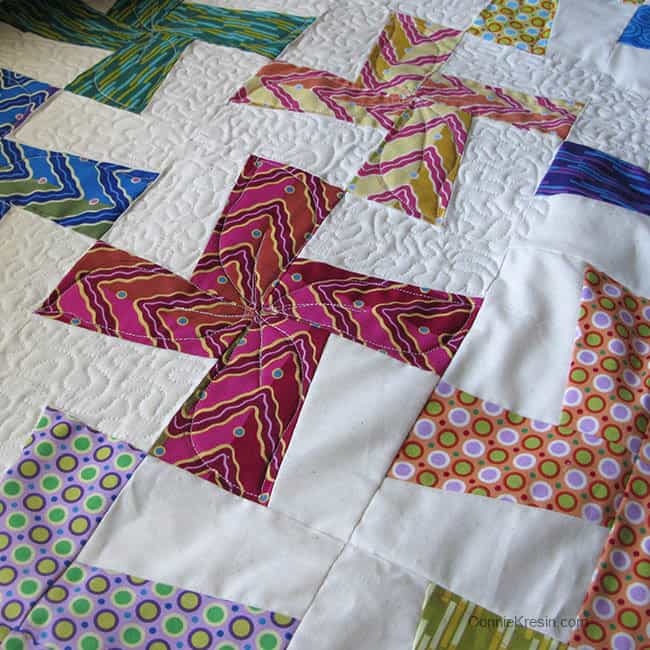
I did a little flower design on the River Whirls.

I did a free motion leaf on the prints and stipple quilted the back ground. I had this little stripe fabric that I thought matched pretty good for a binding. I like to finish the binding on my quilts by machine following this tutorial.
I just had to show one more photo, it was so great to be outside and there wasn’t any wind. I am so ready for Spring!

This is a revised post from 2012 that I thought I would share.
The quilt is all washed and crinkly now….perfect for a baby!
Using coordinating fabrics makes it easy to design blocks and a quilt.
I hope you enjoyed the River Whirls quilt tutorial

MORE POSTS YOU MIGHT LIKE:

Please note that this post contains affiliate links, which means I’ll earn a small commission if you purchase through my link at no extra cost to you. Please see the full disclosure here. As an Amazon Associate, I earn from qualifying purchases.
Great deals for you!
Looking for great buys on fabric and things? Check out these links
- Connecting Threads
- AccuQuilt Deals
- Fat Quarter Shop Daily Deals
- Green Fairy Quilts – Daily Deals
- Missouri Star Quilt Co – Daily Deals
- Scrapbooking
- The Quilt Keeper
- SewingMachinesPlus
- Electric Quilt
- My Amazon Store for all the quilting things I use and more

About Connie
Hi, I’m Connie Kresin Campbell, the quilter, writer, and photographer behind Freemotion By the River. I enjoy inspiring others with my quilt tutorials and patterns. You’ll also see my sweet adopted dogs from time to time.
Be sure and subscribe to my newsletter for more free tutorials and printables.
I really like this! Thanks for posting the tutorial.
Gostei. Vou tentar fazer para sobrinho. Obrigada
Hi Connie! I love this pattern! I make baby quilts for the NICU (preemie unit) at our hospital. This would be perfect! Thanks! Terry
Now I have the Song “Big Wheel Keeps On Turning” running through my head – but what a wonderful quilt! Looks complicated but your direction have made it very easy! Thanks! Hope the weather is turning by you – we’re in the low 80’s but the humidity has finally gone. Thanks!
Hi Connie!
What a cute quilt! I’m thinking that would make a great table topper. I’ve got just the fabric to use with it. Hurray! Give Mr. Mickey a hug for me. I have a 16 year old cat and cherish every day I have with her.
That is an awesome quilt. And I love how simple the quilting is too. Ironically I just made a couple of those blocks yesterday because I had 5″ squares left from another project. I had a small collection of the blocks hanging in the closet from earlier in the year, and now I have a couple more.
Hi Connie, That River Whirls baby blanket is so cute. I’ve made Rainbow Squares this summer but can’t figure out how to send you the picture. This pc is windows 10. I’ve had it just a year, but being sick for so long I haven’t learn a lot of it.
Connie,
So clean and crisp, love the pristine look of the white background and the colors that you chose, your placement and the quilting on the blocks. It looks striking outside in front of the river. How is Mr. Mickey doing? Praying for him.
Luv this pattern…if you trim your charms a quarter inch off of on side
You will get perfect blocks…no trimming..pauline from canada
How cute ! Perfect to make for Quilts for Kids and Project Linus. I just happen to have Lilly & Loom charm packs, the candy prints. Thank you for sharing such a cute tut.
BTW- found you on Pinterest.
That looks incredible. Your quilting on it is beautiful too.
Love it – another great tutorial. Thanks for sharing!
You are so welcome Patti!
Hi Connie. Love this quilt that I first though, “Good Grief, How did she make these blocks?” Now that you have shared your very easy method, I think I could sew one of these…someday when I have my sewing machine and supplies available again. House is listing soon.
Thanks Sherry, I can’t wait to make it again when I have time!
Lovely tutorial. It looks like it would be easily adaptable to a larger size, too. Thank you! –Andrea
Great tutorial!!! Nice to know that I don't need a fancy tool to make this block!!!
This is a great tutorial! Love the pattern
Love this – so much color and movement. Thanks for the nice tutorial too.
This is so cute, it looks very complicated at first, thanks for demystifying the pattern. I love the fabrics too!
Cindy
Such a pretty little quilt, and a great tutorial! Whoop whoop!!
Visiting from Sew Darn Crafty link party.
What a pretty quilt. And I love the FMQing you did on the coloured parts of the blocks.
Great tutorial and great blog – so glad you linked up! Which river do you quilt by?
It's beautiful, Connie! Great FMQ and tutorial too! Thanks for linking up to TGIFF!
Another great tutorial. Thanks – you do the best descriptions, makes them really easy to follow. Marilyn
Great tutorial, I like that you are not wasting fabric, will have to work on this one. Thanks, you saved me from another ruler. LOL
Thank you for the well written tutorial. The quilt is beautiful. I love the bright colors against the white.
Wonderful quilt…great bright colors just pop out! blessings, marlene
Great tute – thanks for that – I think I see it in my future!
I've been wanting to make one of these for a while now and you've inspired me to do it. Starting it Sunday!
My kitties do not go outside either. Way too many coyotes, foxes, hawks, bobcats, etc. I'm sure you're in the same situation. They are much safer in the the house. 🙂
So lovely – will have to try this pattern!
Pretty quilt and great tute. Thank you. Do you prefer this method over the Twister Ruler? Your way looks 'twisted' but you saved all that fabric… there's no waste! Yippee. Your little stand-in-fur-baby seems to like it outside. Gorgeous.
This is a really pretty quilt! Thanks for the great tutorial! I am really happy to know how to make this block. Maybe this is how I'll use my charm pack!
Oh, my goodness. When I saw the first photo I thought Oh how beautiful but when I got to the tutorial part I was so excited.
Thank you, I love this pattern!
Hugs,
Susan
This is lovely – have already started to cut the squares – will be using Kaffe Fassett fabric – many thanks
Now that is cute! That would make a darling baby quilt. You must stop with the great ideas. I'm never going to get all these done!
Enjoy your nice weather. We have a ton of fresh snow here. No outside pictures today!
beautiful, Im loving twisters and yours looks so clean and fresh :O)
This is beautiful! Thanks so much for the tutorial! Happy Friday to you 🙂
Good evening…
What a beautiful kilt.
Thanks for your tuto.
I think one day quickly I'm going try to do something like that.
Thank you
Maria Rosalia
Very pretty and I think I know now what to do with a charm pack I've been hoarding… TY !
Thanks for sharing this tutorial — the quilt looks so pretty. Another one I need to make!
Thanks for the tutorial. A wonderful quilt for using up some of those charm squares. Great shots of the outdoors too.
Great tutorial and charming quilt. This one goes on my to do list. Deb.
Cute little quilt Connie with lovely quilting that reall sets it off.
Lovely quilt! Great tutorial too – looks like a fun pattern for charm squares.
Why aren't the cats allowed outside? Looking at the surroundings they would LOVE it!
That is such a fun block to do and I love the fabrics in yours. The river looks so calm!!
That is just gorgeous and thank you for the tutorial.
I hope spring arrives soon for you – without the tornadoes.
Cute project – thanks for the tut!
Wonderful! Thank you for the tutorial.