
Halloween Two Pumpkins Mug Rug Tutorial
This post may contain affiliate links which won’t change your price but will share a commission.Are you looking for a fast and easy quilt project for Halloween? The Two Pumpkins mug rug would make a great gift for a teacher, a friend or just for yourself. I have included the little pumpkin appliques for you.
I have had many of you tell me that you would like to get better at free motion quilting or applique and I always, always say that you should try some small quilt projects like mug rugs!
Mug rugs are the perfect quilt project for practicing.

Halloween Two Pumpkins Mug Rug
6″ x 8″

Supplies
- Scraps of orange, black and brown batiks or quilt fabrics
- 7″ x 9″ cream batik or neutral quilt fabric for the background
- 7″ x 10″ batting
- 7″ x 10″ backing fabric
- Heat n Bond Lite
- Binding – 2½” x width of fabric
- Black and cream Aurifil thread for stitching
The first thing I did was go to my bins of Island Batik fabrics and choose some fun batiks for Halloween. I really like storing my batiks in these open weave baskets as it is easy to see what I have. This is the Algot system from IKEA, it is no longer available.

Trace the pumpkins onto Heat n Bond Lite. I like to cut the center out from the pumpkins and then use them for the face pieces.


You can iron the face pieces on right away if you like.

Fabric markers are a great way to add little details to applique. I cut the background fabric a little over sized, about 7″ x 9″.

I used a brown marker at first but then decided to stitch over it with black thread.

It is always a good idea to place some type of stabilizer behind your applique before stitching. I am using a page from an old telephone book. I am using my old vintage 15-91 Singer sewing machine with the feed dogs dropped and a darning foot to do my free motion quilting.

This is the backside of the applique done on the phone book paper.
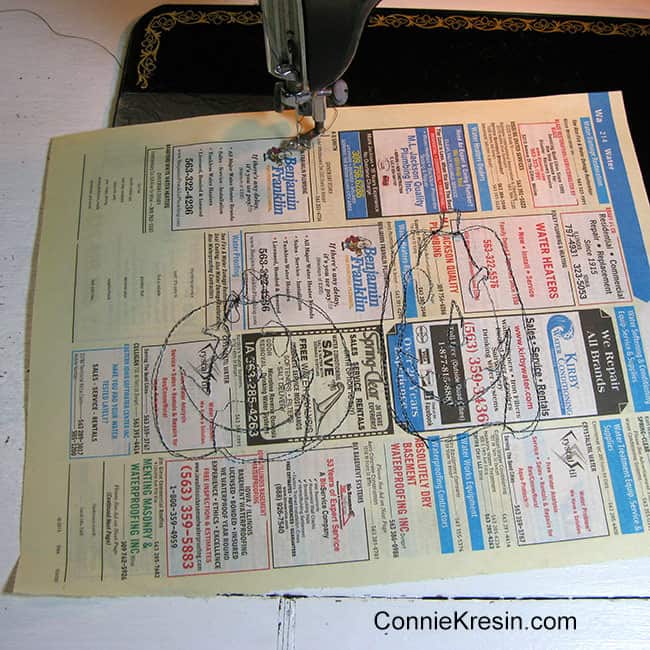
Remove the paper, it usually is very easy to do using your fingernail to tear it.

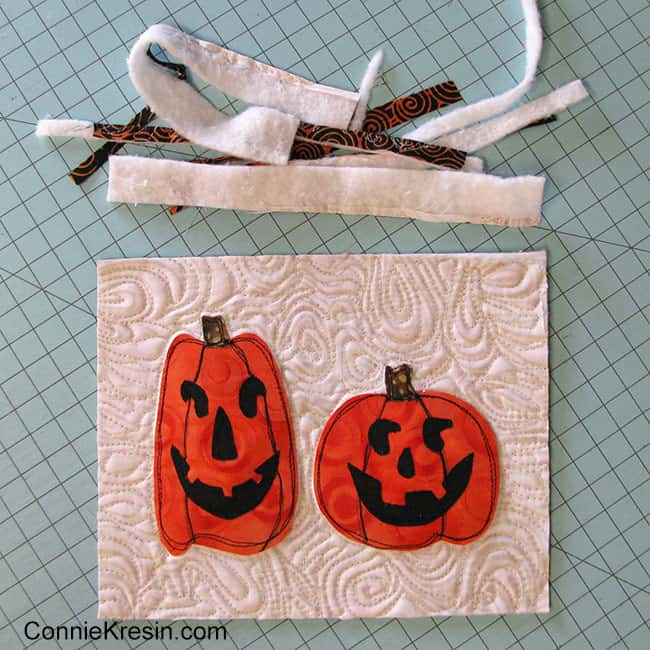
Next, you’ll need a small piece of batting, I have a drawer that I use to store leftover pieces. Little Sadie was taking a nap while I quilted.

Cut a backing piece and your batting slightly bigger than the mug rug top.

Quilt the little Halloween two pumpkin mug rug.

Once the piece is quilted, trim it to size. I made this one 6″ x 8″.
Cut a piece of fabric for the binding 2½” by the width of the fabric. Fold in half and attach to the front of the mug rug.

Once the binding is sewn down, press it to the back. Use little clips to hold it in place and then top-stitch.


This could also be used as a mini wall hanging. I pulled out some cute green buttons that would really be fun to use on this.

See how small it is compared to the Pumpkin table runner that I made last week.

Download the free templates and a PDF of this post:

This post may contain affiliate links. Please see my full disclosure policy for details.
Great deals for you!
Looking for great buys on fabric and things? Check out these links
- Connecting Threads
- AccuQuilt Deals
- Fat Quarter Shop Daily Deals
- Green Fairy Quilts – Daily Deals
- Missouri Star Quilt Co – Daily Deals
- Scrapbooking
- The Quilt Keeper
- SewingMachinesPlus
- Electric Quilt
- My Amazon Store for all the quilting things I use and more


About Connie
Hi, I’m Connie Kresin Campbell, the quilter, writer, and photographer behind Freemotion By the River. I enjoy inspiring others with my quilt tutorials and patterns. You’ll also see my sweet adopted dogs from time to time.
Be sure and subscribe to my newsletter for more free tutorials and printables.
Hello Connie Dear: Your Pumpkin Mug Rugs are so cute. I am too late again this year to make one for Skyler but I am certain I will have enough time before next Halloween. Happy Halloween and lots of Treats with no Tricks.
So nice to see Miss Sadie.
The Mug rugs look so fun to make – really need to get moving on this – haven’t even put up the Halloween Lights! Thanks
Hi. Is there a pattern for the pumpkin mug rugs?
That is so cute and your quilting looks great on it.
Hello Connie, Such a fabulous tutorial with adorable applique pumpkins! I would have loved to have made these for my Dad. He always loved it when I would make him a new set. Thank you for sharing another special tutorial that is written really precisely. Have a fabulous day!
Spooktacular Mug Rug and tutorial. Thank you. #CreativeGoodness