
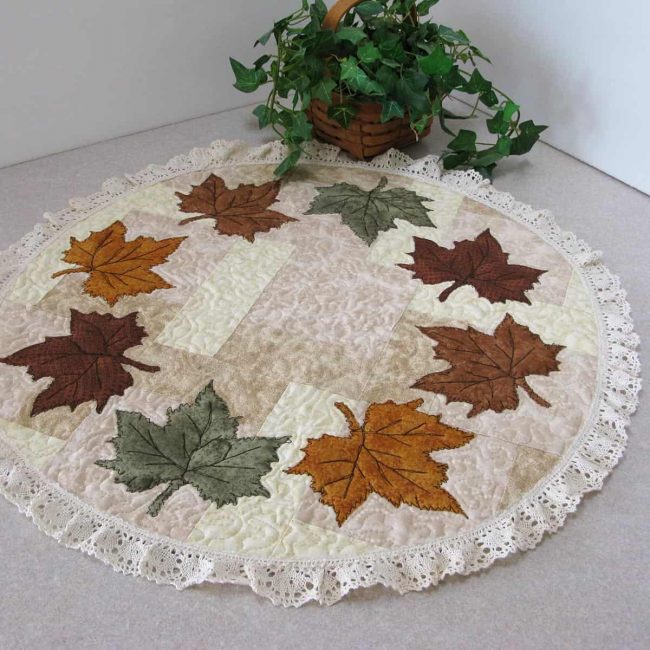
Maple Leaf Centerpiece Tutorial
This post may contain affiliate links which won’t change your price but will share a commission.If you haven’t been here before I’m Connie and I am excited to be part of the AccuQuilt Fall Blog Hop – I have a tutorial for this Maple Leaf Centerpiece and a giveaway.

Maple Leaf Centerpiece Tutorial
If you don’t have a AccuQuilt GO! Baby don’t worry, I’ll show you how to make this without it and share a template with you.
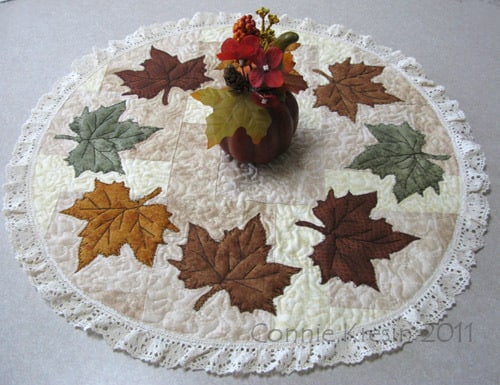
I should warn you that I’m a visual person so I like lots of pictures.
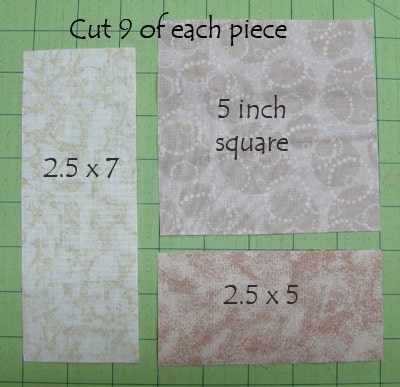
First thing we are going to do is make our blocks out of neutral/tan fabrics – this is a great time to dig into your scraps.
Cutting your scraps
- Cut 9 – 5-inch squares
- Cut 9 – 2-1/2 inch x 5-inch rectangles
- Cut 9 – 2 1/2 inch x 7-inch rectangles
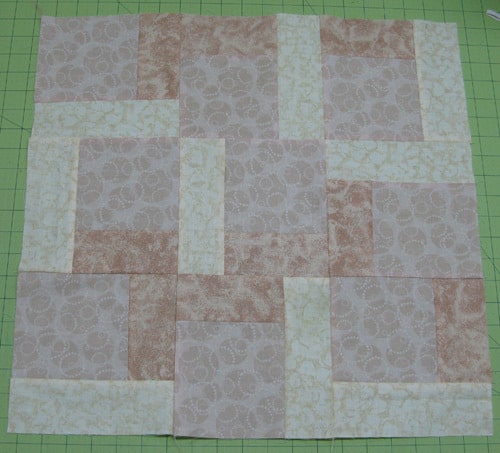
Use a 1/4 inch seam allowance.
Sew the 2-1/2 inch piece to the 5-inch square.

Sew this piece to the 2-1/2 inch by 7-inch rectangle.

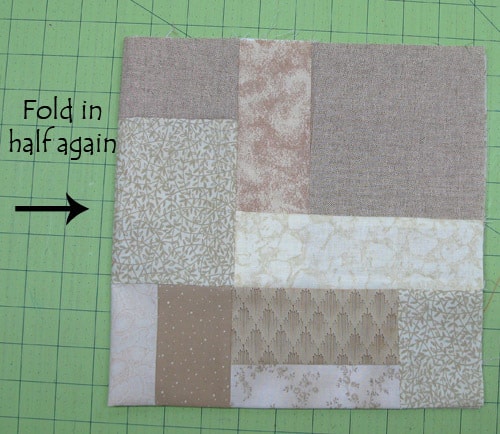
Make 9 blocks and arrange them however you like. If you look at the layout below you can see that I will only have to match the seams of the 9 blocks.

Sew the blocks together. You now have a piece about 20 inches square.
Now fold the piece in half.
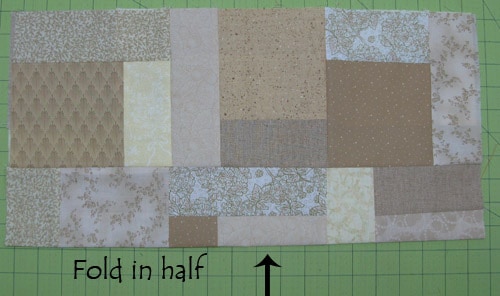
Fold it in half again.
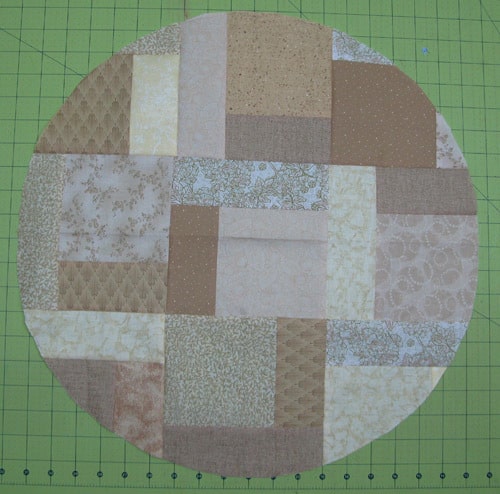
Now we are going to cut a circle.
This is a tool I bought at an art store years ago. There is a point on it that I put at the center of the piece (lower right corner in photo) and then I place the end with the pencil at the bottom left corner just in a bit on the fabric. I tighten the screw on the point and then draw a line from one side to the other.
You can also do this with a pin and a string wrapped around a pencil. Then carefully cut the line with your rotary cutter.

My circle is approximately 18 inches.
I used my Accuquilt GO Cutter to cut maple leaves using my Fall Medley die.
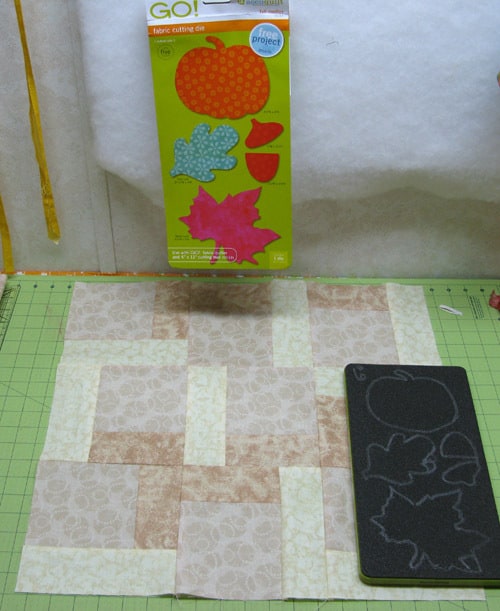
I cut a strip of Heat & Bond Lite and fuse it to a strip of fabric. Since I am only cutting the maple leaf I cut pieces to just cover that die.

If you don’t have the Fall Medley die or a GO! Baby you can print off this maple leaf that I have for you.
Place the leaves on the top and fuse.

Next place a backing right side down on your table. Put your batting – I used Warm & Natural – on top of it and then your pieced block on top. I then did a free motion applique around the leaves with a dark brown thread.
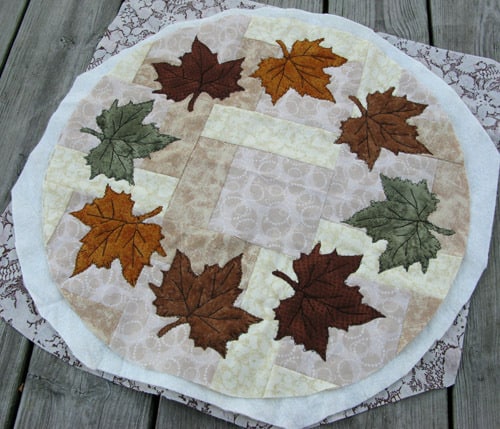
You could also use a blanket stitch or satin stitch.

Then I did a stipple free motion quilting with a cream thread.

Close up of the stitching on the maple leaves.

Now trim your centerpiece and zig-zag or serge around the edges. I then stitched cotton cluny lace to finish it.
You could make a bias binding – if so you wouldn’t want to finish the edges with zig-zag then.
Great deals for you!
Looking for great buys on fabric and things? Check out these links
- Connecting Threads
- AccuQuilt Deals
- Fat Quarter Shop Daily Deals
- Green Fairy Quilts – Daily Deals
- Missouri Star Quilt Co – Daily Deals
- Scrapbooking
- The Quilt Keeper
- SewingMachinesPlus
- Electric Quilt
- My Amazon Store for all the quilting things I use and more
Love it! I have two round tables that it would look great on! Thanks for a chance to win!
another fun table topper! love your circle tool!
I am going to make this for my daughter and daughter in law for fall. Your directions are so complete and easy to follow. Thank you. I am new to your blog and look forward to following you.
I am a new follower.
Would love to win this table centerpiece. Have a GO!, and love it, but not this die. Thanks for the chance to win.
Nagyon szép őszi levél bemutató 🙂
Köszönöm 🙂
I didnt even notice the giveaway part until I posted a comment and started reading the other comments, so I am following your blog now. 🙂
This is so pretty! I love the leaves! Very cute idea!!!
Just what I need to jumpstart my fall decorating!
Hello~
I also meant to say or add I become a follower…
enjoyed my visit—
I will be back! 🙂
Blessings~
Lori
Hello,
Thank you for a wonderful chance to win a beautiful table runner!
Blessings~
Lori
I love the table centerpiece! I'm very partial to maple leaves. Thanks for the chance to win!
Love your leaves, thanks for the tutorial, what a lovely fall gift to win. I sure like how you pieced the circle, I'll try that.
I am a follower.
I would love to win–I love fall and leaves; this would be perfect in my dining room.
I am a follower!
I think it is my turn to WIN!
I am a follower 🙂
This is such a great idea… I love fall colours so it is perfect 🙂
Thank you for your excellent tutorial – I think I can do it now! Please enter me in the giveaway – I neeeeeed it. thank you for the opportunity to make something so beautiful.
Love this fall tutorial !! Soo pretty. angeldove 7dt@ gmail.com
I love the autumn leaves in this design. I would love to have a play with them.
Hi Connie, I hope I'm not to late to win this. It is probably one of the nicest centerpieces I have seen this fall. Thanks for sharing.
there! i've got it posted on my blog, akgranny.blogspot.com. whew!
goodness, yes, i'd like to win your neat kit … it's just right for fall.
hi! i'm one of your new followers; you have greaat stuff to follow!
I am a follower.
Who wouldn't love to win it – I certainly would!
Shared on FB
I'm following you!
I'd love to win this – I love autumn's colors the best!
Check out my blog about your giveaway here:
http://winningdays-cheryl.blogspot.com/2011/10/what-i-learned-yesterday-and-day-before.html
I am impressed withyour blog so just became a follower and subscribed to your post via email. Thanks for sharing. Jane
Thanks for the great tutorial. I may try to make something like this after I finish my current quilt which needs to be done in a week. EEEk! Jane
I am a follower of Quilting by the River also.
Sadly, I do not have a blog as of yet so I'll just cross my fingers that one of my two comments will be liked by that good ole' random number picker. 🙂
Thank you so much for the chance to win and also for such a great tutorial.
Oh my gosh Connie! This is just gorgeous. I really love the fabric colors and the maple leaves you've used. I would love to be able to make one just like yours.
I think that it may even become a gift for my son and his fiancee, They have a gorgeous round wooden dining room table this would look beautiful on and they don't have any table decorations yet as they're just starting out. I know she would just love it.
Thank you for such an awesome tutorial as well. I LOVE extra pictures. I am also a visual learner so the pictures definitely help me also.
I am following via Google Connect 🙂
well that is just lovely! Thanks for sharing
This is just adorable!! And your tutorial was perfect! Great job, Connie.
I'm a new follower too!
I'd love to win the kit. Those leaves are just gorgeous! Thanks for the chance.
I am following Quilting by the River via Google Friend Connect.
Thanks for hosting this giveaway!
cgreenleaf2(at)gmail(dot)com
With the last name of Greenleaf you just know it want to make your Maple Leaf Centerpiece. I don't have the GO! dies so winning your giveaway is the only way I can make this. 😉
I am a follower to your blog!
I would love to win. Your tutorial is so great!! Thank you!
Of course I would like to win. But even if I don't, I am saving the tutorial (and the Halloween one) so I can make one myself. Thanks for the great ideas!
Lovely centrepiece! Thanks for a chance to win.
Interesting tutorial. Might even try it. Found your blog and bookmarked it to check out. Thanks for the chance to win your give away. Robert, in northern Iowa.
I'm a new follower.
Great tute! I was actually thinking of making some 'chargers' this way for my Thanksgiving Day table. I really wanted to make them dresden plates, but that will take forever! THis is a faster method and pretty too! Would love the kit!
I am a new follower.
I thought that was such a cute mat and to have the leaves already cut out. I would love to win a kit to make my own. Thanks for the chance.
How cute is this?? I would love to make this so YES!! I want to win it!
I'm a new follower!!!
I love your fall table topper!! It's gorgeous!!! I love how you free motion quilted the leaves! They look great! Thanks for the chance to win!!!!
http://jocrazymama.blogspot.com/2011/09/i-love-blog-hops.html
New follower on board!
I would LOVE to win!! thank you for the tutorial!
This Centerpiece quilt looks lovely. I do not own a GO! so using the cut outs would be great! Thanks!
Oh fall is my favorite time of year, and this is just delightful. I love the leaves!
I am a follower
Thanks for the tutorial. I love the way you quilted the maple leaves. I would love to win your kit for your lovely fall table mat. Thanks!
I'm a new follower!
Hi Connie
Great tutorial – thanks!
I am a new follower of yours. So glad I found you. Your blog is great!!! I live just up the river from u. Thanks for the giveaway.
Hi Connie, Beautiful Centerpiece. Woould luv to win!!!
Lovely center piece 😀
& thanks for the tutorial + the giveaway!
I follow!
Lovely center piece 😀
& thanks for the tutorial + the giveaway!
I'm a follower.
I would love this!
I included your giveaway in my blog today:
http://straystitches1.blogspot.com/2011/09/im-ready-for-october.html
I'm a new follower of your blog. Looking forward to being inspired and learning lots.
Thanks again for a chance to win.
usairdoll(at)gmail(dot)com
Wow! What a great center piece. I'd love to win this. I'm also a visual person and I learn that way the best. Thanks for a great tutorial.
Yes, Thank you to Darlene for putting together this blog hop and Thank you for the giveaway and a chance to win.
usairdoll(at)gmail(dot)com
I am now a follower. Thank you for the chance to win this cute kit. It would like nice on my little table.
How very nice. I am not into Halloween, but I love the leaves. Our maples are turning flame red in the area right now. So pretty.
I'm telling you the tutorials are keeping my attention and I don't make holiday things…well…not very often anyway. Thanks for the inspiration!!
Smiles,
Kelly
I follow 🙂
I'd love to make a Fall table topper with this, thanks for the chance!
ourbusylittlebunch(at)hotmail(dot)com
I'm a new follower of your blog.
vail in tn
Love the maple leaf centerpiece. It's very pretty. I'd love to make my own with your precuts.
vail in tn
I am a new follower. 🙂
I would love to win a kit for this table topper. Thanks for the great tutorial.
I am a follower via gfc! 🙂
What a gorgeous fall centerpiece! Thank you for a chance to win a kit! 🙂
Really appreciate your detailed tutorial and a chance to win the kit. Perfect timing for Christmas gifts by changing the leaves.
I would love to win this – so cute! Thanks for the opportunity!
I follow your blog. Thanks again!
What a great project. It would be a treat to win this. Thanks for the chance to win!
I am follower!
I would love to win!
I've been wanting to make an autumnal table runner–yours is beautiful! Thank you for the giveaway.
wordygirl at earthlink dot net
Fall is my favorite time of year so really love your giveaway, thanks so much!
I follow you already and love your tutorial. Love the new dies available now from Accuquilt! Thanks.
I am a follower, too.
I love the fall leaves, this is a beautiful project!
Such a fun giveaway! Thank you for the opportunity to win this! You've got a new follower!
That is just the prettiest centerpiece! I just love the way you quilted the leaves and your lace edging is darling! Keeping my fingers crossed that this pretty kit ends up at the end of my dirt road!
I am a new follower – yay!
Throw my name into the hat! I would love to win this table topper, it is very nice! Thanks!
I am a new follower
This is a great table topper. Thanks for the giveaway.
This is such a 'classy' looking fall piece and would look fantastic on my entry table under a beautiful vase or even a flower pot. So pretty! I'd love to win this.
Love the tutorial and would love to
win. thanks for showing us how.
The leaves are just about turned here in Vermont and are inspiring autumn quilty projects. This would be so perfect. Thank you for the chance to win – I love this project and will be making it even if I don't win. VermontPines@aol.com
I`m glad to stopping by.I`m a follower.
Great tutorial.The leaves are very nice.
This is so adorable!!! thanks for the tutorial.
I just became a follower, looks like a lot of nice projects to look at. By the way one of my best friends grew up in Muscatine, Iowa. Small world.
I would very much love to win your wonderful candle mat. I just love fall and I love my "GO" cutter.
I follow you via GFC 🙂
I'd love to win! I love fall and want to make this. Thanks for the chance!
You have a new follower and it's me.
I love your table cover. I do want to make it. Fall Medley is a such a neat die. Thank you.
I am now a follower
I liked your tutorial, and the other ones on your blog as well.. I would love to be a winner on your site.
I am a follower of your blog.
OH, yes please enter me into your giveaway. I would love to win this.
I'm a follower.
Loved the tutorial and would love to win.
Oh and I'm a follower too. blessings, marlene
I'd love to win this – you have perfect timing since I'm beginning my fall decorating! blessings, marlene
Thank you for the giveaway.
I liked how you made your autumn topper into a circle — think I could find my late father's big compass and use it. Pretty pretty…
I follow your blog! thanks again!
Such a beautiful centerpiece! I would love to be entered to win – I would love to make this. thanks for the tutorial – I appreciate the work that goes into these! thanks!
What an inspirational tutorial. I love your Maple Leaf Centerpiece. Excellent. I definitely want to make this. And I have a couple of tables that are now screaming at me to make it for them, or threatening they want to move to your lovely home. Did I say excellent tutorial? Absolutely spectacular.
SewCalGal
http://www.sewcalgal.blogspot.com
I am a new follower 🙂
what a beautiful centerpiece! I am glad i stopped by 🙂
I blogged about your giveaway at http://salliessampler.blogspot.com/2011/09/maple-leaf-centerpiece-giveaway.html.
I'm a follower!
I would love to win! Thanks for the opportunity!
Hello again!
I left a blog post about your giveaway on my blog!
Thank you for having this!
I am already a follower of yours and am so glad. Blogging is so inspirational.
This is a fantastic tutorial! I love how you stitched around the edges of your leaves too. So great.
The maple leaf centerpiece is so perfect for this time of year and I do love that fall medley of the accuquilt dies. I would love to win!.
Wow…I'm asking for a go on my Christmas list……they look like fun. What a nice fall table centerpiece.
Adorable – I would love to win it! And I think I would use it for other seasons too 🙂
I'm following – thanks for the great tutorial.
Hi – I would love to win this – reminds me of my youth in the Northeast. Thanks.
I am a follower. 🙂
That is a great centerpiece. I really like the background, It is perfect for the leaves to sit on. And what a great idea to make it into a kit. I would love to put it together.
What a beautiful and timely giveaway. I'd love to win and thank you for the opportunity to do so.
I am already a follower of your blog. Thanks for the opportunity to win your beautiful giveaway.
I love how you added the lace around the centerpiece.
I'm a follower.
I am a follower of your great blog!
Wonderful tutorial Connie and a sweet little table topper , I love autumn leaves .
Cool tutorial and a very fall-like centerpiece which I'd love to have.
thanks!
I put a link to your page on my blog!
I have joined your site as a follower.
Posted your giveaway on our blog at World of Charity Stitching Blogs Sites & Things We Like. Come visit us. We have a giveaway too.
Dona
http://wocs-blogssitesandthingswelike.blogspot.com/
I'm following you.
Love my Accuquilt Go! And I love your centerpiece. thank you.
New follower!
babsnwv at gmail dot com
Would love to win – great tutorial and the pictures are so helpful!
babsnwv at gmail dot com
And of course, I'm a follower!
Oh Connie, I would love to win that kit! It's absolutely gorgeous!
Tracey
thepeonyteacup.blogspot.com
Already a follower :-). Again, THANKS!
I would LOVE to win! Thanks so much for the opportunity!!!
I am a regular follower of your wonderful blog 🙂
What a wonderful centerpiece and a great tutorial. I would love the opportunity to win the pieces to make it.
blogging about the giveaway and tutorial on my blog post.
I am already a follower..thank you for this chance.
Oh yes; I want one…lol
Hi Connie: What a wonderful centrepiece. I can't wait to make one. Would really love to win this giveaway. Very much enjoy your blog.
Connie that is lovely! You always have the nicest projects. Please don't enter me in your amazing give-away though since I have that die but I think I might just make one! Great job!
I'm already a follower. Thanks for the giveaway.
Love the tutorial. The background pattern is something I'm going to try out for a scrappy quilt. Thanks for the giveaway.
Thanks for the giveaway. I'm a follower.
I'd love to win! The leaves are just beautiful!
Link left in my blog
katusya04@gmail.com
I am your follower. I like your blog.
Very nice! I want to sew it. And I want to win it.
Hello Connie! Great tutorial and so beautiful autumn decoration!
Thank you for a giveaway!