
Avalon Candle Mat Mini Tutorial
This post may contain affiliate links which won’t change your price but will share a commission.
I always enjoy using up every last scrap from a charm pack or any of my quilt fabrics as they aren’t cheap.
I recently shared my Clamshell Pillow tutorial that was made with a charm pack. I was able to get 64 little 1½- inch squares from the leftovers of the clamshell cuts and made a little 8-inch square.
This fast and easy tutorial makes an Avalon Candle Mat mint. The finished size is a 12-inch square candle mat.

I also had a fat quarter of the red floral print and I used that for a 2½-inch border.
My favorite quilting tools
These are some of the items that I use all the time when I’m quilting.
Then I added my backing, batting and quilted it.
I just cut 2 1/2″ strips from another fat quarter that I had and added the binding using my machine binding tutorial.
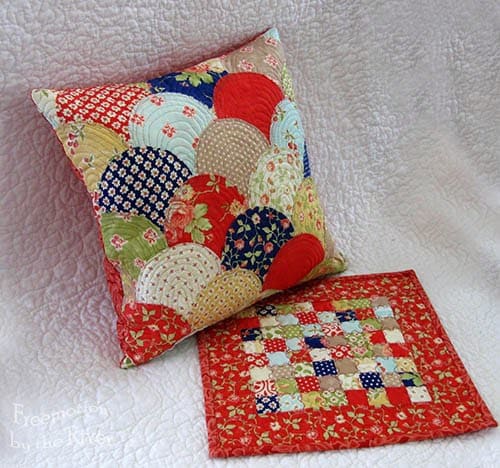
Isn’t it cute with the Clamshell pillow that I made last week and…..all the scraps from the charm pack are used up.

I always enjoy a photo of the work before quilting.
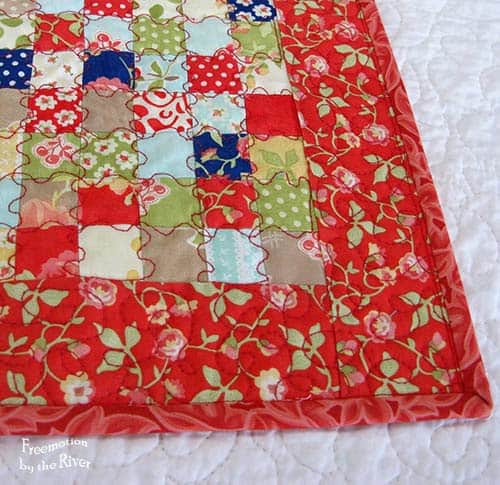
A closeup shows that I just did a free motion wiggle stitch over the seams and some stippling in the borders.
The backing and binding were some other pieces I picked up that match perfectly.

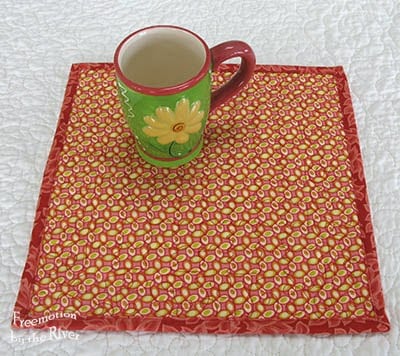
I thought the colors in my mug looked cute with it….can you imagine how many cookies I could put on this!!
Maybe I’ll skip the cookies and just use it for a centerpiece.
Be sure to look at my other AccuQuilt tutorials!
Great deals for you!
Looking for great buys on fabric and things? Check out these links
- Connecting Threads
- AccuQuilt Deals
- Fat Quarter Shop Daily Deals
- Green Fairy Quilts – Daily Deals
- Missouri Star Quilt Co – Daily Deals
- Scrapbooking
- The Quilt Keeper
- SewingMachinesPlus
- Electric Quilt
- My Amazon Store for all the quilting things I use and more

About Connie
Hi, I’m Connie Kresin Campbell, the quilter, writer, and photographer behind Freemotion By the River. I enjoy inspiring others with my quilt tutorials and patterns. You’ll also see my sweet adopted dogs from time to time.
Be sure and subscribe to my newsletter for more free tutorials and printables.

I love the colors in that line and your mat is just gorgeous.
I love the candle mat! One of these days I need to make some for myself. Someday…lol.
Love your pillow and candle mat. I too try to use up all of my scraps!
OK, I KNOW I sound like a broken record Connie, but I really love the candle mat. I need to make one of these for Curt. He's been using the Yankee candles I don't really love so I want to make one for him to put under the jar so it won't heat up onto his desk or the printer.
Love this candle mat, Connie! And especially the quilting. It gives the illusion of a jigsaw puzzle. Great use of those scraps!
Very nice clamshells
Your candle mat is really pretty. I like the squiggle wiggle over the seams. I may borrow for use on some of my smaller projects. Good for you to use it all up. That is my goal this year….to use up my stash and all the bits and pieces.
You do seem to get a lot of mileage out of your fabric! 🙂 Very nice. Congrats to Pamela!! 🙂
So glad to see I'm not the only one using every last crumb. (I am trying to convince myself of a 1" minimum save rule.)
I love that clamshell cushion. The clamshell pattern and the colours work really well on that scale. Isn't it satisfying to use every last scrap of fabric! 🙂
Fabulous use of every snippet of fabric. Love both projects and how they coordinate. Congratulations to Pamela C. Creative Stitching Bliss…
Way to go on using up the charm pack instead of throwing it into the 'I'll use this someday' bin, LOL
I have a partial I am planning using as soon as I find time, spring craft show and customer quilts got me hopping!
CONGRATS TO PAMELA!
LOVE THIS SCRAPPY BRIGHT RED MINI QUILT>SO CUTE!
THANKS FOR SHARING!
msstitcher1214@gmail.com
Such a cute mat. I was cutting some prepinted labels and thought they would be a perfect starting point for a mug rug. I think I will work on that idea later today!!
Those are some itty bitty squares! Beautiful, both pillow and candle mat!
Both projects are wonderful. Congratulations to the winner and thank you for hosting.
Love the colors and fabrics…so pretty!!!