
X Spot Quilt Pillow tutorial
This post may contain affiliate links which won’t change your price but will share a commission.
I guess the X Spot Quilt Pillow tutorial will be my very first of many quilt projects made at our new country house. I took the leftover blocks from the X Spot quilt and turned them into a pillow tutorial. Do you like to make pillows? Pillows and placemats are probably my favorite things to make.
Well……I also love making table runners and mug rugs….who am I kidding? I enjoy making any kind of quilt project!

This is our guest bedroom downstairs. It has one small window which doesn’t have an egress window so technically this can’t be called a bedroom. There is no way you could climb out that window if there was a fire but there is a walkout door just outside the room.
This room houses all of my quilts on three chrome shelves.

It was a lot of work moving all of these! My daughter helped me pack them into heavy plastic bags for the move. It feels so good to have them all folded and on my shelves again! I sort them by pillows, placemats, mug rugs, table runners, baby quilts etc. It makes it easy when I want to pull something out for new photos or just to use.

I mentioned in my last post about moving into my quilt studio that I found a box of quilt blocks that I made a long time ago and decided to go ahead and finish piecing the quilt.
One of my favorite places to find quilt blocks is in Electric Quilt 8. I searched it looking for this block and found something similar called a Simple Autograph block. The center section was larger so I redrew it to create a finished 1-inch strip in the center.
X Spot Quilt Pillow tutorial
18-inch square pillow

Here is a drawing of the 18-inch pillow in Electric Quilt 8. This shows using (16) 5-inch squares cut in half so that each fabric shows up twice in the pillow.

Materials
- 5-inch scraps or a charm pack – (16) needed for pillow
- One fat quarter of cream or white fabric (I used muslin)
- 5/8 yard of backing fabric
- Aurifil 50wt cotton thread
- Schmetz needles
- 18-inch pillow form
Supplies
- Sewing machine
- 1/4″ foot for your sewing machine
- Magnetic pin cushion and straight pins or wonder clips
- 5-inch square quilt ruler
- Rotary cutter and mat
- Iron and wool ironing mat
How to make the X Spot pillow
Step 1: Cut your fabric
- Cut your 5-inch squares in half diagonally.
- Cut the white/cream fabric into 1½-inch by 8½-inch strips.
Step 2: Sew blocks
- Fold the 1½-inch by 8½-inch strip in half and iron to make a crease.
- Repeat this step with each diagonally cut 5-inch square.
- Match the creases and pin.
- Sew the seams with a ¼-inch seam allowance.
- Press to the dark fabric.

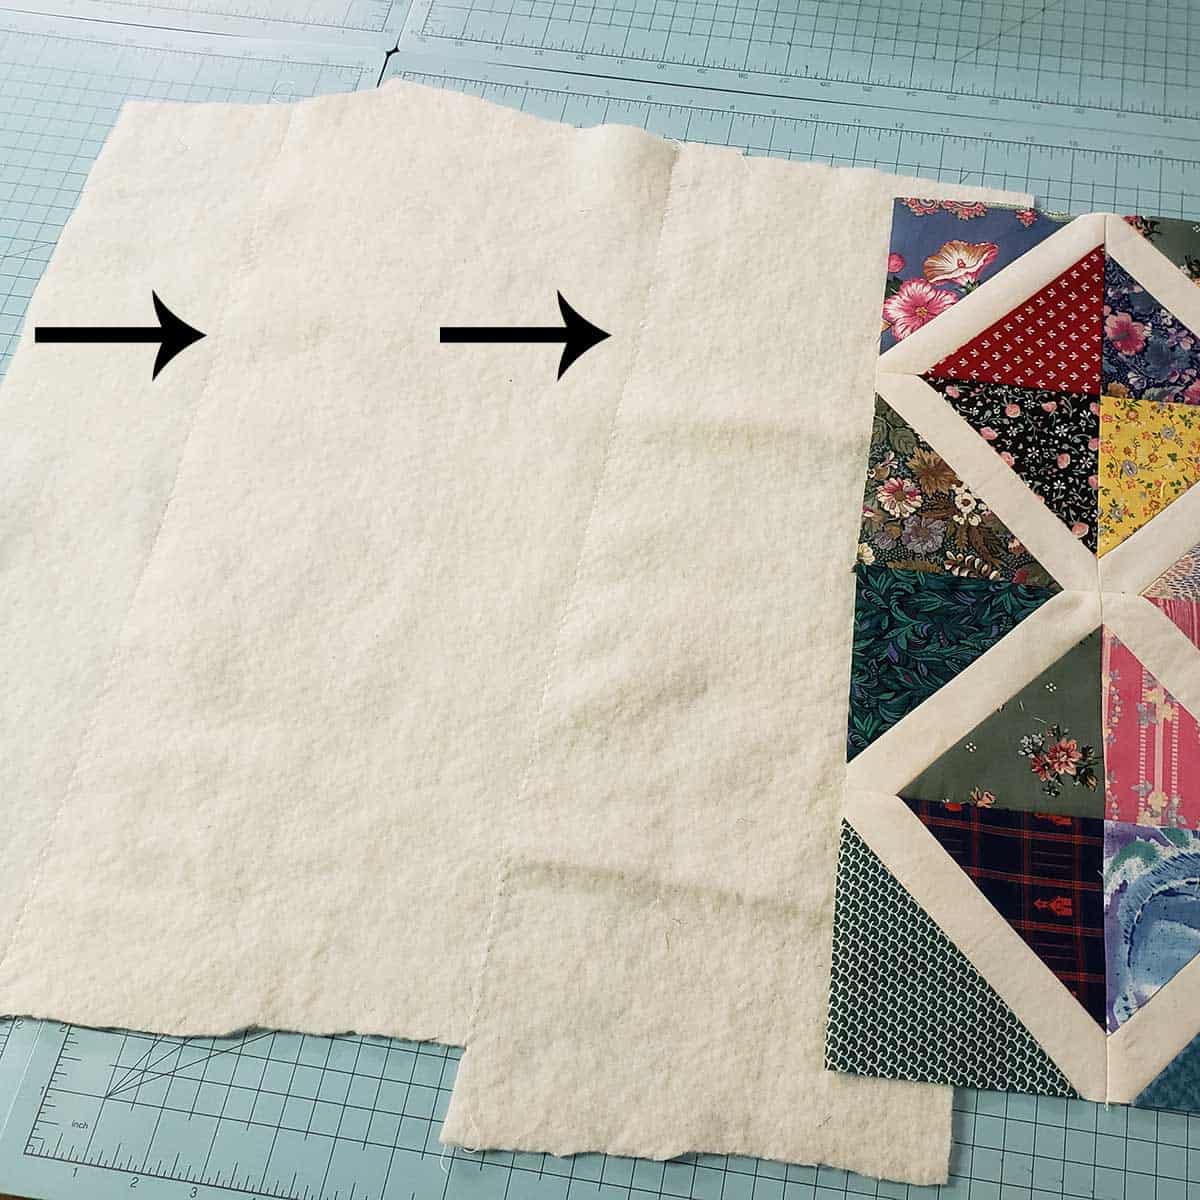
Step 3: Trim the block to size
- Trim the block to a 5-inch square.
- The easiest way to do this is to use a 5-inch square ruler, I can’t find mine at the moment so I am using a 5 inch square of fabric as my template.
- You just want the square centered on the block.

There is very little that you have to trim off.

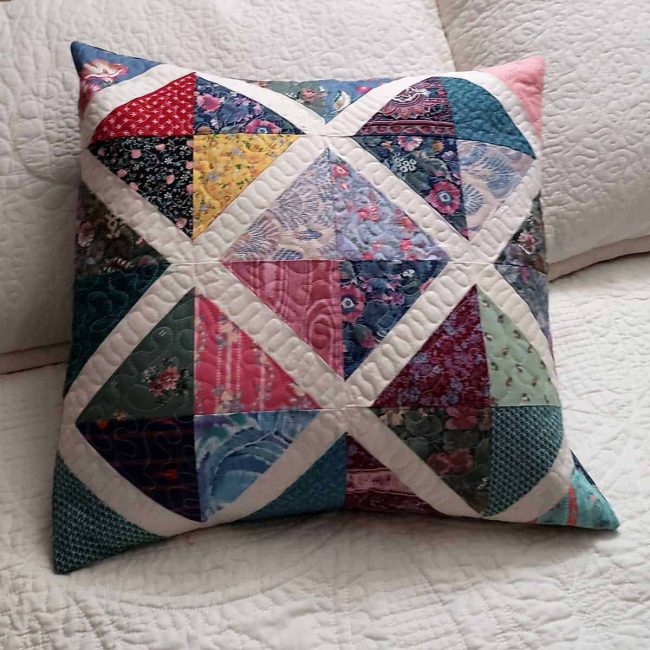
Make 16 blocks for the pillow
Sew 16 blocks together using the photo below to show you how to arrange the blocks.

Small quilt projects are the perfect place to use leftover pieces of batting. I zig-zagged 3 scraps of batting together for my pillow.
I used a neutral color of thread for my quilting. I did a simple free motion quilting on the prints and a little wiggle loop on the muslin.
Pillow backing
I just did a simple envelope-style back and also edge-stitched about a quarter inch in from the edge of the pillow.
- Cut 2 pieces of a neutral fabric – 13″ x 18″.
- On each piece fold one of the 18″ sides under ¼” and press.
- On one piece, fold under another 1″ and topstitch it.
- On the other piece, fold under ¼” again and topstitch.
- Place the 1″ top stitched piece face down on the right side of the pillow top.
- Next place the ¼” top stitched piece face down on top of it.
- Pin the pieces and stitch around the pillow with a ¼” seam allowance.
- Double stitch over the area where the back pieces overlap to make the seams stronger.
Final Step:
Insert your pillow form and enjoy your new pillow! Now think about making the quilt!
Purchase an ad-free PDF of the X Spot Quilt Pillow tutorial.
X Spot Quilt
Here is what a quilt looks like in Electric Quilt 8. I enjoyed using my scraps for this quilt but it would really be fun to make this with a couple of charm packs of bright fun fabrics!

I’m not sure when this quilt will get quilted but at least the pillow is done!

I am really enjoying all of the natural sunlight that comes into our living room and what a view!

Get a ad-free PDF
Purchase an ad-free PDF of the X Spot Quilt Pillow tutorial.

Please note that this post contains affiliate links, which means I’ll earn a small commission if you purchase through my link at no extra cost to you. Please see the full disclosure here. As an Amazon Associate, I earn from qualifying purchases.
Great deals for you!
Looking for great buys on fabric and things? Check out these links
- Connecting Threads
- AccuQuilt Deals
- Fat Quarter Shop Daily Deals
- Green Fairy Quilts – Daily Deals
- Missouri Star Quilt Co – Daily Deals
- Scrapbooking
- The Quilt Keeper
- SewingMachinesPlus
- Electric Quilt
- My Amazon Store for all the quilting things I use and more
Pin this for later

Hi Connie
Just seeing this today- Hope everything is going well in your home. Sounds like your “boys” are all keeping you busy. I Love this pattern and you make it look so easy. I have some fabrics that might just be perfect for this. Thank you so much for sharing it. Hope the pups and Mr Bob will all feel better soon.
This is a very attractive pillow and quilt top. I know you will love having a long arm once you get used to it. I’m a straight line quilter myself and I definitely stick to small quilts and pillows. If it gets any size on it at all, I send it out for quilting. We are sending healing vibes to Builder Bob, Rusty and to Mr Mickey. Connie, you have to take care of yourself as you have all those fellows depending on you! Get well and stay well – all of you!
Thank you for the pillow tutorial. I just found several charm packs and I’m going to try this pattern. Hope that poor Rusty improves along with Mr. Mickey and that your husband finds some relief for his knee.
First, I just want to say that your dedication to Rusty and of course, little Mickey, is admirable and absolutely heart warming. I understand the dedication required to help these poor little critters.
Second, Love this pattern, I did purchase the PDF for my DIL who is new to quilting and is leaning to modern design. The pattern lends itself to her esthetic and design style.
And last but not least, welcome to the land of long-arm quilting. There is a learning curve most certainly, but you can quilt your work so much faster and depending on the type of machine you have chosen, the options are endless. I prefer free hand work and chose not to add computer designs, I have great fun. I wish I had more space though. When I see photo’s of your new “wide open spaces” I dream of ways to expand my current studio. Actually, I was awake at 5 am doing just that. I am hopeless. Thank you for sharing, best wishes for the pups, and poor Bob and his knee. I do understand that one too! Stay happy and healthy and keep us updated on your quilting adventures!
Connie, I was feeling so proud of myself at completing the blocks and getting everything in place to finish my pillow. But, guess what? I had only “8” blocks, not 16! I used an older copy you had for this pillow and you must of seen the error and corrected it to read 16, not 8. Just had to share this with you. I made a quilt similar to this pattern with the strip in the middle and had some charms left over – they worked perfectly. Luckily, I had enough charms left to make the other 8 squares.
I’m into making pillows and small items, so this is another one to sew.
With such easy yet specific instructions and diagrams, this X-Spot pillow will be a beginner’s dream for me to make.
Connie, the racks of your completed projects show an amazing array of quilts and other items.
Best wishes as you move to your new home and studio.
Oh Connie this is just lovely. I have been making crumb quilts from my stash, which I am sure every quilter has plenty of 🙂 and this pattern would be just perfect.
I also have a a couple of charm packs that I have been brain storming of what to make with them… Well ta’dah, as usual you have given me the brilliant ‘light bulb’ inspiration that has sent my brain into overdrive with your X SPOT pattern. THANK YOU for all you wonderful tips, tutorials & quilting inspiration that you so willingly share with us all.
Quilting friends from afar,
Lynda
I was going through drawers and making 2 1/2 strips of everything – my own jelly rolls. Now it looks like I need to make some 5″ squares. One of the ladies from quilting was doing just that at quilt club today. She made piles of 5″, 4″, 3″ and all the scraps go to the rag bag at church where the “precious little pieces” are sent out (somewhere!?!). Quilters! We waste nothing!
Love the “Quilt Room!”
Love seeing the snow! We haven’t gotten any – but I should be quiet about that! Love this pattern! Perfect way to use my “precious” pieces that are just too small and anything – but perfect for this.
How many squares do you need to make the quilt?
It would depend on how big of a quilt you wanted to make. Each square is trimmed to 5-inches so would be 4½-inches finished. For the quilt diagram I showed, it would need 64 blocks.
I really like the X marks the spot the pillow and the quilt top. It will be a great way to use up my fabrics.
Thanks for sharing
Merry Christmas, Miss Connie,
I am happy to hear that both you and your husband are recovering. Oh, my goodness, your house, studio, and first quilt in your new home are beautiful. The view is from your living room is a Christmas card. Thank you for sending all your tips, inspiration, and updates. You are a blessing.
Good Aftenoon Connie:
So glad you and Builder Bob are feeling better. Hope his smell and taste soon return. Nothing like smelling some good home cooked food.
Both your pillow and quilt is lovely. I have always loved scrappy quilts. It is a great way to use up odd sods and left overs. I have make a lot of crumb or mile a minute quilt blocks and hope to get them into a quilt this winter. Maybe make a lap quilt for each of my four sisters. What do you think a good size is for a lap quilt?
Thank you for all your help and inspiration. I do hope and pray you are both able to enjoy Christmas. We will be home for christmas. My family and I have already exchanged gifts at a distance. the presents are under the tree waiting for Christmas morning. It will be a different christmas but at least we are all still healthy. Take care and a Merry Christmas and a great New Year to you and all your family and friends.
This is why I like your blog! The hint about folding the pieces to give even placement is brilliant.
When I saw your previous blog I wanted to make this but with everything that is going on in your life thought it might take you a while to do the tut ( sorry I doubted you). I found a few other instructions for this, tried them out but threw the blocks in disgust because I couldn’t get them to centre properly. I should have waited because you’ve just solved the problem. Thank you.
Thanks so much for this. Super way to use up some of the fabrics that are too precious to pitch and too small to do much with! And you have written such great directions! We are still snowless! Chicago usually has a little cover by now. Take care of yourselves and enjoy the view!
It seems you and Builder Bob work fast even under your current circumstances! I wish you continued healing and great health in the near future.
I love this quilt pattern. It is simple, but makes a great design when all put together. I have several charm squares that can be put to good use with this pattern.
Thank you so much for sharing your knowledge of quilting and patterns!
Claudia
Thank You Connie, I needed a quick project for a gift for a family member in a new house. This is perfect. I think I even have a few blocks already made….where? Glad to see you back to creating!
Greetings! I’m so glad to hear you and BB are on the mend. Your new location is something I long for, maybe one day! But I will be thankful for what I have. Thanks for sharing your projects.
Good to see you back in action, Connie. I love the pillow and the quilt. I have so many scraps and FQs that could be used in something like that. I’ll have to put it on my list for 2021. LOVE the view out your window – snow and all. We had snow here this week, but I hope we don’t get anymore. It’s fun to look at, but not much fun to deal with.
I love the quilt. The pillow goes so nicely. Also I was suitably impressed over the three shelving units you have filled to the brim with all of your quilts and other projects. That is a great idea and you are so prolific and making these projects. I’m glad you and build your Bob are doing better. Don’t overdo. It takes a while to get over the virus and I always find that if you are tired it’s best to sit down for a few minutes and rest. Merry Christmas Connie and thanks for all you do.❤️😎Ellen