
Twirling Windmills Quilt Tutorial
This post may contain affiliate links which won’t change your price but will share a commission.Do you like to make quilts that are designed around just one quilt block? Twirling Windmills is a quilt that you’ll enjoy making with this easy quilt tutorial.
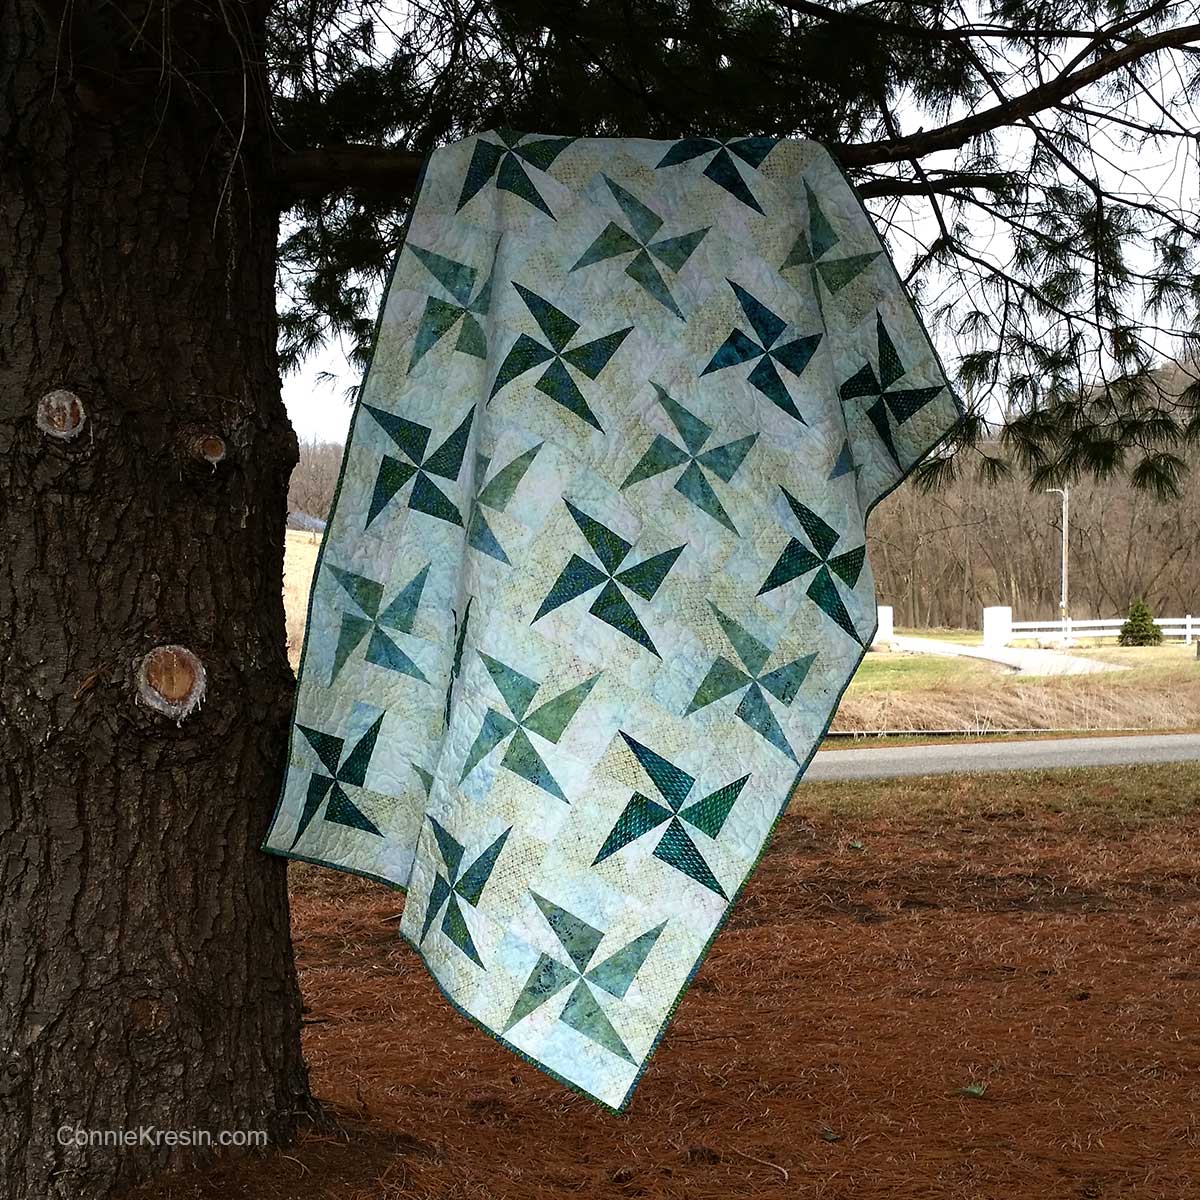

Twirling Windmills has to be one of the easiest and fastest quilts to make when you cut your batik fabrics with a AccuQuilt GO! Electric cutter. This block reminds me of all of the turbo windmills we have here in Iowa.
Use templates instead of AccuQuilt dies
I thought I would share this tutorial and also include directions and a template that you can use if you don’t have the AccuQuilt cutter and die – of course, if you have the dies, it takes no time at all to cut out your quilt!
There are also rulers that are great to use for the half rectangle quilt blocks. Creative Grids Perfect Rectangle ruler features a 2 to 1 ratio to cut proportional half rectangles up to a finished height of 9 inches.
Twirling Windmills Quilt Tutorial
Finished size is 48″ x 72″
I hope you enjoyed this tutorial! This has been converted to an optional PDF that’s optimized for printing.
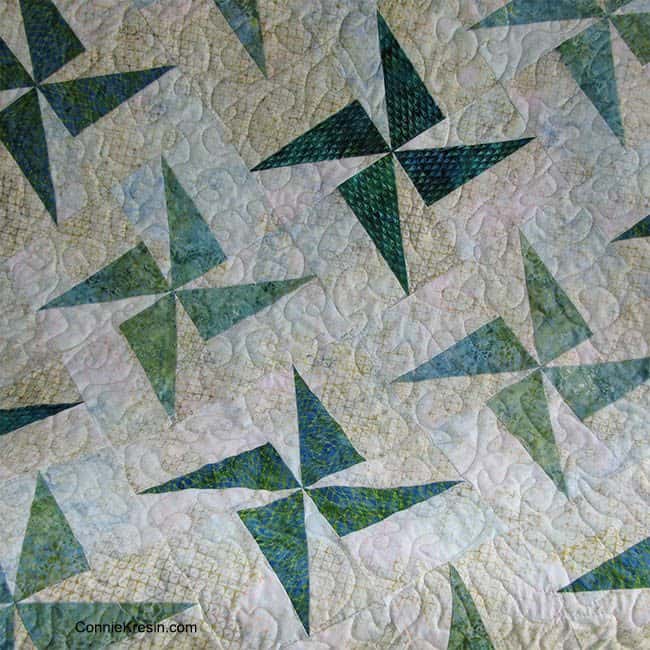
The finished size of the quilt block is 12-inches. It would be very easy to make this quilt larger or smaller.
GO! Fabric Cutter: You can use all of them
GO! Cutting Dies:
- GO! 12″ Qube – die used #55724 3 1/2 inch x 6 1/2 inch rectangle
- GO! #55411 3 1/2 x 6 1/2 Rectangle
- GO! #55017 2 1/2″ Strip Cutter
Fabric:
- 2 5/8 yards light batik for background
- 5/8 yard medium teal batik
- 1 1/8 yard dark teal batik (this includes 1/2 yard for binding)
- 5 yards of backing fabric

Cutting the blocks with the AccuQuilt dies:
- Cut 96 light batik rectangles with the #55724 rectangle die.
- Cut 96 light batik half rectangle triangles with the #55411 – die.
- Cut 48 medium batik half rectangles with the #55411 – die.
- Cut 48 dark batik half rectangles with the #55411 – die.
Directions to cut the blocks without using the AccuQuilt dies:
Please note that you are NOT cutting the rectangles in half – you will use the template provided.
- Cut 96 light batik rectangles – 3 ½” x 6 ½”.
- Cut 96 light batik half-rectangles with the half-rectangle template.
- Cut 48 medium batik half-rectangles with the half-rectangle template.
- Cut 48 dark batik half-rectangles with the half-rectangle template.

I am using batik fabrics from Island Batik, from the Sea Shore collection. The wonderful thing about using batiks is that both sides look the same.
- Sew with a 1/4″ seam allowance.
- Follow the diagram below to help piece your blocks.
- It is so easy to match the pieces with the dog-eared corners.

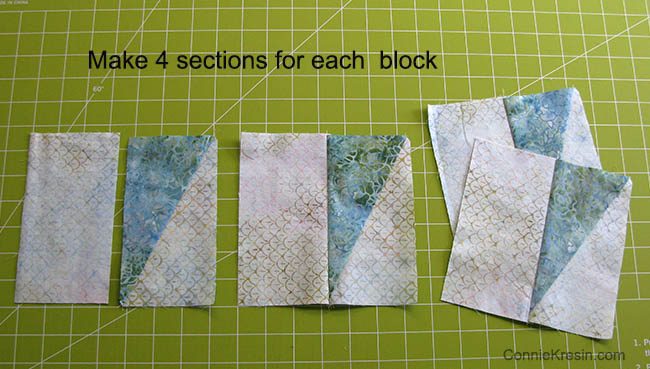
Make 4 sections for each block, press your seams to the light fabric.
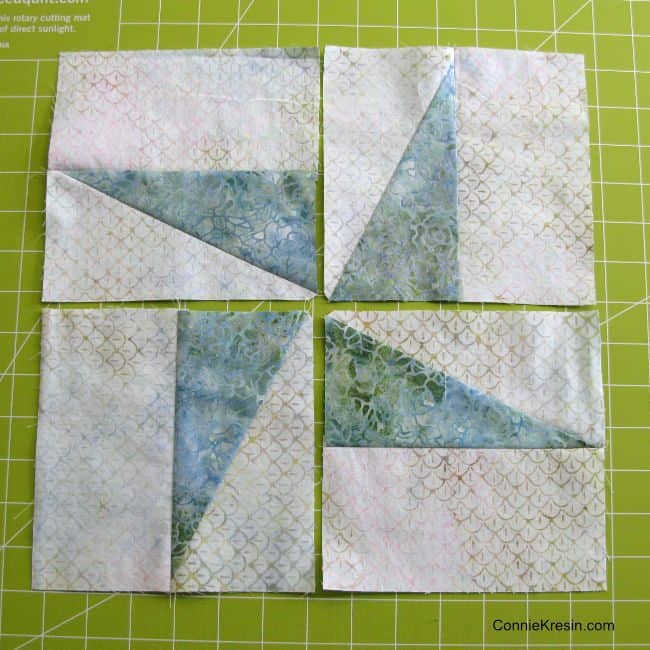
Lay out the 4 sections for each blocks as shown below and then sew together. You have made your first block!
Originally I was going to make a Twirling Windmills crib quilt but I had so much fun making the blocks that I decided to make a larger quilt.
Make 24 Twirling Windmills blocks

- Layout your quilt with 6 rows of 4 blocks alternating the medium teal and dark teal blocks.
- Layer your backing and batting – quilt as desired.

- I did a free motion stipple quilting using Aurifil thread in a medium teal color.
- Cut your binding strips 2 1/2″ using the AccuQuilt GO! #55017 2 1/2″ Strip Cutter die.
- Join the strips, press in half and sew to the front of the quilt.
- Finish your binding by machine using my Add Binding By Machine Tutorial or by hand.
Twirling Windmills Quilt Tutorial
I hope you have enjoyed the fast and easy Twirling Windmills tutorial made with the AccuQuilt GO! Fabric Cutter and GO! dies. If you are looking for more ideas for using the GO! Qube Mix & Match 12 inch Block (55778) and the GO! 12 Inch Companion Set you might enjoy some of my previous quilt tutorials.
- Summer Flower Table Runner Tutorial
- Chinese Forget Me Not Wall Hanging
- Harrison Rose Table Runner Tutorial
- Crystal Table Topper Tutorial
Twirling Windmills by the Sea Shore Quilt Tutorial
I hope you enjoyed this tutorial! This has been converted to an optional PDF that’s optimized for printing.

Here is another quilt that I made using the same block but it was a little smaller. I made this as a baby gift and I think I made it with the 6″ Qube set.

There are also rulers that are great to use for the half rectangle quilt blocks. Creative Grids Perfect Rectangle ruler features a 2 to 1 ratio to cut proportional half rectangles up to a finished height of 9 inches.
Please note that this post contains affiliate links, which means I’ll earn a small commission if you purchase through my link at no extra cost to you. Please see the full disclosure here. As an Amazon Associate, I earn from qualifying purchases.
Great deals for you!
Looking for great buys on fabric and things? Check out these links
- Connecting Threads
- AccuQuilt Deals
- Fat Quarter Shop Daily Deals
- Green Fairy Quilts – Daily Deals
- Missouri Star Quilt Co – Daily Deals
- Scrapbooking
- The Quilt Keeper
- SewingMachinesPlus
- Electric Quilt
- My Amazon Store for all the quilting things I use and more

About Connie
Hi, I’m Connie Kresin Campbell, the quilter, writer, and photographer behind Freemotion By the River. I enjoy inspiring others with my quilt tutorials and patterns. You’ll also see my sweet adopted dogs from time to time.
Be sure and subscribe to my newsletter for more free tutorials and printables.
Beautiful quilt Connie I have to make it
Love it Connie i have this quilt
This is really cute! Thank you for the tutorial and the template! Very appreciated.
Hello , Beautiful flower garden and love the bird feeder and ornaments. Hope you get a lot of enjoyment from bird watching and all the other animals . Thank you for the beautiful quilt tutorial and the template to go along with it . I almost forgot to tell you that i loved your sewing room , It is awesome . You Rusty did a awesome job painting it .
Looks like Iowa! with all the windmills! We tried to get a windmill here, but the law is – “It has to be able to fall down with hitting anything”. Oops, not here – so I’ll make the pretty kind – with all the colors, although the tone one is very nice!!!! Thanks, j
Love what you’ve done with the garden!!!!! Do you make house calls?
Love the garden, can’t wait to see it next year in full bloom! What a lovely view!
I just checked and the link to download the templates works.
Can you lead me to the link for this template? I do not have a die cutter.
Sharon
Connie,
For the Twirling Windmills, I cannot seem to locate the templates if one does not have an AccuQuilt machine. Am i missing something?
You can find the link to the template right under the heading
“Use templates instead of AccuQuilt dies”
Thank you for the tutorial. It makes a beautiful quilt.
Hi Connie, My friend and I are looking forward to making this beautiful quilt. We don’t have the AccuQuilt and will need to use the template you provided. Although the 1″ square is to scale when printed, it would seem the measurement of the rectangle and half rectangle are not. Can you please confirm that when NOT using the AccuQuilt that the cut measurements of the rectangle is 3 1/2″ x 6 1/2″and half rectangle is the 3 1\2″ x 6 1/2″ rectangle cut on the diagonal. We are hoping the start the project this weekend. Thanks so much.
The measurements are correct, if you print the page and check “Print Actual Size” – you’ll have the correct measurements of 3½ x 6½. Good luck!
That can’t be right. If you cut the 3 1/2 x 6 1/2 rectangle in half, there isn’t any seam allowance added in. When assembled, it would be a smaller size and wouldn’t match the rectangle size you’ll need to join it to.
You aren’t cutting the rectangles in half. Please read the directions again, I have included a template that is used to cut the pieces if you don’t have an AccuQuilt cutter and the die.
Love it
Thanks Barbara!
Hello Connie! What a lovely quilt you have created! I especially loved the darker teal fabric you chose, but when used with the other fabrics it all worked to splendidly together and created quite a soothing and inviting quilt to snuggle with. Thank you for your great tutorial. If my friend has these templates, I will get them cut out when I see her next week. If not, it will be awhile but I will make it with the templates. Thank you so much for sharing! Have a great day!
I’m so glad you like it Brenda and I hope your friend has the die. Otherwise have fun cutting with the templates!
Love this block/quilt. I have the bloc loc half rectangle that I could use for this. I might get a different size block but I can adjust the rest easily, thanks girlfriend!
You are so welcome Vicki! I have made this block in other sizes too.
Thank you Connie for providing this great tutorial to make this cute quilt. You are just so generous.
You are so welcome Lu!
Very pretty quilt and pattern. Yes, thank you for sharing it.
Thanks Danice!
Thank You so much for sharing this beautiful Quilt + pattern+tutorial too! Beautiful photo of your project!
Thanks Linda, I’m glad you liked it!
Gorgeous quilt with the softest ocean colors of Island Batik fabrics. I really think I could sew this block. Gorgeous Connie…<3
LOL, I KNOW you could sew this easy block Sherry! Thanks
Beautiful quilt and great tutorial. I think I need to get the GO! #55411 3 1/2 x 6 1/2 Rectangle die.
QuiltShopGal
http://www.quiltshopgal.com
Thanks Darlene, this is one of my favorite and most used dies!
This is a beautiful quilt. Thanks for the tutorial!!
Glad you enjoyed it Ariane!