
Twister Dots Tutorial
This post may contain affiliate links which won’t change your price but will share a commission.
Small wallhangings or table toppers are perfect quilt projects when you want to try a new technique. This Twister Dots tutorial is fun to make!
Lil Twister Dots Tutorial

This is a fast and easy tutorial for a Lil Twister Dots Tutorial project that would be perfect for a table topper, wall hanging or as a pillow. I made this when I took part in the Dots on Dots blog hop with Madame Samm.
I used the 2 1/4 inch square Lil Twister template in this tutorial. There is also a pattern included with this template. I bought my Lil Twister template from my local quilt store.
You can also find a 3 1/2″ Lil Twister template from Primitive Gatherings here that you can use with five inch squares of fabric.
Twister Dots Tutorial
Sew with a ¼” seam allowance.
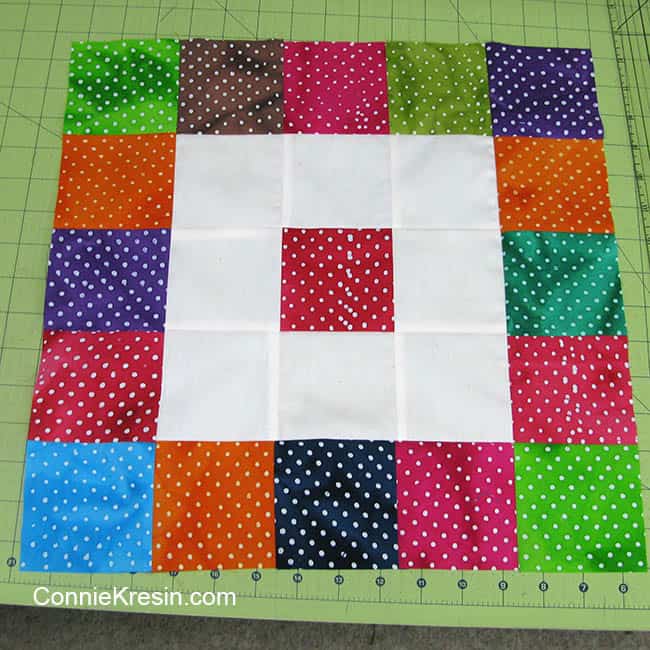
- Cut 17 – 3½ inch squares of your dot fabrics
- Cut 8 – 3½ inch squares of your solid fabric
- Sew your blocks together in 5 rows of 5 as shown below
- Sew all of the rows together
Measure your piece, if your measurements are different than mine, cut your pieces the measurements you come up with.
- Cut 2 pieces of your solid fabric 2¼ inch by 15 – 3/8 inch and sew to the top and bottom
- Cut 2 pieces of your solid fabric 2¼ inch by 18 – 7/8 inch and sew to the 2 sides

Now comes the fun part! We will use the template to cut out our blocks. You can see how I laid the template on the blocks, there are lines on the template that you line up on the seam lines.
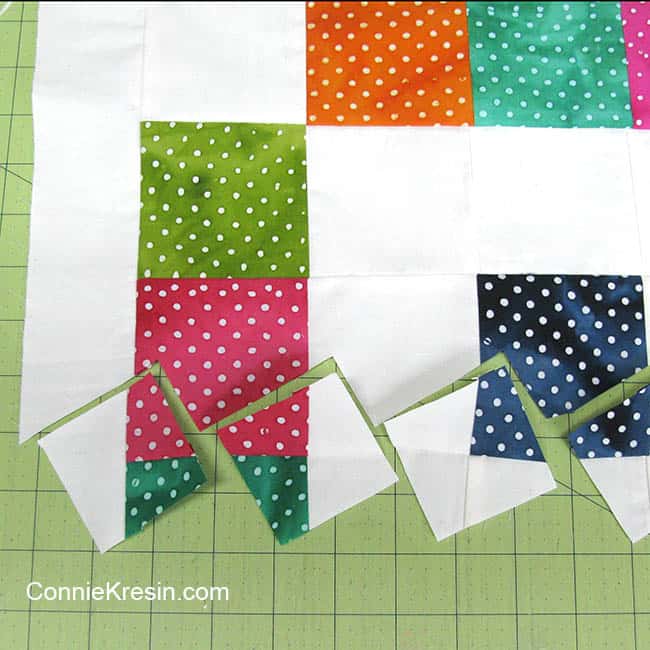
The bottom shows one row of the blocks sewn together…..you’ll end up with a piece quite a bit smaller. I left the scrap pieces so you could see them – I’ll use them for applique on another project.

You will rotate each block to the right – look at the bottom left corner of the green on the cutting mat to see how I moved it.

I usually sew each row as I go, it is fun to see the difference in size. Can you see that the piece is just a little bit bigger than half the original size.

Here is the completed block before I added a border to it.

When I added the border to my block yesterday you might have noticed that the border pieces didn’t match up in the corners….I just made some strips and put them on.
I decided to make another one with borders that fit….and a little different design.
- Cut 13 – 3 1/2 inch squares of your dot fabric
- Cut 12 – 3 1/2 inch squares of your solid fabric
- Sew your blocks together in 5 rows of 5 as shown below

- Cut 2 pieces of your solid fabric 2 1/4 inch by 15 3/8 inch and sew to the top and bottom
- Cut 2 pieces of your solid fabric 2 1/4 inch by 18 7/8 inch and sew to the 2 sides
Sew your rows together for a little different block.

Now we’ll add the border. I had lots of extra 3 1/2 inch squares so I took some and cut off strips that were 1 1/4 inch wide or……
- Cut 28 – 1 1/4 inch by 3 1/2 strips
- Sew 14 strips together along the 3 1/2 inch side – twice
- Now cut each strip in half as shown, each piece will be 1 3/4 inch wide by length of border


- Sew a border to the top and bottom
- Cut 4 – 1 – 3/4″ squares of your solid for the corners
- Sew one of these to each side of the 2 remaining borders
- Sew these borders to the sides of your block

Here is the finished block which is a 13½ inch block. I didn’t get the other one quilted yet.

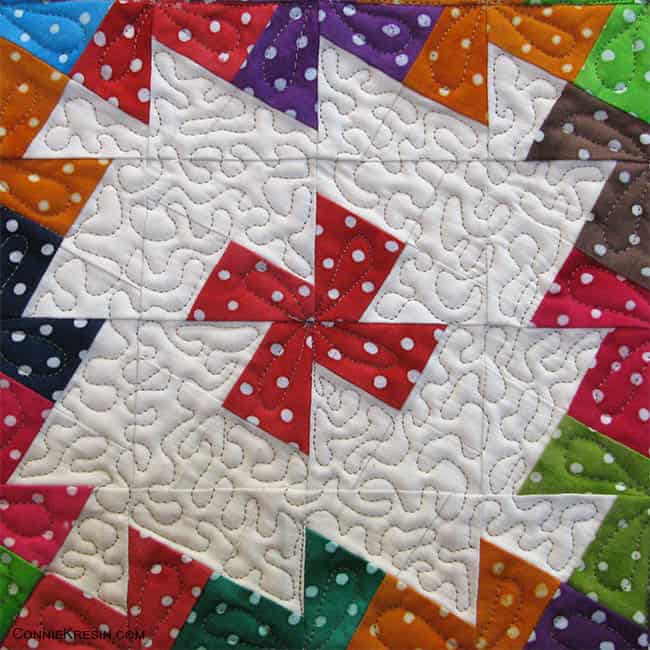
Here is a closeup of the free motion quilting I did on the Lil Twister Dots quilt.
Other posts you might like:
- Scrappy Mug Rugs
- Scrappy Christmas Mug Rug Tutorial
- Selvage Mug Rug
- Happy Galentine’s Day Mug Rug Tutorial and more Fabric Baskets
This post may contain affiliate links. Please see my full disclosure policy for details.


Thank you so much, I love the tutorial on the pin wheel quilt. Love the dots.
I love your web site and all of the pattrens.
Thank you so much for this tutorial! I REALLY appreciate it! I have been a bit confused and yours makes perfect sense! Can't wait to get started!!! :O)
Wow! That is very cool! I love sewing blocks together and then cutting them up to rearrange them. The polka dots are great for this!!
Love this! I'm planning to use this technique to make bed quilts for my boys.
Wow it looks totally awesome!
Awesome
holy schmoly, Connie, you sure do get a lot of quilting done! And your creativity never disappoints!
Great tutorial Connie. I just love these twister quilts.
I love the tutorial. I have done tessellations before but had to make my own templastic template so I have followed your link and ordered the real deal. Funnily enough I have that exact little pack of dotty fat 1/4s.
Cath @ Bits 'n Bobs
Cute! I loved it!
I really like the circular look. Thanks for showing how you did it.
Oh Wow…Connie…now I can't thank you enough…I got myself the tool….and then nothing…I had no idea where to start…now I think I can do this…lol
YOU are a doll to show us how..
WOW! Great tutorial Connie 🙂 I wondered how to get the different shapes to the twisters. Thank you! BTW,
I hadn't noticed that your borders didn't fit in your earlier quilt… until you mentioned it here ;)) But, it still looks beautiful.
I think I'll have to get the mini ruler too.
Thank you so much for the beautiful tutorial!!!
Thanks for the tutorial. I have never paid attention to how a twister is done. It turned out perfectly!
I just quilt two quilts made with that twist. Now I am thinking I may make one of my own. Love the dots thanks for showing us.
Oh Connie, Thank you so much! I know it is a lot of hard work to put together a tutorial.
What a wonderful tute. I now understand how to sew it together on the first run. Love how you changed it up for the 2nd one. Thanks for making it so clear.
Great tutorial! I have one of these in an even small size from the same company. I haven't tried it yet, it is for 2.5" squares.
I just love your blocks!!! They are gorgeous!!!
That turned out soooo cute! Now I have to try one of these twister quilts. The fabrics with dots against the white background were gorgeous!
Great tutorial Connie! Isn't the Lil Twister fun??? I never get tired of seeing the effects of using it on different patterns :*)
Thanks for the tut! Lil twister is time comsuming but it looks terrific. Figuring out where to put the color and white blocks to start is what confuses me.Glad you did the tut to clear up the confusion.
Wow how clever is that!!? I've heard of Lil Twister but had no idea that's how it was done!! Thanks for the tute 🙂 Looks brilliant!
Hahaha! This is why I just enjoy looking at other people's Lil' Twister patterns … whew! 🙂
I love the twister look and you did a wonderful tutorial. I still haven't tried this technique out, but you have inspired me. Thanks for sharing – and I loved your dottie flowers from yesterday, too.
Thank you for the tutorial, it looks so complicated but you did a great job in explaining.
All I can say is….WOW!! Love it.
I have the tiny Twister ruler so I'll have to give it a try after seeing the dots… Thanks for the tute and inspiration!
Thank you, I pinned it!
Thanks for the tutorial Connie if a person changed up the colors it would make a great Christmas wreath 🙂
That is SEW COOL! I have both the little and the big twister tool, and haven't used either one of them! If I ever decide to sew again, I'm ready!
Exellent tutorial!
wow Connie there is a lot of work in this one,and it looks fantastic,well done.xx
You are so clever and it turned out so cute!
Very cute and thianks for the nice tutorial.
Thank you for the tutorial! I LOVE this quilt idea!!!
Wow, just amazing as usual! Thanks!
Lovely tutorial – the smaller rotary really helps with the small templates, too. Thank you for sharing.
I was just talking with a friend yesterday about the twister ruler. the mini one is so cute!
Perfect! The dots are so cute – really fun. Thanks for a great tute.