
Country Placemats and Table Topper Tutorial
This post may contain affiliate links which won’t change your price but will share a commission.Summer time is the perfect time to use colorful placemats outside on your table. Having a deck with plenty of room makes it fun to entertain.
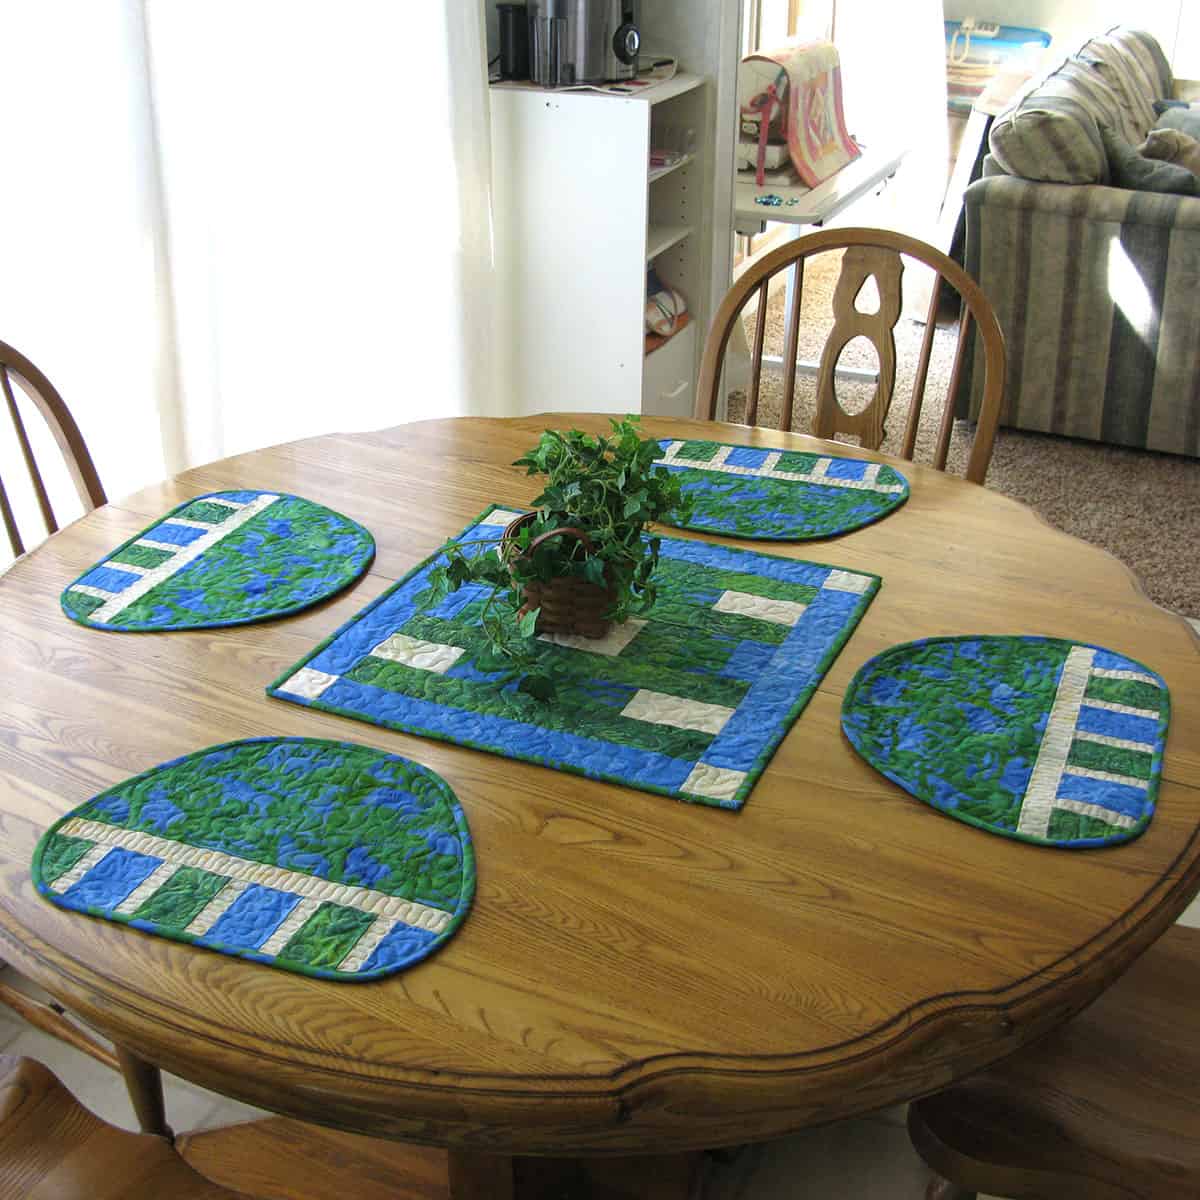
Today I have a tutorial for placemats that look great on a round table.
Summer in the Country Placemats and Table Topper Tutorial
If you don’t have a round table just skip the part using the template.
We use placemats all the time…..don’t these look great out on the deck?

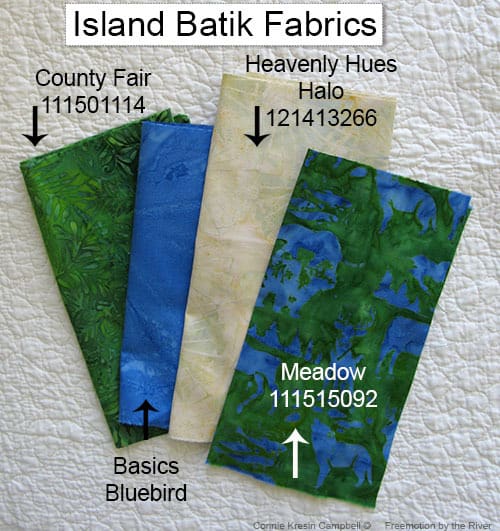
Being an ambassador for Island Batik means getting to work play with new fabrics before they hit the stores.
Fabrics for placemats and table topper:
- ½ yard of dark green batik
- ½ yard of blue batik
- ½ yard of cream batik
- 1½ yard of green print batik
- 1 yard fabric for bindings
- 2 yards Backing fabric
Placemats
Cut the following fabric pieces:
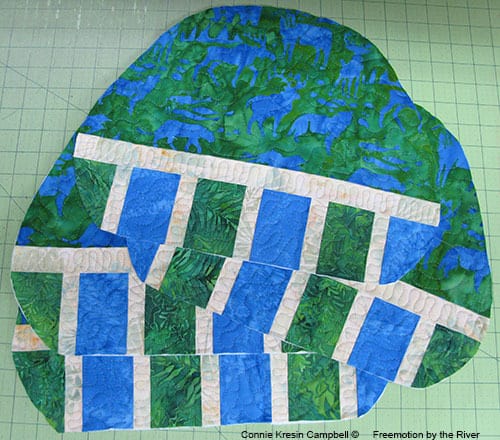
- 6 – 2 1/2” x 7” Green batik
- 6 – 2 1/2” x 7” Blue batik
- 10 – 1 1/8” x 7” Neutral batik
- 4 – 8 1/2” x 16” pieces of the blue/green print batik
Sew the pieces together as shown below with a 1/4” seam allowance. Make two separate sections.

Trim the sections to 4 – 3 1/4” x 16” pieces.

Cut 4 – 1 1/2” x 16” strips of the neutral batik and add to the top of the sections. You can see mine are a little longer than needed.

Cut 4 – 8 1/2” x 16” pieces of the blue/green batik and add to the top of the neutral strip as shown below.

Add your backing and batting and then quilt as desired.
If you would prefer to make rectangle placemats you can now trim the piece and add the binding.

I made a template out of freezer paper and ironed it to each piece. I then cut around it, pulled it off, and repeated it with the rest of the placemats. Download the placemat template which is 15 1/4” wide by 12′ tall.

Because the placemats are curved you will want to use bias binding.
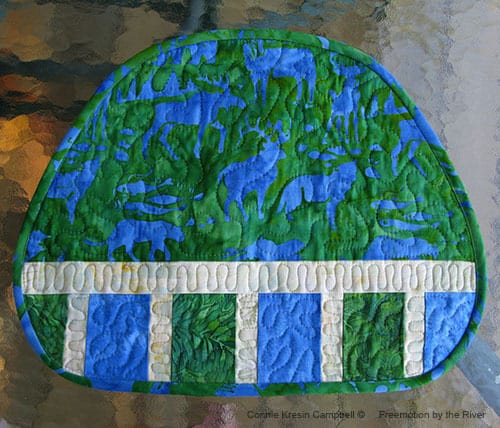
Here is a closer picture of one of the finished placemat.
Cooking is never my strong point but all of the ambassadors were asked to share a recipe. I have been eating tons of salads lately and here is how I make it.
Romaine lettuce, tomatoes, cauliflower, onion, mushroom, and carrots. For a dressing, I mix together 1 tablespoon of olive oil, 1/2 tablespoon of balsamic vinegar, and a little garlic salt and pepper.

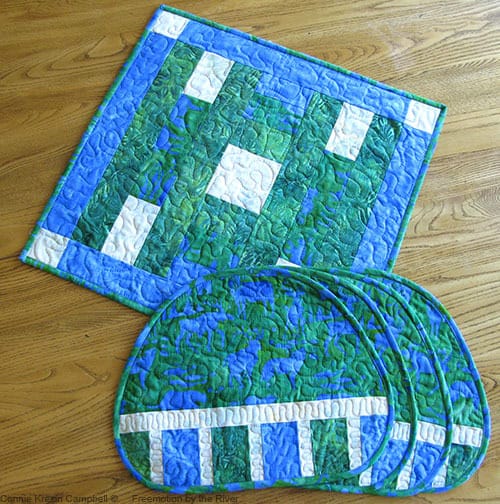
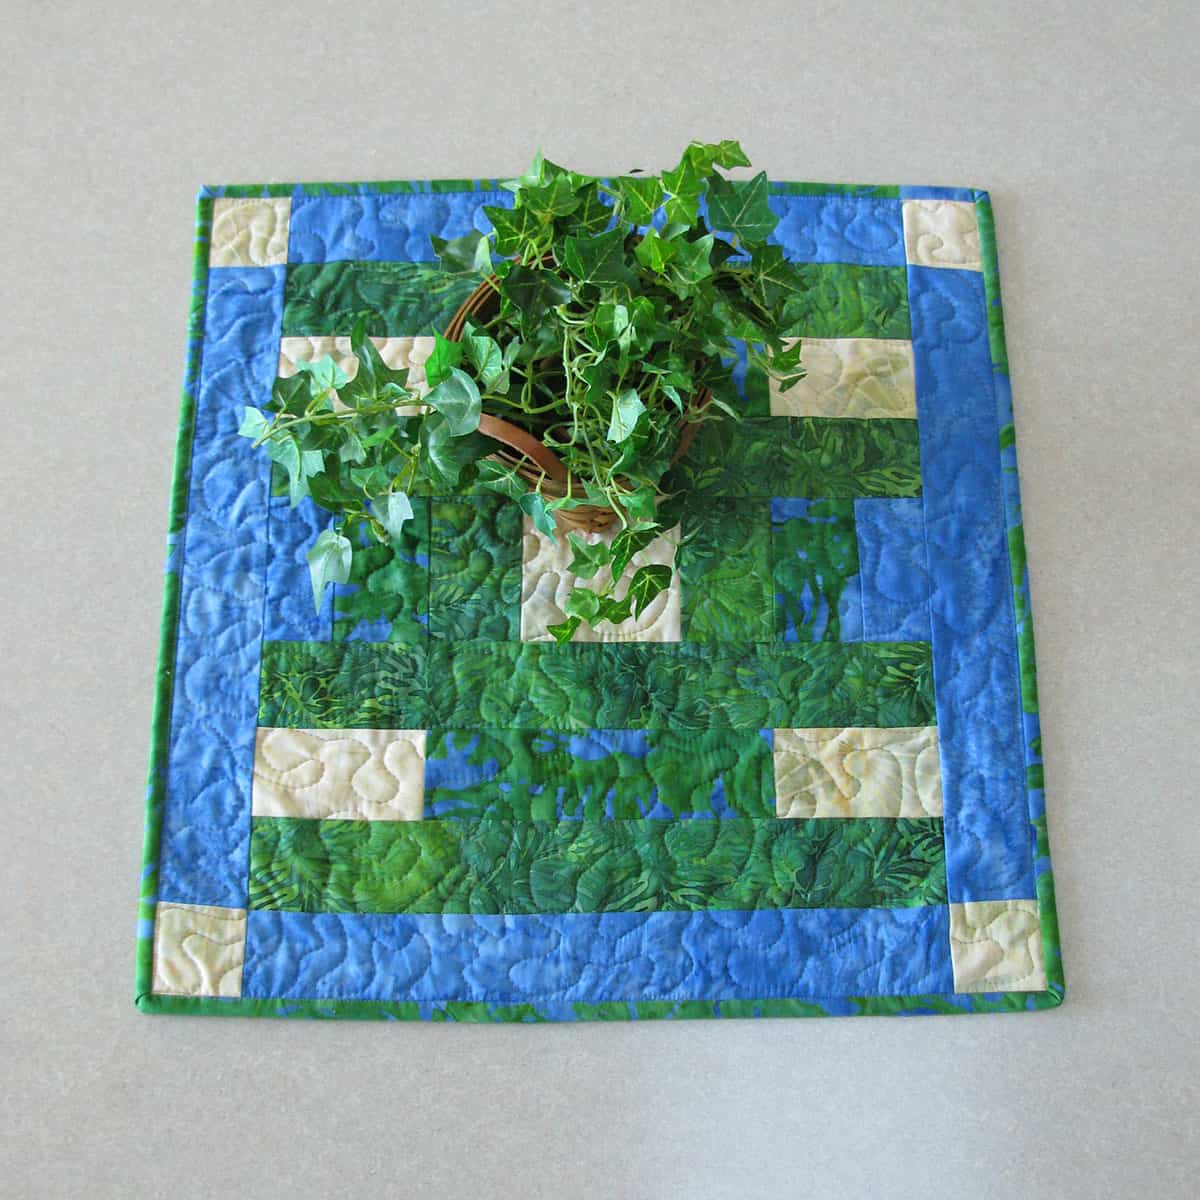
Table Topper 20″ x 20″
I somehow deleted the tutorial for the table topper so I have redone it for you.
Cutting:
- 2 – 2½” x 4½” Green batik
- 4 – 2½” x 16½” Green batik
- 2 – 2½” x 4½” Blue batik
- 4 – 2½” x 16½” Blue batik
- 2 – 2½” x 4½” Blue/Green print batik
- 2 – 2½” x 8½” Blue/Green print batik
- 1 – 4½” squares Neutral batik
- 4 – 2½” squares Neutral batik
- 4 – 2½” x 4½” Neutral batik
Use the following diagrams to sew the pieces together.
Starting at the center, lay out the 4½” square and then add the 2½” x 4½” pieces to each side. Continue adding the rows as shown.
Add your backing and batting and then quilt as desired. Then add your binding.
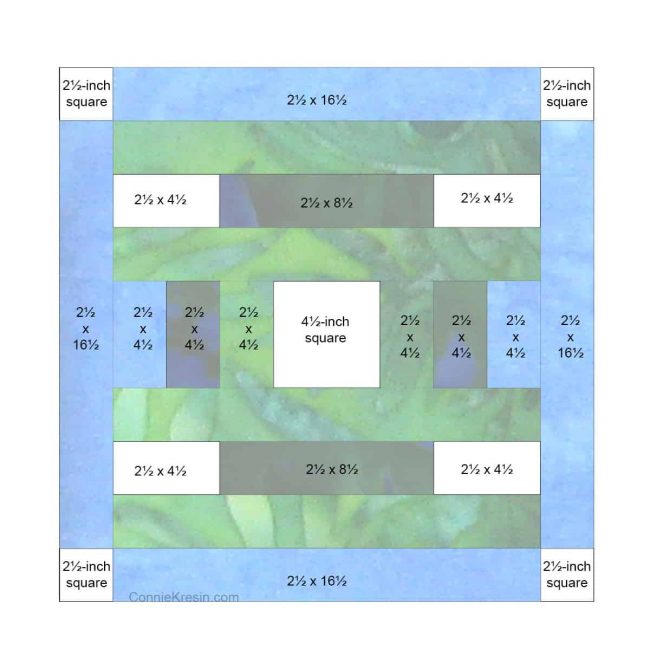
The dark sections above are actually the green/blue print so I marked that on this diagram.

I hope you enjoyed this tutorial! This blog post has been converted to an optional PDF that’s optimized for printing.
Here are some other ideas of colors you could use.

Please note that this post contains affiliate links, which means I’ll earn a small commission if you purchase through my link at no extra cost to you. Please see the full disclosure here. As an Amazon Associate, I earn from qualifying purchases.
Great deals for you!
Looking for great buys on fabric and things? Check out these links
- Connecting Threads
- AccuQuilt Deals
- Fat Quarter Shop Daily Deals
- Green Fairy Quilts – Daily Deals
- Missouri Star Quilt Co – Daily Deals
- Scrapbooking
- The Quilt Keeper
- SewingMachinesPlus
- Electric Quilt
- My Amazon Store for all the quilting things I use and more
Good morning Connie, I hope you and your fur babies are staying warm. I wanted to say how much I love the Country Placemats and Table Topper. I can hardly wait to receive my pdf of the Country Placemats and Table Topper. I have recently changed my kitchen table from a 70 inch round table to a 48 inch round table and have had trouble finding Placemats to fit the table. Thank you for the Country Placemats and Table Topper, I think the Placemats will be perfect and the table topper can be reduced to fit. I enjoy seeing your emails and open them first. Thank you, have a Blessed Day. Rose
I love this set which is great for a round or oval table. I had previously purchased the pattern so just need to get busy making a set of my own. I love the mix of blues and greens. So beautiful.
Connie Dear you know how much I Love these BLUEtiful placemats and table topper. They are perfect for my round table. You are the most generous soul and thank you. Your sharing of patterns and techniques is very welcome. Merry Christmas…
Thanks Connie for providing such lovely designs for your subscribers to use.
I love this table topper and the shape of the placemats. Judging by the comments, many patchworkers have been inspired to make this set.
I have the pattern, I have the fabrics and need to take action.
During 2023, I’d like to make two designs each month and I’ve already entered my choices on the monthly progress charts you’ve provided.
thank you so much…I too have a round table and always looked for a pattern like yours. That is great and love the colors you chose also. hugs
Love that they are rounded at the corners. On my round table with always have the “ears” overlapping. And so wonderfully bright! Thanks!
I’m trying to make these look like a summer trailer. So cute!
Rusty looks AMAZING! (So do the placemats, but he’s so cute with his eyes so perky!!!!) I made these and it was as easy as you said – and they got carried off by my daughter!
First time I saw this pattern on your site. i am glad to have found it! I love them for the fact that not only are they in my actual home Decor color scheme, but that they remind me of the cute little campers that you sometime see going down the road on a summer day :).
Thanks Connie:
Will make a round table mat in blues this year. I have a couple of sets but looking for something a little different. The snowflake table topper is a nice pattern for my table for winter. All your work is such beautiful colours. You do a beautiful job. Keep up the good work and good for you to order some fabric. Hope your granddaughters pick up your talent.
Love green and blue together!
My favorite colors and batiks too. Sew beautiful. PS When I get to the end of the jelly or preserves I use the jar to make dressing. The little leftover fruity goodness adds a little something to the vinaigrette.
What great placemats! They would really perk up our dining table.
Absolutely love the colors, and the shape of the placemats is unique! Love everything about these!
Hi there Connie,
Thanks for the great tutorial! Those placemats are in my favorite, most soothing colors!
Thanks!
Quilty Huggs,
Jacqueline
oh they are so beautiful!
These are sooo pretty!! Would love to have them on my table.
What a wonderful pattern. You did yours in my favorite colors! I am going to try this pattern for some Christmas presents.
I love the place mats and plan to make for our kids for Christmas. Thanks for sharing.
Thanks for the tutorial. I love that blue and green batik with the animals.
beautiful palace mats, love the shape!
Love the unusual shape and how they fit the table so well. The colors are gorgeous.
Those placemats are great! What a wonderful shape!
gorgeous placemats and topper. they are in my favorite colors and i just happen to have a round dining table.
Love the colors…great job!
Great tutorial. I love the freezer paper template idea.
These do look gorgeous especially out on your deck. The outdoor light seams to make the colors even richer.
Loved the fabrics you worked with. Love the photos from your deck
Your placemats and table topper are beautiful. Thank you for sharing and for the giveaway. This set would look great on my round table on my lanai.
I adore these placemats! I always use them when we dine outside on the deck, but rarely do we use them inside. We probably should though! I like how the bright batiks just seem to glow outside on your table. Thanks for the how-to also!
mmmmmm i have some of this fabric but in dark colors i really like your placemat idea ty for sharing
What a great tutorial!
Just wanted to tell you those are great colors!
What beautiful placemats and table topper. They would look great on my table,too.
Love how they turned out great job Connie as always. love your Blog.
Beautifully done Connie.
Great shape on these, and so fun to give away a complete set. Pretty colors, and great salad.
Connie, I love these! They are perfect for the table in my sunroom! Even the color is just right.
I follow your blog and your tutorials are easy to understand.
Thanks for sharing this tutorial . . . I love the shape of these placemats.
Very nice placemats and table topper, they really are bright and cheerful!!
Beautiful placemats and in my favorite colors and Island Batik fabrics. Great Hop…
Love those placemats…my round tables would love fantastic with those babies! Thanks for the chance!
Thanks for the fantastic tutorial. These would look lovely on my round table in my kitchen.
Oh, Connie, they came out beautifully! You make a great ambassador! What a sweet give away. Thanks so much.
I do have a round table these would look great on. Thanks for the chance.
Oh, how I love that northwoods theme. It really spoke to me! Love your tutorial, and the salad sounds delicious!
oh Connie, these are so pretty. I love how you made the top of the placemat round. Ohhh these would be perfect in our kitchen. Thanks so much for a chance. Opps, thanks for the pattern also.
I just love that Meadow fabric with the animals on it! Great way to showcase it.
Oh what a beautiful project! They would fit right into my house and round table! The colors are perfect too! Thanks so much for sharing your tute and for the giveaway! As always another perfect project!
these look great Connie! fun shape and great for a round table for sure….
Oh my gosh!! What a lovely Set!! & my very Fave Colors too!! Would be thrilled to win something made by you! Thanks for the chance!!! 🙂 Your salad sounds Yummy too….we do lots of salads here too…thanks for xsharing recipe…and Tutorial! 🙂
Love those colors! I have a veranda table that is waiting for something new!
Your placemats are gorgeous Connie! I love the colors and shape. And I'm envious of that wonderful deck you have :). Thanks for sharing.
Blues/greens combos are my favorite! Placemat set is lovely.
I love your fabric choices and the great tutorial for you placemats. They look so pretty on your table on the deck. This fabric would match my dining room perfectly.
These are awesome placemats in your gorgeous Batiks. You do gorgeous things with Batiks.Because of you I joined a block of the month using Batiks. I usually do not use them for some unknown reason.
Love the way you have shaped the mats, perfect on a round table
I love your idea for these placemats, that pattern looks perfect for some fabric I've had hanging around for way too long, waiting to become placemats. Now to find some time amidst the big quilt projects.
The fabric choice is gorgeous and your tutorial is very easy to follow. I live making placentas for my table. This may be in my lineup of fun and easy projects. Thank you for your generous creativity.
The fabric choice is gorgeous and your tutorial is very easy to follow. I live making placentas for my table. This may be in my lineup of fun and easy projects. Thank you for your generous creativity.
Great colors…makes that salad look more delicious….:)
Those are really pretty, Connie – especially with those colors by the water. I also like how you rounded them off for a round table.
Love the projects and the batiks. These are my colours. This is my project for quilting this week – need placemats!