
Raw-edge Applique Clamshell Pillow Tutorial
This post may contain affiliate links which won’t change your price but will share a commission.
Have you ever made a quilt using a clamshell template? Most of the time I prefer to make quilts that are fast and easy and curved piecing doesn’t rank in that category.
I received the 4-inch clamshell die from Accuquilt and decided I had to find a “fast and easy” way to make a clamshell quilt project.
Once again I chose to make something small instead of a large quilt. A pillow is something you can always use or give as a gift, pillows are one of my favorite things to make. What do you think of this!

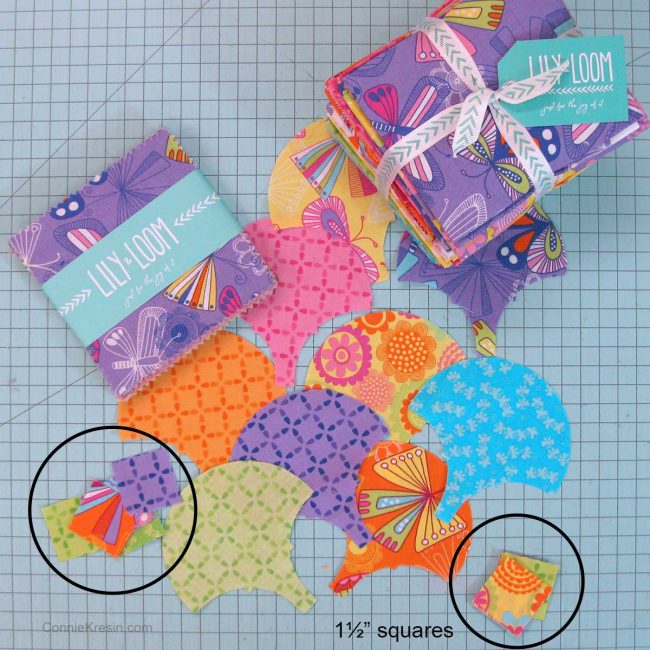
I had a charm square pack and also a fat quarter bundle of a cute fabric group called Lily & Loom from Bluprint. You may not be able to find this exact collection anymore but they always seem to create new collections that are very similar.
Fast and easy raw-edge applique clamshell pillow tutorial!

Clamshell Pillow Tutorial
16″ x 16″
Supplies:
- 1 charm pack – you will use 32 of them
- 1 fat quarter for backing
- 1 fat quarter of muslin
- Batting
- Elmer’s Washable School Glue
- 14″ zipper
- Accuquilt GO! cutter
- Accuquilt GO! #55435 4″ Clamshell die
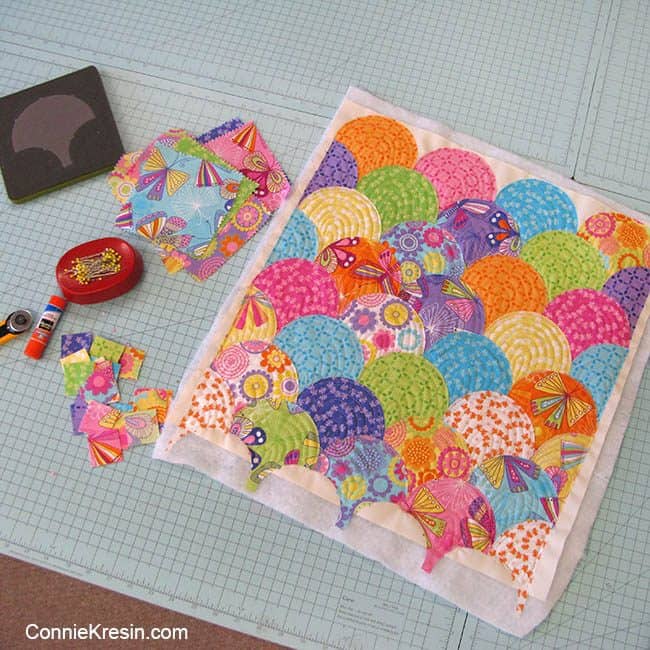
Cutting the shapes
Cut out your clamshell shapes using the AccuQuilt GO! clamshell die.

Can you see in the photo below that I placed the top edge of my 5-inch charm squares close to the top of the die so I would be able to use the scraps.

I was also able to cut out two little 1 ½” squares from each charm square that I’ll use for another project. It is always best to cut up your scraps right away so they will be ready to use.
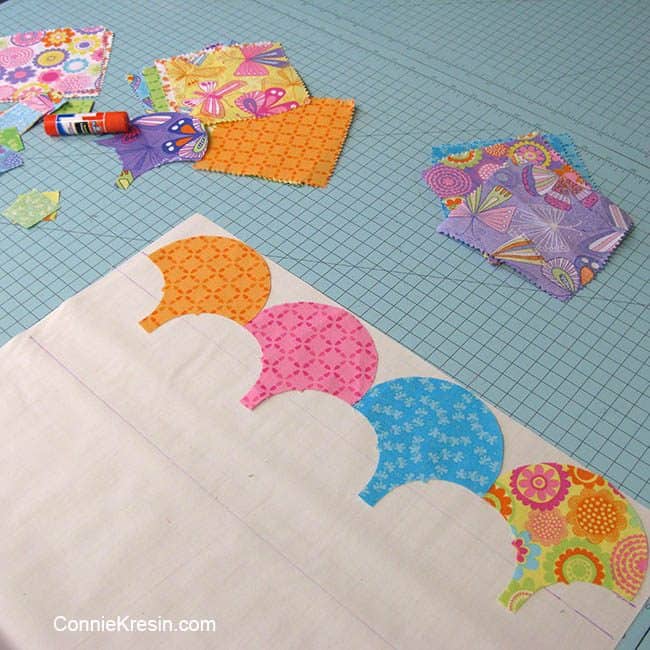
Cut a piece of muslin 17″ x 17″ to use as a backing for your clamshells.
I marked a couple of lines with my FriXon pen just to help me keep my pieces straight, it isn’t necessary, just line up the clamshells so they are touching just a little.
Glue the clamshells
Place one row of clamshells on the muslin backing and then use the Elmer’s Washable Glue to keep them in place. Do one row at a time.
I almost forgot to show how I added the glue to the back of the clamshells. You don’t need much, just enough to hold the clamshell in place until you sew it down.
When the glue dries it is clear, I never have any trouble stitching through it either.

Raw edge applique
There will be very little fraying as the edges of the clamshells are cut on the bias which makes this a perfect raw edge applique project.
Add your batting to the backside of the muslin before stitching down the shapes. I like to do this to add a little dimension to the clamshells.
Pillows are a great way to use up old scrap pieces of batting. I always keep them, trim them to straight edges and then zig-zag the pieces together.
I used Aurifil 50wt #2324 thread, it is a neutral color that blended in very well with the fabrics.
Free-motion quilting
I did simple free-motion quilting on each clamshell. First I stitched close to the edge around the entire applique clamshell and then I just did some lines.
You could do any kind of free-motion quilting on the applique clamshells.
You could just stitch along the top of the shape but I wanted each clamshell to be completely quilted. Notice that I filled the entire shape with quilting, I did this because I want this pillow to be able to be washed repeatedly and not have pieces come loose.

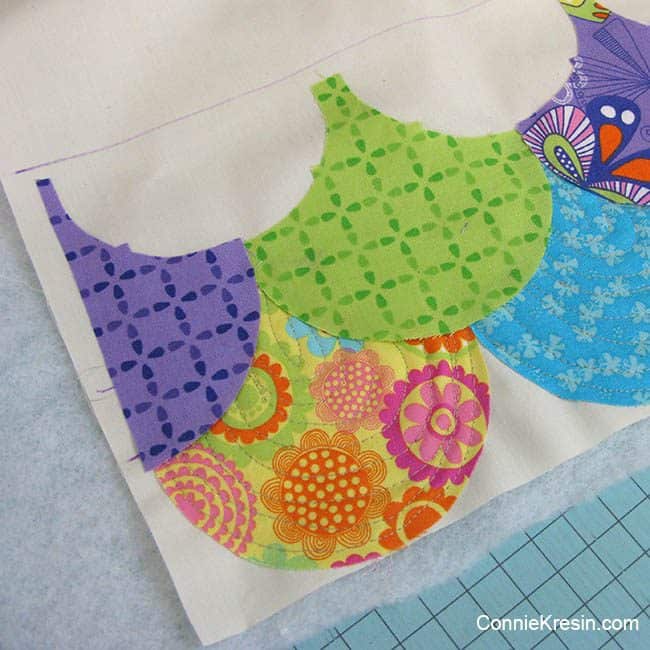
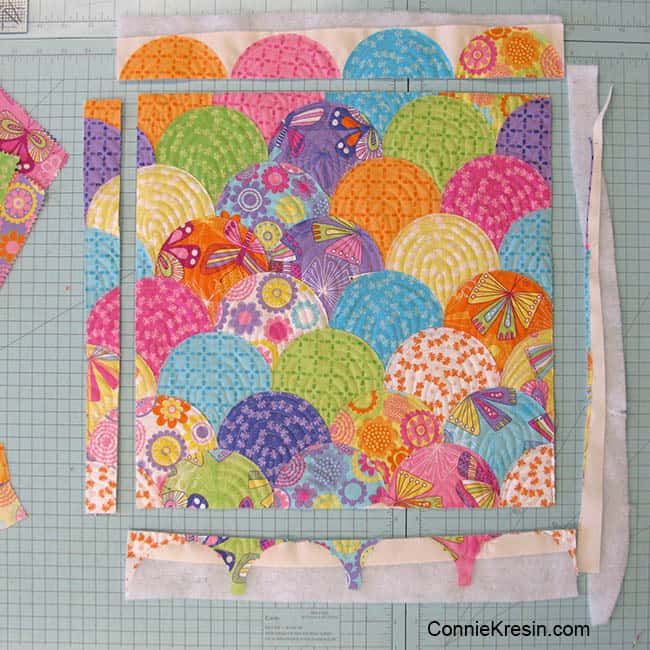
Continue adding rows. I found it easier to complete a row and then glue the next on down. You’ll also want to cut several clamshells in half to use for the sides of every other row.
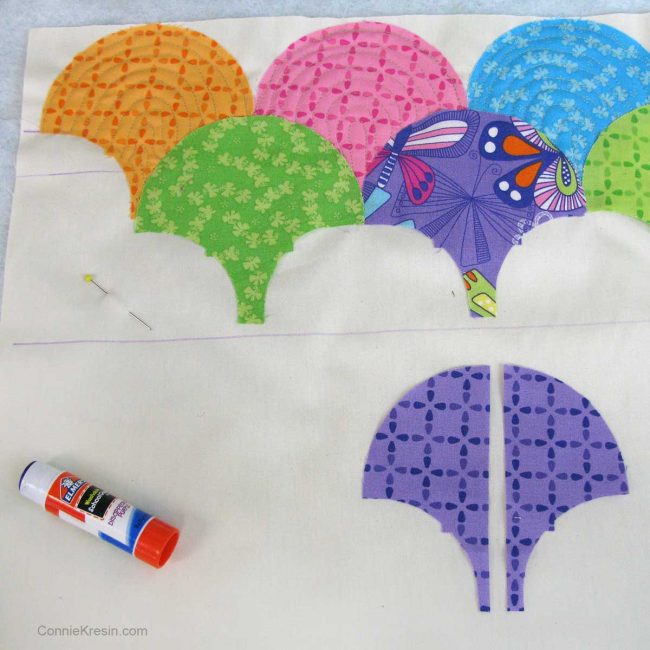
The second row requires a split clamshell for each end. I cut one in half and used both pieces on the same row.
See how the half pieces are used at the end of every other row?

It was easier for me to do my free-motion quilting with my pillow upside down as I did my stitching.
I probably shouldn’t show you this photo, you can see that my lines are kind of wonky……wiggle squiggle quilting and I ran out of the bobbin thread halfway through so I just used a different color…no one will see it.

Continue adding rows to cover the entire muslin piece.
Here is my applique clamshell pillow ready to be trimmed. There are 8 rows of 4 clamshells (every other row has the split clamshell), now it is time to trim the pillow top.
Trim your pillow top
Trim the pillow to 16½” x 16½”, there really isn’t much waste.
For the back of the pillow I used one of the fat quarters in the Lily & Loom collection…..I finally had to open the bundle….guess that means I’ll have to make another quilt project!

Add the pillow back
The plan was to make an overlap backing on the pillow but a fat quarter at 18″ x 22″ wasn’t going to work.
Not enough fabric for the overlap. If I would have had 2 fat quarters of the same fabric I could have.
I dug into my drawer of zippers (doesn’t everyone have a zipper stash) and found a perfect color match.

Zipper
I forgot to take pictures but here is how I added the zipper.
Basically, I add a zipper by cutting the fabric in half, sewing it back together with a 1/2′ seam and doing a basting stitch the length of the zipper. Be sure and stitch a tight seam for the rest of the seam. I then press the seam allowance open and lay the zipper right side down on it. Pin and then stitch. When I’m done I remove the basting stitches.

Finishing
Place the right sides together. Stitch around the pillow with a 1/4″ seam and turn your pillow right side out.
Make sure you open your zipper before sewing the back to the front of the pillow…..trust me…..you don’t want to forget this step.
I have mentioned many times that I’m not a perfectionist, I love cutting, stitching, quilting…..everything about quilting and I usually can’t wait to get to the next quilt project.
Many times there may be a small mistake and I don’t fret about it. Can you see the mistake in the pillow? I could have gone back and fixed it but I didn’t. Now if this were going to a quilt show, quilt market or if I was selling it…..I would have fixed it.

The top blue clamshell has a little pleat in it.

This is a pillow to be loved and washed over and over so I don’t think the little oops will matter to my granddaughters.

I hope you have enjoyed this fast and easy Raw-edge Applique Clamshell Pillow Tutorial if you make a pillow I would love to see it!
This is pretty much the same tutorial that I shared when I made the Avalon Clamshell pillow tutorial, you might want to take a quick peek at it. Different fabrics give a completely different look.
Use a template instead
If you don’t have an Accuquilt cutter you could always use a template to cut your clamshells, it will just take a little longer. There are several different sizes available and here is a 4¼” clamshell template.
Accuquilt also makes an 8″ clamshell die that would be fun if you wanted to make a larger project this way.
- Accuquilt GO! cutter
- Accuquilt GO! #55435 4″ Clamshell die
If you enjoy Accuquilt projects, I have an entire category of quilt tutorials that you should check out!
Subscribe (free!) to my newsletter and get access to my resource library. Once subscribed, I will send you newsletters several times a week.
Great deals for you!
Looking for great buys on fabric and things? Check out these links
- Connecting Threads
- AccuQuilt Deals
- Fat Quarter Shop Daily Deals
- Green Fairy Quilts – Daily Deals
- Missouri Star Quilt Co – Daily Deals
- Scrapbooking
- The Quilt Keeper
- SewingMachinesPlus
- Electric Quilt
- My Amazon Store for all the quilting things I use and more


About Connie
Hi, I’m Connie Kresin Campbell, the quilter, writer, and photographer behind Freemotion By the River. I enjoy inspiring others with my quilt tutorials and patterns. You’ll also see my sweet adopted dogs from time to time.
Be sure and subscribe to my newsletter for more free tutorials and printables.
Great little tutorial Connie — thank you so much for the raw edge clam shell AND the Zipper Tute…. I’d love to make this !!
First things first: I LOVE, LOVE, LOVE the colors of the fabric! They’re so…HAPPY!
I can’t wait to try this! I have some (about two hundred!) precut circles that were given to me by a friend whose mom died. They’ve been sitting in a bin for several years, so now I know what to do with them! Thank you so much for all your generous tutelage and for being so positive about encouraging people to try something new. You are much appreciated by me!
Maureen
I just love the clam shell pillow, Connie. Your tutorial is wonderful; thank you for that. And your quilting is just what I need to try–FM is a challenge for me, but I just might be able to conquer fears trying this project. Thanks a bunch!
Great tutorial, Connie! I have always wanted to make something with clamshells, and you have inspired me. I use my 1.5″ squares for leaders and enders and make small projects with them. I’m making your falling charms for a baby quilt and mini falling charms for a changing pad. We became great grand parents this week!
I can’t believe the timing of this post! I was ready to donate all of my cut circles of fabric! LOL I had been working at turning them into YoYo’s, one circle at a time and decided I was never going to make a Yo-Yo quilt top, so added them to the fabrics I was going to donate. Going to go retrieve them post haste! THANK YOU!
Thanks for the pattern and the ideas. School Glue is the best invention ever! I have one in every drawer along side my Stain Stick! They even have one now “Scotch” Wrinkle-Free Glue Sticks 2/Pkg-.27oz” that won’t mess up paper. Thanks for sharing this again, I missed it before and have a wonderful dinner. It sounds yummy!
Hi Connie! Love your quick patterns. I love to quilt easy table runners and pillows. Anything that takes a long time is not for me.
I love this pillow, it is so charming and pretty. I am going to give raw edge appliqué a try.
Thank you for sharing this pattern.
Doreen
Such a cute pillow!!
That Clam Shell pillow is so cheerful with your fabric selection! Thanks for sharing your method, what a fun project!
Connie your JOY of sewing and making projects absolutely shines through in your blog posts. This pillow is super fun and perfect for your Grands. Thank you for sharing your tutorial…and I very much appreciate your acceptance of non-perfection. Bless You Dear…XO
Another fantastic tutorial and a beautiful pillow! Great job, Connie!
-Soma
I love it! I would have never thought to applique. Thank you for a neat idea! I’d be trying to piece by hand. Of course, I don’t have the Go, but I’d make a template now. Your fabrics are beautiful!
First time I have seen claim shells that I really liked. This pillow is so darling. Thanks Connie. You opened my eyes this time.
Really like the colors in your pillow. I ordered my charm pack (actually 3 charm packs). Now I have to order the clam shell GO die. My 11 year old grand daughter will be visiting on spring break, so I am going to see if she would like to help with this pillow. If she likes it, I will let her take it home. Thanks so much for all your generosity with sharing your tutorials. I appreciate it very much.
Hello Connie; Using both the Clam Shells and the Lily Loom fabrics sure was a perfect choice! Plus, you did another marvelous tutorial! I am not familiar with the zipper basting, but have a friend who I swear was born with a sewing machine and fabric! LOL. She honestly is an excellent seamstress and quilter who will show me how to do this method. I avoid zippers as often as I can. LOL. Yet your pillow tutorial has me in the mood to pull out some spring fabric, the clam shell die and a zipper! We shall see what the week…..end brings! Thank you again, Connie and have a great day!
I love this pillow! The fabrics are fun and the technique is simple – perfect.
I love this pillow – so cute in these fabrics!
Beautiful project Connie. Love Elmer’s school glue for quilting, thankfully it is becoming more easily obtained here in Australia now. And thanks for the basting reminder about the zip. I was taught that method in school Home Ec and I’d completely forgotten. I always do envelope covers, but I’d like to have the confidence to add in a zip occasionally too. Pinned.
Love the fabrics and pillow, Connie! Thanks for sharing!
Such an adorable pillow! Great job, Connie!
I love that fabric!
What a fun project to use up some pretty charms or scraps, Connie! I’d love to make a few of these to perk up my porch chairs for summer. I’m adding it to my list…..!
Great job on the pillow Connie. I’m not a fan of such lively fabrics but I wouldn’t turn that pillow down, it looks great.