
Quilt Block Hidden Wells Tutorial
This post may contain affiliate links which won’t change your price but will share a commission.
Are you in the mood to experiment with a neat quilt block? I have a quilt block tutorial that I think you will like!
One of my all-time favorite quilt blocks is the Hidden Wells block that can be made in many different sizes or colors for a completely different look.
Get a free PDF of this tutorial, keep reading

This is a technique that was developed by Mary Ellen Hopkins in 1989 for her Hidden Wells quilt.
This may date me but I remember when her book came out and I bought it from my favorite quilt shop. I can’t remember if this was done with rotary cutting or not. Yes, I remember cutting out blocks using scissors!
I couldn’t wait to make a Hidden Wells quilt and knowing me, I probably made several and lots of blocks. You see this technique quite often now.
Please note that the finished blocks will have bias edges and be very stretchy. Handle your blocks carefully, you can also starch your fabric to help with this.
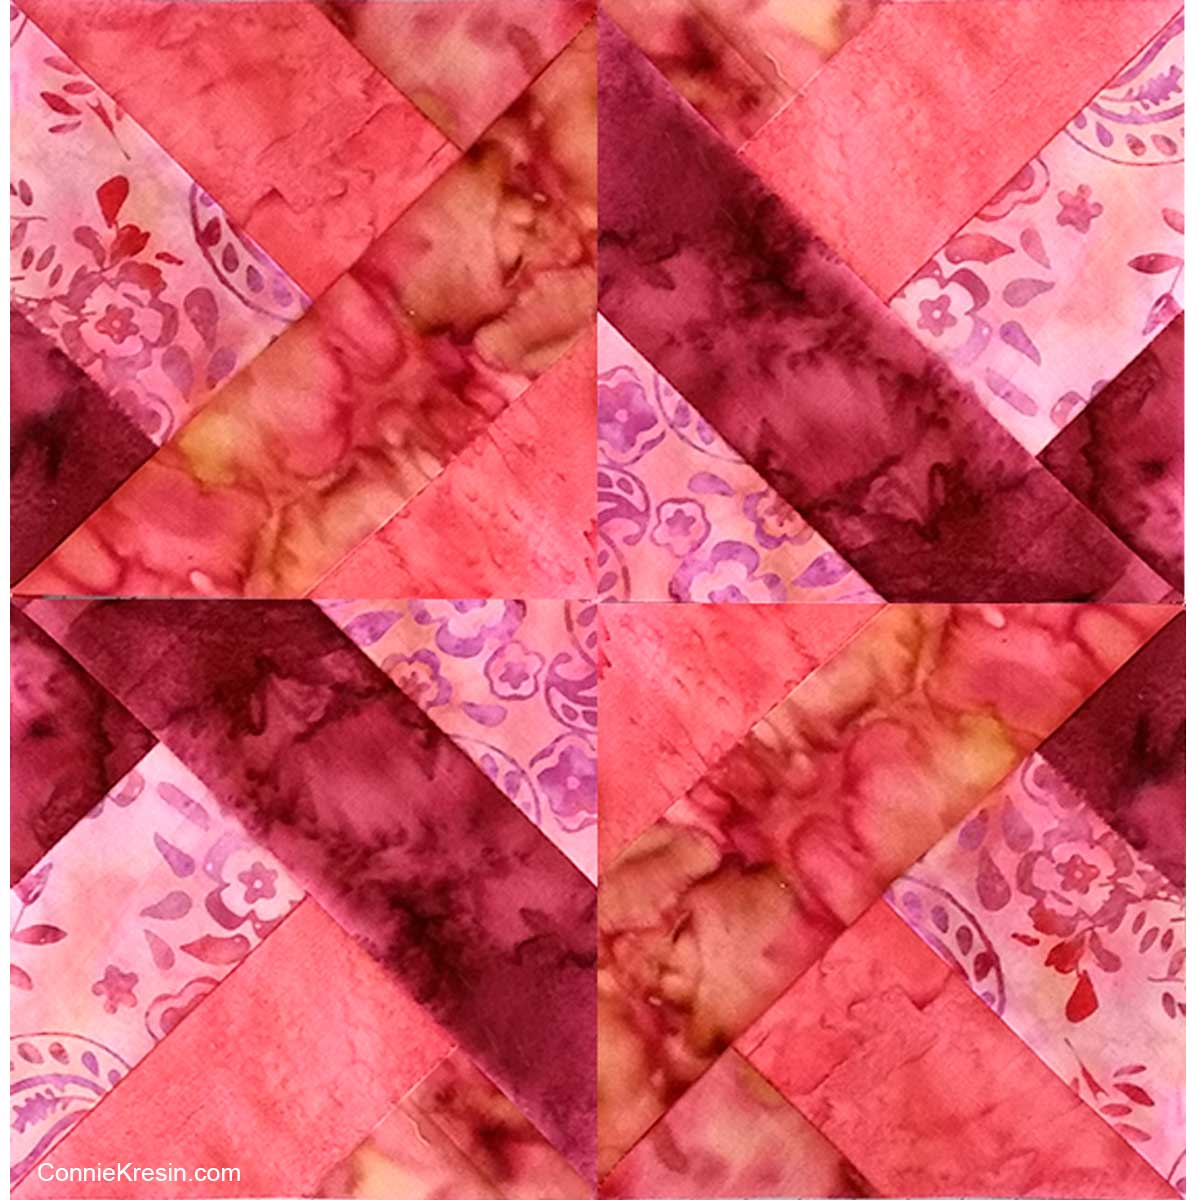
Hidden Wells quilt block tutorial
It can be done with a different number of strips in different or equal widths. The sizes of the strips can be the same or different depending on the look you want. Trust me, you can really get hooked on making the Hidden Wells block!
I happened to have some fat quarters of batiks in my stash, (imagine that) and picked four fabrics that I thought looked good together for this tutorial.
You will need 4 different fat quarter fabrics:
Fat quarters are generally 18-inches x 22-inches. Using coordinating fabrics makes it easy to design blocks and a quilt.
Step One:
- From each fabric – Cut (1) strip 2½-inch by 18-inches

- Sew the four strips together with a ¼” seam allowance and press toward the darkest fabric
- Measure the width of this strip – it should measure 8½-inches
- Subcut the piece into two 8½-inch x 8½-inch squares.

Step Two:
- Place one block right side up with the strips going up and down
- Place the second block right side down on top with the strips going left to right as shown

Step Three:
- Pin the blocks together
- Sew a ¼” seam around all four sides

Step Four:
- Use a ruler and your rotary cutter – cut diagonally from one corner to the other
- Repeat this on the opposite diagonal corner as shown below

Step Five:
- Open your pieces and carefully press so you don’t stretch the block
- The blocks should measure approximately 5½-inches x 5½-inches – square up if needed
Step Six:
- Arrange the blocks until you find a design you like and then sew them together with a ¼” seam allowance.
- Your block should measure about 10½ inches


Hidden Wells Quilt Block
You will be able to make more Hidden Wells quilt blocks using the four fat quarters. You could try arranging your fabrics in a different order for a completely different-looking quilt block.
I hope you have enjoyed this fast and easy quilt block tutorial. Would you like to see more ideas using this block in different sizes?
Here are a couple of quilt projects I have made using a quilt block like this:

Would you like to see what this block would look like in different color? I just recolored the block from above to get the variations. You could also use two light and two dark colors.
I would love to see what your blocks look like!

Through the magic of Photoshop, I can show you want a quilt would look like.

Great deals for you!
Looking for great buys on fabric and things? Check out these links
- Connecting Threads
- AccuQuilt Deals
- Fat Quarter Shop Daily Deals
- Green Fairy Quilts – Daily Deals
- Missouri Star Quilt Co – Daily Deals
- Scrapbooking
- The Quilt Keeper
- SewingMachinesPlus
- Electric Quilt
- My Amazon Store for all the quilting things I use and more

About Connie
Hi, I’m Connie Kresin Campbell, the quilter, writer, and photographer behind Freemotion By the River. I enjoy inspiring others with my quilt tutorials and patterns. You’ll also see my sweet adopted dogs from time to time.
Be sure and subscribe to my newsletter for more free tutorials and printables.
Your tutorials are fantastic. Instructions plus the pictures are easy to follow.
Have you used a jelly roll for these blocks? So pretty, I need to try this block.
This is great!!! I think I’ll be using this technique with my batiks. I’ve been trying to come up with something unique to use up some of my fabrics! Thank you so much for a great tutorial.
I am thinking of making this block into a quilt using a jelly roll in varying shades of blue. There are 20 different fabrics in the jelly roll ranging from dark to light blue so there would be several different block color combinations. Would this work well with this block?
Hi Connie. Love your Hidden Wells block and want to make it in green for my granson.
I am a fairly new quliter and need the amount of fabric for a double queen quilt. Please advise . Thanks Karen ..
Hello Karen- Were you able to get the fabric amounts needed for your quilt?
I want to make a throw and also a queen size. If you know the yardage, I would appreciate your suggestions. Thank you. Elaine in Illinois
Hi Connie and family,
Hope you all had a wonderful Christmas and will be Blessed in the New Year. Like you I’ve moved way too many times- but this New Year I have decided will be my try new skills yr. I love this easy to “make it my own” design. I too thought of red white and blue for a quilt of valor donation. I’ve been waiting on a handyman to build my shelves but I may just have to make the best of it from bins. I don’t want to be up till 4:30 am Christmas finishing up lol. So I am making a plan….Thanks for the ideas and give Mr Micky and Rusty a hug for me.
Je viens de découvrir votre site et je vais sûrement y revenir. Très intéressant et les explications et tutoriels sont clairement expliqués. Merci de nous partager vos connaissances.
I just stumbled across your pattern for Hidden Wells quilt block. I’m can’t wait to try it. Beautiful pattern!!
Connie, you have explained this quilt block better than any one I’ve seen yet ! You make it so simple. I’ve looked and looked at this
block on different sites and just didn’t get it. You made it so easy !!
Thank you SO MUCH! Emilie in NC
Thank you, Connie, for presenting all your tutorials on your quilt patterns. Exactly my favourite kind of patterns: nice & easy – & quick to finish!!! I have not yet, to date, posted a picture as Iˋm currently preoccupied with other matters not related to sewing or quilting. As soon as Iˋm done with these obligations, I will post some pictures. Please pat your fur-babies for me!!!
Best wishes,
Margaret
Thank you. I really enjoy your website, and all the tutorials. Love this one especially. I want to make a “beachy” quilt using tones of sand and
tones of water. One sand color is shells. Should I save the shells for the border?? Do you think this would work using this Weld design?
I would think that would work beautifully Debbie.
I made this Hidden Wells quilt in 2003 and just posted it on FB. I have a pic of my late husband with Mary Ellen Hopkins however it was probably taken before cell phone cameras. I may search for it and post on FB.
It is a beautiful quilt. Made with purple and green batiks.
I’m a quilt top sewing newbie. Really like this pattern & plan on using it soon. My question – if utilizing a jelly roll what would be approximate finished size? Thanks
Hi Connie, I am new to your site and I just want to say Thank you so very much for sharing your tutorial. You are a very good Instructor and your examples are easy to follow. I also love your choices of colors, they are vibrant and cheerful. Thanks again and have a great day.
What size strips would I need to make a 12 1/2 inch block?
3 1/2 inch strips Beverly
Thanks…that is what I thought, but it has been a long time.
After sewing the 3 1/2” strips together, do the squares need to be cut larger than 8 1/2”?
The four strips are 2 1/2 inches each and your piece will measure 8 1/2 inches so you can cut squares. Just make sure the blocks are square.
Hi Vicki, sorry didn’t realize you were asking about the 12 1/2 inch block. Yes, your squares will be cut 12 1/2 inches.
I love the block but am frustrated at how the seams butt up against each other. For the most part all of the seam allowances are going in the same direction. How did you deal with this?
I just sew the seam carefully and slowly. It will work.
Stumbled across your website. What a great idea for making quilts in all sizes for charity.. For a change so different from the usual “just blocks”. It goes quick and takes care of all your strips leftovers.
Thank you Heidi.
Thank you for posting this block with instructions. I just made it and plan to make many more. How did you quilt it? I’m using the blocks to make a table runner. Thx again!!
Thanks Connie. I am a very newbie to quilting. I think your tutorial is even easy enough for me to try. I love the colours you’ve used. They look so good. Thank you so much
Hi Connie – LOVE this block and can’t wait to try it – I want to make my brother and sister in law a large throw – but not sure how much fabric I would need to accomplish this. I I do 4 different colors and can you tell about how much I would need of each color ? I am pretty new to quilting so not so good a calculating what I need and sometimes ending up short and the fabric goes out of stock or unavailable anywhere
Hi Julia, if you used 42″ wide fabric you could make 4 blocks using four 2½” of the different fabrics. Just figure out how many blocks you need. 1 yard of each should make a nice size quilt.
This is a really nice technique and I’m sure it would look good in many different fabrics.
I love the way this block came out. The color’s are amazing. I think these color’s would make a beautiful Valentine’s Day quilt. So glad I stumbled across you.
Thank you
Brenda
Hi Brenda, yes it would be perfect for Valentine’s day, if you make something please share it with me!
Thank you for the tutorial I am a newbie so I am very grateful..😀
Thank you for the tutorial. I am thinking of using this pattern for a baby quilt for our first great grandchild. She is arriving in April. Our family is quite excited. We haven’t had a new baby in our family since her Mother was born 27 years ago.
Thank you for tutorial. Have a great new year.
That is a great block that looks like so much fun to make.
WOW!! This block is really cool and the colors of Island Batik fabrics you have used is stunning. One of these days I just must try making a block from your excellent tutorials. Thank You Dear…
Thanks for the tutorial.
Love the colors (my favorite) and the block is cool! Thanks for sharing! 🙂
It is always good to be reminded of these fun techniques. I remember when I first learned this (and it was a very long time ago, too). Thanks for the reminder of something fun and quick to do!
Thank you for sharing your tutorial. I’m a beginner quilter and your step by step instructions are easy to understand.
What a neat block, I see a table runner!!
Gorgeous blockand so many variations to set them up for a quilt. Thanks for the tutorial.
I made that years ago and it was so fun and quite impressive. Like you, I bought several of her books and loved her designs. The batiks are such a great idea for this design with so many bias edges. The colors you chose are gorgeous too.
Connie,
Love your colors! This is a fun quilt.
Hello Connie, I am looking forward to creating all sorts of Christmas projects through out the remainder of this year and next year. This block instantly made me think of Red, White and Blue though. Ha, Ha, Ha….So, I may have to pull out some fabrics today and play with your block tutorial because I do want to create a special quilt for one of my Uncles who served in Vietnam. Plus, I have not had the opportunity to use my AccuQuilt machine in quite some time. Connie, you are such an amazing designer who comes up with so many ways to share your creations! I am proud to be able to call you a blogger friend, I sure wish that we will be able to meet in person some day! Thank you for sharing another amazing block pattern and tutorial with us! I hope that you have a fabulous day!
That is stunning! Thank you for sharing the tutorial.
You are so welcome Carla!
I have 3 jelly rolls in varying shades of blue (20 different fabrics from dark to light) that I would like to use for this block. Do you think this would work out well for this block.
I used this pattern to create a quilt for my SIL way back in 2010, after a family vacation to Hawaii. She loved her batik brights quilt that reminded her of all the pictures her daughter took of the beautiful flowers in Hawaii.
I bet that was beautiful Susan!