
Morning Glory Quilt Block tutorial
This post may contain affiliate links which won’t change your price but will share a commission.
Looking for a fun quilt project? How about making some easy Morning Glory quilt blocks with this easy tutorial.
Get out your scraps for this block! I like using batiks and often times mix them with permanent press muslin which is what I am doing here.
I have made the block in two different sizes, the small size would make a perfect baby quilt or table runner and if you are looking for a fast and easy larger quilt then pick the large block.
Morning Glory Flower block
Can you see a flower when you look at this block? I also see a kitty cat, just add eyes and a little nose.
4½-inch unfinished block size

Put four of the blocks together for an even neater block.

Block directions
Directions are for the smaller quilt block.
Cutting for one section of the block
- Cut one – 2½-inch square of cream
- Cut three – 2½-inch squares of your print choice
- Cut two – 1½-inch squares of cream
- Cut one – 1½-inch square of your print choice

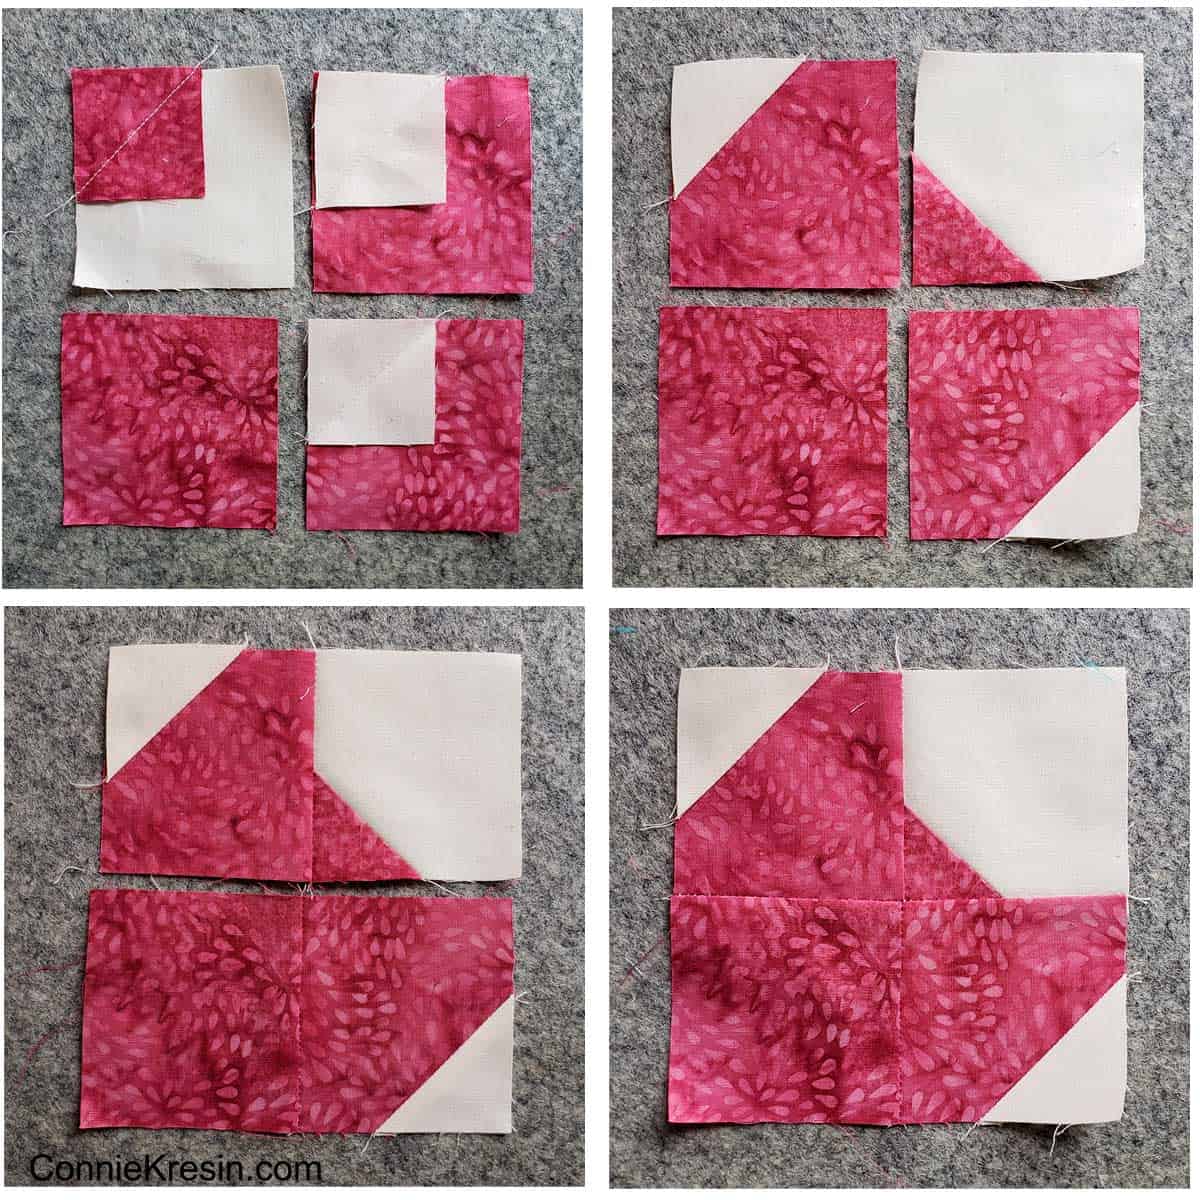
Adding small squares
Fold your small squares in half diagonally. You could also draw a line using a Dritz Heat Erase pen. They come in assorted colors.

Lay the small squares on top of the large squares with right sides together.
Stitch a diagonal line just a hair from the fold. Trim leaving about a ¼” seam allowance. Fold and press.

Here are the steps for the block. Arrange the blocks as shown and then sew together. Use an ¼” seam allowance throughout.
Cutting the Morning Glory block
Choose two different prints
- Cut four – 2½-inch squares of cream
- Cut six – 2½-inch squares of your print choice
- Cut six – 2½-inch squares of second print
- Cut eight – 1½-inch squares of cream
- Cut two – 1½-inch squares of your print choice
- Cut two – 1½-inch squares of second print
Block size – 8½-inch unfinished – when place in a quilt the block will be an 8-inch square.
Sew four blocks together to make the Morning Glory block.

Here are two blocks.

You can also use your scraps for the blocks. In fact if you have 5-inch squares – you can cut three 2½-inch squares and one 1½-inch square!

Here are four scrap blocks.

Large Morning Glory block
Notic how much bigger this block is! If you have a 10-inch layer cake you can use it for a quilt of blocks this size.

9½-inch unfinished block
Directions below are for the large quilt block.
Cutting for one section of the block
- Cut one – 5-inch square of cream
- Cut three – 5-inch squares of your print choice
- Cut two – 2-inch squares of cream
- Cut one – 2-inch square of your print choice
I think I’m going to work on more of the bigger blocks today for a fast baby quilt. Want to join me? I’ll share more soon.
Here are a couple of ideas of how you can use the Morning Glory block.

Here are a few more ways I have used this block:
PDF Morning Glory Quilt Block
I hope you enjoyed this tutorial! This blog post has been converted to an optional PDF that’s optimized for printing.
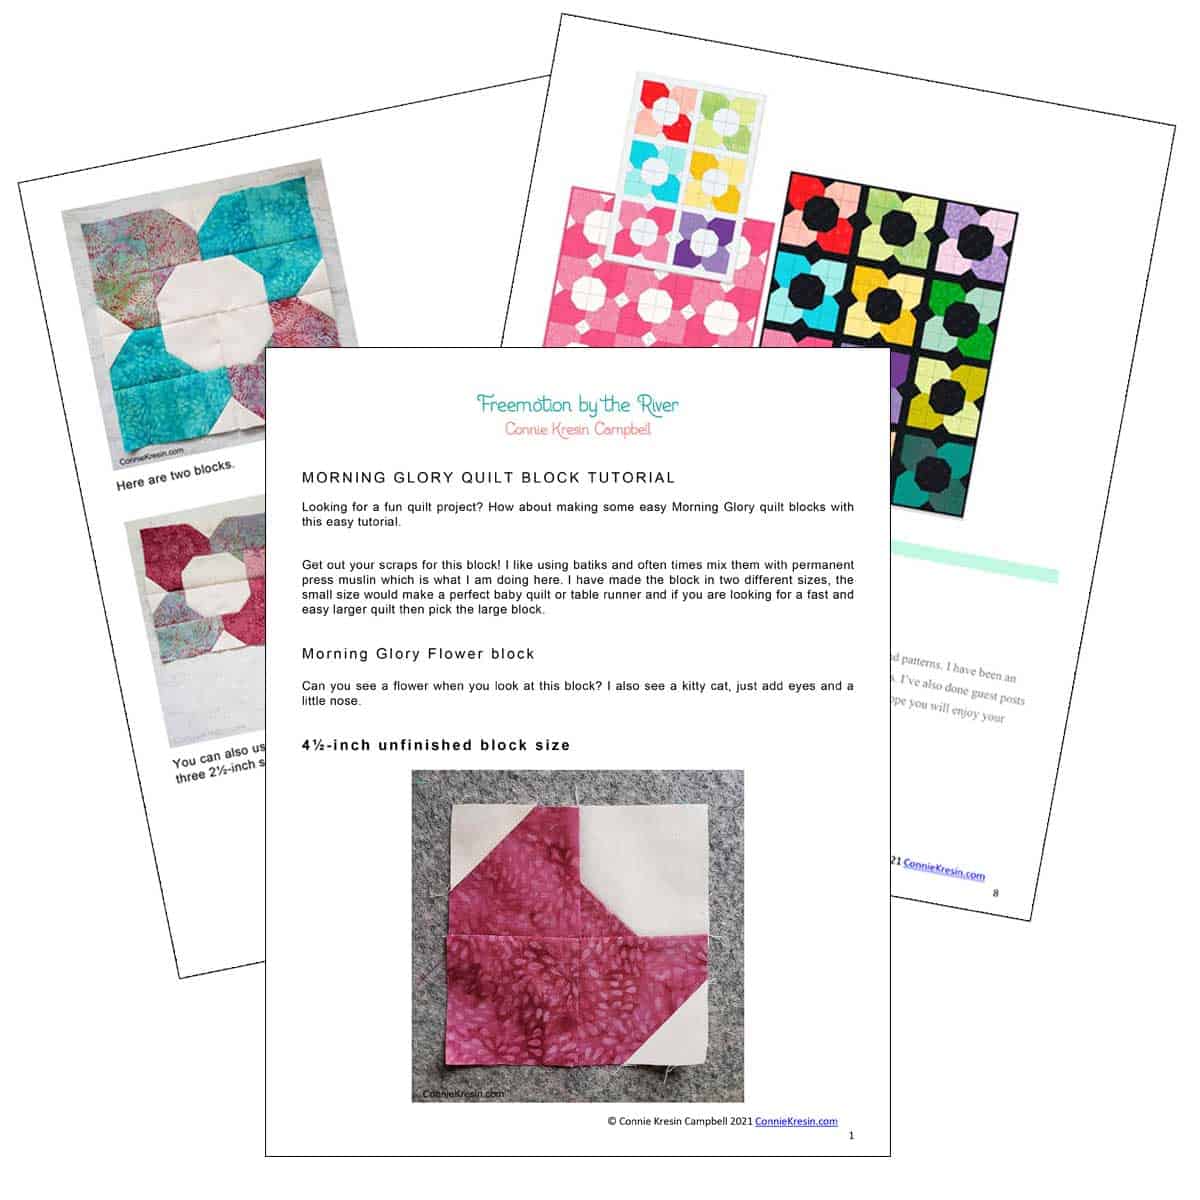
Download a PDF of the Morning Glory quilt block tutorial
Be sure and check out my other quilt block tutorials.
Great deals for you!
Looking for great buys on fabric and things? Check out these links
- Connecting Threads
- AccuQuilt Deals
- Fat Quarter Shop Daily Deals
- Green Fairy Quilts – Daily Deals
- Missouri Star Quilt Co – Daily Deals
- Scrapbooking
- The Quilt Keeper
- SewingMachinesPlus
- Electric Quilt
- My Amazon Store for all the quilting things I use and more

About Connie
Hi, I’m Connie Kresin Campbell, the quilter, writer, and photographer behind Freemotion By the River. I enjoy inspiring others with my quilt tutorials and patterns. You’ll also see my sweet adopted dogs from time to time.
Be sure and subscribe to my newsletter for more free tutorials and printables.
I can’t wait to make this Morning Glory quilt! Going to make a lap size. Thank you!
Thank you for the pattern ! Can’t wait to make it
Thanks for the new block. I think it is a kitty too! All is needed are two buttons for the eyes!
I also think it looks like a fox. Looks great in red with a tiny bit of black fabric added to the ‘ear tips” and the nose as a final note.
I love your tutorials. Thank you. Your latest portrait with Mr. Mickey is just lovely.
Thanks Connie for another great tutorial. This is a fantastic block with lots of scope for lovely colour combinations. It’s versatile for many different quilts and projects too.
I really like this creative block. So often designers use old traditional blocks with a new name. I’m going to make this one. Thank you! And thank you for the pdf. So many ads sometimes make me lose interest. But I do understand why you have them.
Thank you for sharing this block, I have been looking for a new pattern for my colourful bits and bobs of fabric with springy colours.
Thank you for sharing
Doreen Sherk
Love, love, love this pattern and made it for the dog’s bowl. Yes I love my dogs. They only get the best. I remember 1,000 years ago, we used pretty blocks like this as the pillow panel of a q-willow (a quilt pillow). I always like those because I could tuck my feet in the panel part.
Thank you. This is such a pretty block.
Thanks! I’m working on the bigger blocks today.
What a lovely and easy block and I love what a beautiful quilt it can be turned into. Thanks Connie, I appreciate what a wonderful gift this is in these trying times.
You are so welcome! It is fast and easy to make.
Hi,
Enjoying your site and patterns, love it. Do you have quilt that actually uses scraps of leftover material that doesn’t always match? When I see patterns titled “scrappy” they appear to closely same color etc. Any quilts you have done with random fabric scraps? Love to see it.
Also do you have idea on adding easy pattern to backing of quilt to expand the length/width?
Much appreciated!
I can just picture a bunch of these in yellows and golds for sunflowers. Thanks for a cheerful block idea, Connie.
That would be fun!
I love this idea for using up scraps. I’m going to look through my materials to see what I can make. We love cats in this household and it would be fun to make that the theme. Thanks Connie!
So many ideas! A cat quilt would be fun!
That does look like a fun one to try Connie! I think I would do the larger block-you know to get done quicker, LOL Thanks for the instructions. Happy Easter!
Working on the bigger block today and already have nine done Vicki!
Thank you for the Morning Glory block tutorial. Looks like a nice easy block to make. Happy Easter!
You are so welcome Barbara, it is easy!
I love this. I think I will try it tomorrow.
This looks like a great quilt for those fabrics not big enough to use, too big to scrap quilt and when I was looking at it it also looked like a kitty cat. Nice diversion from making masks. Had to get really creative with the elastic and used garden wire for the nose bridge.
Today is family conference call. 18 families across the U. S. – lots of noise! Happy noise. Ages 15 months to 74.
Thanks for the new pattern – (was that Mr. Mickey supervising Bob the Builder?)
This is a perfect scrap block! The garden wire works great for the nose bridge and yes, that was Mr. Mickey supervising Bob the Builder!