
Mini Chinese Forget Me Not Wall Hanging Tutorial
This post may contain affiliate links which won’t change your price but will share a commission.
How would you like to make a mini Chinese Forget Me Not wall hanging?
Some time ago I designed a wall hanging that used the AccuQuilt GO! Cutter and dies and some of the beautiful batik fabrics that I had from Island Batik.
I was always going to write up a tutorial for the Chinese Forget Me Not wall hanging for people that didn’t have the AccuQuilt GO! Cutter and dies but I forgot about it.


Mini Chinese Forget Me Not Wall Hanging Tutorial
I was doing some rearranging of my quilts and projects and came across the wall hanging and hung it up on my wall.
I kept looking at it and finally decided to remake it as a mini Chinese Forget Me Not wall hanging. I’m not sure which one I like the best!
I have also updated my original post about the appliqued Chinese Forget Me Not wall hanging and included directions to make the 24″ x 24″ size using the AccuQuilt GO! Cutter and also directions to make it without having the die and cutter.
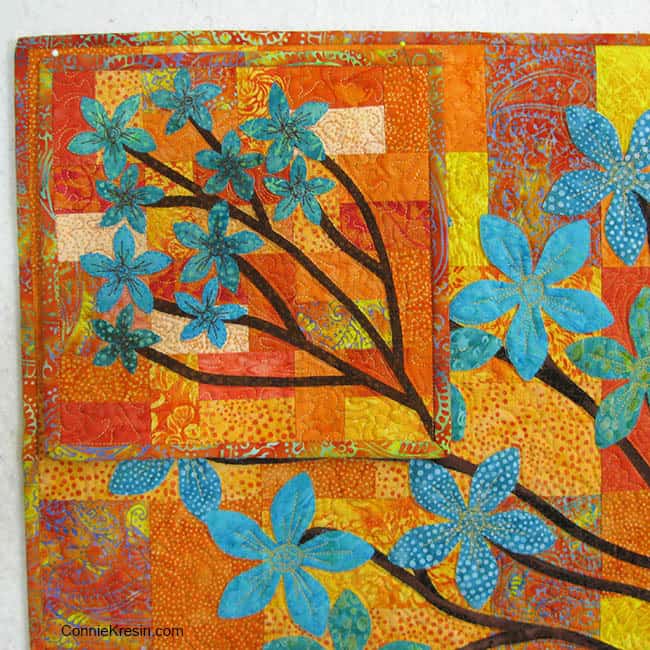
Mini Chinese Forget Me Not
10″ x 10″

I took a photo of the mini blocks next to the larger wall hanging. I have to admit I love the mini quilts and have been making more and more of them.

Looks like I have plenty of cutting mats, doesn’t it? At some point, I actually bought 2 more of the blue mats to completely cover my cutting table.
10” x 10” Mini Wall Hanging cutting instructions:
Cut 32 – Orange/Yellow Batiks – 1 3/4” x 3” rectangles
Sewing Instructions: Use a ¼” seam allowance

Make 12:
• Sew two of the rectangles together along the 3” side.
• Your blocks are now 3” x 3”.
• Join another rectangle to one side of 8 of the blocks.
• Your blocks are now 3” x 4 ¼”.
You now have:
• 4 – 3” x 3” blocks
• 8 – 3” x 4 ¼” blocks

Use the following diagram to layout your blocks.

Applique using the template and directions:
There isn’t a diagram for adding the branches and flowers to the background, just look at the photos and add your branches and flowers as you like.
When you cut your strips of fabric for the branches on the bias, your pieces are very easy to bend into a shape you like.

• Add the fusible web to your dark brown fabric and then cut 1/4” strips on the bias for the branches.
• Cut your teal/turquoise scraps into eleven 5″ squares and add the fusible web to them.
• Use the template to cut out ten or eleven flowers – vary the size if desired.
• Remove the backing from your fused fabrics.
• Place your background piece on a surface you can iron on.
• Arrange the stems similar to the diagram below.
• Use a pressing cloth when you iron the branches to your background.
• Carefully iron and shape the branches.
• Arrange the blue flowers along the branches and iron them down using the pressing cloth again.

Appliqué the branches and flowers in your favorite type of stitch. I use a straight stitch vintage Singer sewing machine to do mine.
Layer your batting between the backing and the front. Quilt as desired. I used #2360 brown 50 weight Aurifil thread for the stitching on the flowers.

Here you can see the difference in the stitching on the flowers.
Here is the 10″ mini wall hanging on top of the 24″ original Chinese Forget Me Not.
I recently had a question about the applique – I did a free motion wiggle stitch applique on the flowers using my vintage Singer sewing machine which is only a straight stitch machine.
I appliqued BEFORE I quilted this and then I free motion quilted close around each flower. Then I went back and added the orange stitching on them which gives the raised look.
These are raw-edge applique – not turned under. I have added fleece for a trapunto look before. When I do that I add the fleece behind the applique, stitch around it and then trim the fleece. You still want to stitch around each piece to give the raised look.

Here is a better photo of the quilting that I did.

Get a free pdf of this tutorial.
My other Applique Tutorials you love:
Great deals for you!
Looking for great buys on fabric and things? Check out these links
- Connecting Threads
- AccuQuilt Deals
- Fat Quarter Shop Daily Deals
- Green Fairy Quilts – Daily Deals
- Missouri Star Quilt Co – Daily Deals
- Scrapbooking
- The Quilt Keeper
- SewingMachinesPlus
- Electric Quilt
- My Amazon Store for all the quilting things I use and more

About Connie
Hi, I’m Connie Kresin Campbell, the quilter, writer, and photographer behind Freemotion By the River. I enjoy inspiring others with my quilt tutorials and patterns. You’ll also see my sweet adopted dogs from time to time.
Be sure and subscribe to my newsletter for more free tutorials and printables.
Love that simple for-get-me-not wall hanging.
Hi Connie,
This reminds me of a class I took in 1997 on making Japanese wall hangings from a book called Kumiko Sudo: innovative Quilt Patterns inspired by Japanese Sashiko and Origami traditions It was a very unique class. I made four wall hangings of flowers. I still have mine hanging up in my guest room.
sincerely,
donna
Good morning Connie, like you I am making some smaller quilts lately, wall hangings as well. I change them up in the studio for some variety. (I am still mooning over the studio you had by the river. That was truly the nicest one I think I ever saw) Anyway, I started making the wall hangings you feature a few years ago to brighten my MIL’s room at the care home. She enjoyed them so much, it made a semi-institutional room more home-like. I think this one is on my list for me! Thank you. I really like the idea of using batting behind the flowers for dimension. That is a great idea.
What a lovely tutorial, Connie. Thanks for sharing the details of how you made such beautiful pieces.
Love this quilt Connie! The colors and quilting are gorgeous!
Cute mini! Love these colors together
Thank you Connie, I love this mini quilt and mug rug. Such lovely bright colours. I’m learning free motion meandering quilting, love to make this little quilt to have a go.
They’re both gorgeous! I really like the colors you chose. Thanks for the tutorial!
Love the blue against the orange-y!! batiks!
Lovely!! The pieced background really sets off the appliques.
So pretty! Love the colors, flowers, and stitching!
Hello Connie; This is a lovely wall hanging and mini quilt. I especially like the color choices that just work so brilliantly together. Thank you for sharing the tutorial also. My quilting friend has a Go Cutter, which we use whenever we can, but we only have a few dies. They can be very expensive, especially when you have to choose between the new fabric for a project or a new die. LOL. We both usually chose the fabric. I do sincerely appreciate your tutorials for those of us without the dies therefore. Have a wonderful day Connie!
Thank you for the cute pattern.
Love the colours and style in this project Connie. And your shop is looking great! 🙂 xx
I LOVE those colors! That is such a sweet design. Thank you so much for the pattern.
Thanks for the adorably cute pattern!
Very pretty. Awesome stitching. Have a great day!!
So cute! I really like the stitching you did inside the flowers. That really gives them dimension.