
Mini Birds Quilt Tutorial 3 Different Looks
This post may contain affiliate links which won’t change your price but will share a commission.About a week ago I showed a little sneak peek at the Mini Madness project I was working on.
As you can see, I actually made three! It has been quite some time since I made a mini quilt and I forgot how fast and fun they are to make!


During the month of March, the Island Batik ambassadors have been sharing all kinds of mini paper pieced project.
Paper piecing is something I enjoy once I get started……sometimes the “getting started” is the hard part. Do you like paper piecing?
Have you ever tried it? Using batiks from Island Batik makes paper piecing easy as both sides look the same
Mini Birds Quilt Tutorial 3 Different Looks
I decided to use my Country Birds pattern as inspiration for a mini. I still have my original Electric Quilt file so I just created a new block and then sized it as a mini. Here is what I came up with and I decided to do a little tutorial.
If you have never done any paper piecing but have thought about trying it….this would be the perfect project for you! I decided to only paper piece the diamond sections and just piece the rest of the sections. Easy peasy!

Mini Birds Paper Piecing Tutorial
Size 6″ x 6″
Yardage – scraps of batiks, jelly roll strips or fat quarters.
I mentioned that I like to use newsprint paper because it is very easy to tear off. If you are trying this for the first time just use regular printer paper.
The first thing you want to do is crease the paper on all of the lines that you will stitch. It makes it so much easier.
I also like to use Washable Elmer’s Glue to glue the first piece to the back of the paper.
Cut your fabrics pieces in the following measurements to make it easy to paper piece the sections.
- Cut the center (1) section 2” x 2 ½” – you will need 4 for the block.
- Cut the other pieces – 1 ½” x 2 ¼” – you will need 16 for the block.
- Use 4 of the sections for your block – I have included 2 extra for practice on the worksheet.
- Use a very short stitch length on your sewing machine.
- Press and trim – make sure to trim on the ¼” line.
You can see that the fabric pieces are a little over-sized. There is nothing worse that stitching a line, folding over the fabric and find out you didn’t cover the whole section.


Be very careful when you go to trim your pieces. When I went to cut the last one I wasn’t paying attention…..I was probably day dreaming…and look what I did!
I cut on the stitching line – not the ¼” line. I’m not going to tell you how many times I do this when paper piecing!
That is all the paper piecing to do for this mini! Are you going to try it?
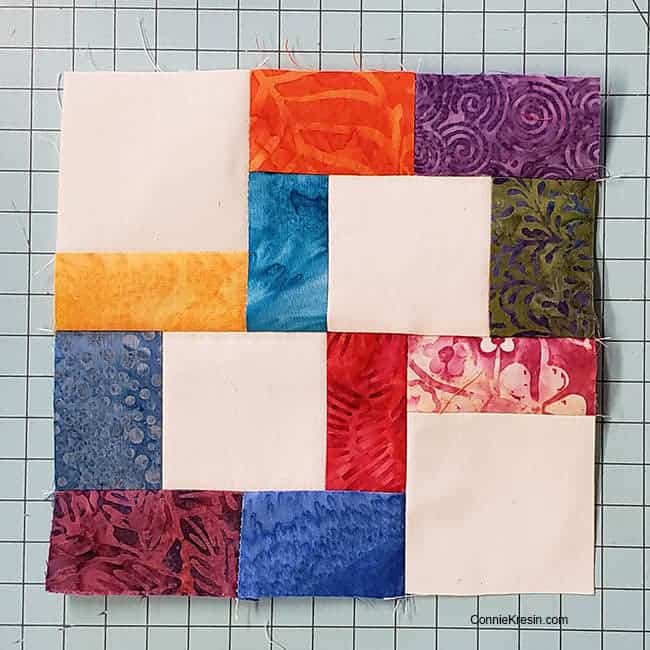
Now you need to cut the following:
- Cream – cut 8 – 1 ¼” x 2”
- Color A – 1 – 2” square
- Color B – 4 – 2” squares
- Color C – 4 – 1 ¼” squares
Use a ¼” seam allowance.
In this sample I stitched the dark blue for the (C) 1 ¼” squares, join one to a 1 ¼” x 2″ cream. Stitch a purple print (B) 2″ square to a 1 ¼” x 2″ cream.
Sew the sections together as shown in the diagram.


It takes no time at all to quilt a little mini!
I cut 2 ¼” strips for the binding.
For this one I did some straight line quilting, I cut the backing 1 inch bigger and then folded it to the front for my binding.

Another experiment….I did a single fold binding on this one – I’m not crazy about it. This was a square block before I did the straight line quilting. It is a little wonky now but that is okay.

Here is a photo showing the backs of the 3 Mini Bird quilts. Did you notice that they aren’t identical?
If you go back to the very first photo you’ll see how I changed color placement and section placement.
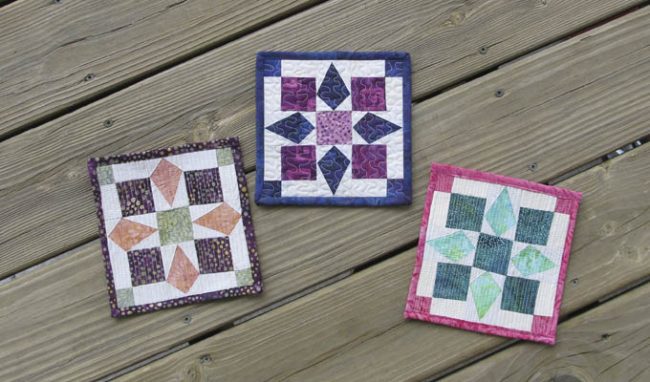
This might be my favorite, what do you think?

Download the free paper piecing templates for the Mini Birds block
This would make a perfect first time paper piecing project!
Great deals for you!
Looking for great buys on fabric and things? Check out these links


Oh Connie, you’ve done it again!!! These are wonderful. Thank you.
Thanks so much Judy, I am so happy you like them!
Those are really nice Connie. Thank you. I saved the tutorial and pattern and am going to print it soon and see if I can do them. Since you say it’s a good one to try as a beginner, it must be for me.
Wonderful!!!
Super cute mini quilts. Yes…your favorite is also my favorite. Great tutorial dear. Sunshine and clouds intermittent here today. <3
I love your mini quilts. Right now I do not have a desire to learn paper piecing, there are still a lot of regular quilt blocks that I want to do. Maybe one day.
these are great! now you “just” NEED to make a gazillion of these and turn into a bigger quilt..
Hello Connie! Your Mini Birds Quilts are fabulous. The fabrics you chose for each one blends so wonderfully with the others; you have excellent talent in this part of quilting. Of course, you are excellent at all parts of quilting that I have seen. I am hoping on your link that it is a larger block tutorial, I have a lovely selection of oranges that I am just waiting for the project that will be the perfect fit and this just may be it. Thank you for sharing and have a great day!
I really like these little mini squares and the colors you made them in. I’ve never done paper piecing but this looks like it might be fun. I’m gong to give it a try. Thank you so much for sharing!
Nice little minis. Paper piecing those points was a great idea. I actually enjoy doing PP. I think I like the perfection in the points with the technique.
Sweet Mini Birds and great tutorial. Thank you.
QuiltShopGal
http://www.quiltshopgal.com
Great minis! At first I looked at the 4 corners and wondered “disappearing 9 patch?”–that would be way too easy! I have a love-hate relationship with paper piecing, but you are so right–batiks make it MUCH easier! I’m o.k.. once I get started and in a rhythm, but wrapping my head around the first two or three patches is frustrating.
Thanks Miriam! You sound exactly like me……it takes a few minutes for me to get back in the grove also!
I do like to paper piece. Thanks for the pattern. It does look quick and easy and yours turned out beautifully.
Oh, Connie, thanks so much for sharing this block as a tutorial! As soon as I get back to my sewing space and set up again, I’m definitely giving it a go. You are very sweet! XO
You are so welcome! Get all set up and start on a fast and easy project like this!
I love your minis. I have been looking for a small project to practice paper piecing on since it has been several years since I used that technique. These will be perfect “favors” when I host my luncheon for my small sewing group. Thank you for another great tutorial.
these are pretty. thanks for sharing
Thanks Lori, just a easy little project 🙂