
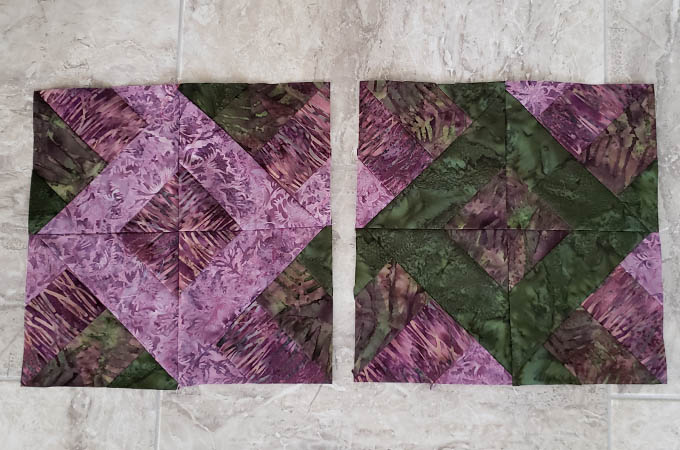
Hidden Wells Quilt Block made with 4 strips
This post may contain affiliate links which won’t change your price but will share a commission.One of my favorite quilt blocks is the Hidden Wells quilt block made with 4 strips of fabric that are each cut 2½ by the width of the fabric. Batiks are a lot of fun to use for this design.
Hidden Wells Quilt Block made with 4 strips

Please note that the finished blocks will have bias edges and be very stretchy. Handle your blocks carefully, you can also starch your fabric to help with this.
The Hidden Wells block was originally developed by Mary Ellen Hopkins in 1989. She made the block many different ways using different amounts of fabric strips.
I had some purples and greens that I thought might go well together, take a look.
Creating the first block
- Cut 4 – 2½” strips width of fabric
- Sew them together with a ¼” seam allowance
- Press the seams and measure the width which should be 8½”
- Cut 8½” x 8½” squares

It is fun to pick the colors and see how the block turns out, sometimes I like it….other times I don’t. You can see in the blocks above that the colors kind of blend together.
Creating the next block
Once you have sewn the strips together and cut them into squares you’ll lay one block right side up and then place another block right side down on top of it.
Pin and then stitch all around the sides with a ¼” seam allowance.
NOTE: Use the same orientation for all of your blocks, example – the green strip is at the bottom of the block that is right side up. The green strip is on the right side and when place right side down, it is on the left side.

Cutting the block
I decided to make more blocks using different hues. I like these better.
Use a ruler and cut the block diagonally into 4 pieces. You’ll want to cut all of the blocks the same way.
NOTE: In the 2nd photo the top square is shown with the wrong side facing up and then laid on top of the right side of the bottom square. Be sure to rotate.

I think Mr. Mickey is getting into the picture thing….or he just likes sitting on my batiks! Isn’t he cute!

The first selection of fabrics didn’t seem to work very well so I made two complete blocks and then mixed the diagonal sections to make completely different colors of blocks.
If you cut strips the width of your fabric for the blocks, you should be able to cut 4 blocks from the strips.
Here are some ideas of what the blocks could look like.

These were the variations that I chose to keep.
Sorry to switch fabrics on you, some of the photos didn’t turn out.
When I dug in my stash for these batik strips, some of them weren’t the full width. I really like the colors in this block but as you can see, I only have enough fabric to make one block.
I think I’ll make a little placemat or something and add the leftover fabrics as a border otherwise this will become another orphan block. What do you think of that?

You can find the original tutorial which is now correct here – Hidden Wells quilt block tutorial
Are you wondering what this block would look like in other colors? I have several other tutorials using this block that you might enjoy.

Please note this post contains affiliate links, which means I’ll earn a small commission if you purchase through my link at no extra cost to you. Please see full disclosure here. As an Amazon Associate, I earn from qualifying purchases.
Great deals for you!
Looking for great buys on fabric and things? Check out these links
- Connecting Threads
- AccuQuilt Deals
- Fat Quarter Shop Daily Deals
- Green Fairy Quilts – Daily Deals
- Missouri Star Quilt Co – Daily Deals
- Scrapbooking
- The Quilt Keeper
- SewingMachinesPlus
- Electric Quilt
- My Amazon Store for all the quilting things I use and more

About Connie
Hi, I’m Connie Kresin Campbell, the quilter, writer, and photographer behind Freemotion By the River. I enjoy inspiring others with my quilt tutorials and patterns. You’ll also see my sweet adopted dogs from time to time.
Be sure and subscribe to my newsletter for more free tutorials and printables.
Really like your Hidden Wells Pattern and lovely color choice.
Love this block. My 2 dogs insist on always sitting on any project I’m making!
I really want to make the hidden wells quilt. Do you think a jelly roll would work? I realize there would be a lot of different colored blocks. Just curious if your thots on it. Thanks.
I love how this block looks, your instructions are always clear and I appreciate that.
I am making a 20 x 20 table topper/ wall hanging. (Finished size) I would like to use this block for the back. Should I just add borders around this till I get to the right size or is there a way to make the block bigger?
It is a quilt as you go project I am not sure I like. I thought I could always use the hidden wells side if it turns out weird. It’s for my sewing classes.
Thank you
Rhonda
How much fabric is needed of each color for a queen quilt?
How have I missed the Hidden Wells block before???? I love it! Has it ever been done with scraps? Would that possibly work to use up some trays of 2.5 strips or is this a “do not do” for this pattern?
I love your quilt patterns and ideas. They speak to my soul! I’m not very tech savvy, but I can’t find how to print them out. Am I missing a click somewhere?
I still don’t understand how you did this. If you cut the squares into four pieces, they do not look like the finished four pieces you have to manipulate.
Can you make the Hidden Walks Quilt using more then 4 blks & cutting bigger squares thus making bigger blocks to sew together?
Yes you can Linda, please take a look at this quilt I made.
https://conniekresin.com/diagonal-strip-blocks-baby-quilt/
Love it!! Thanks so much!!
I want to make 10” block how can I measure the strips to make a block. I’m beginner. I still do scare to start in my own I always rely on my sis. I want try do it on my own .. hope to hear from you soon
Connie,
I love the look of the Hidden Well block and I really would like to make it. I am new to quilting, I would like to make a 12 inch block instead of the size of this one. So would I cut strips 3” by 20” to get a 12 inch block? I would appreciate if you could help me, I just don’t want to waste my material.
Thank you,
Deb
Deb, First of all, at the risk of raining on Connie’s parade…While these instructions can create a lovely quilt, they do not interpret Mary Ellen Hopkins’ original quilt correctly. Her “foot-stomping rules” require that you use 5-7 fabrics, and cut them in different widths. Assuming that you want to create the quilt featured here, I suggest that you work with 3″ strips but not be overly concerned with producing exactly 12″ blocks. I recently completed a ‘hidden wells’ quilt with 9″ unfinished squares cut from the strip sets, and the unfinished large blocks measured 11 1/2″….
Keep in mind that you are in charge of your quilt! Have fun and don’t be afraid to experiment!
I like many of your patterns and appreciate the offer of free PDFs. I have signed onto your site. I don’t get why every time I pick additional PDFs I’m asked to subscribe again. And there are WAY too many pop up ads. I realize that’s probably supporting your site to a degree but every time I want to look at another offer here come the ads and subscribe requests. Sorry to fuss but there it is. Your patterns are lovely though.
Hi Linda, you can always go to my Resource Library and download the free pdfs instead of signing up each time. I always have the password at the bottom of each newsletter I send out. Also, you will never get subscribed more than once.
Need to know how much material to bUy
The Red table topper is beautiful and I will make it. I Love the colors and the layout of the block’s. You Rock. You are truly blessed to work with Batiks. I loved Mr. Mickey he is so cute. . Please keep making beautiful quilts.
Thanks so much Michelle and I would love to see it when done! This is such a fun block to make.
Greetings!
I am wondering how this pattern would look using a random pick of a large number of fabrics (scrappy, but all same color family). Would there be problems laying out the blocks so they would merge into a pattern, or would the Hidden Wells pattern be lost? (Hope I explained it okay)… thanks!
I love this block. I have done it a few times, and yes, I agree with so many… it may be time to revisit.
I sewed this block so many years ago and really liked the results. I think it is time to revisit it. Thanks for posting it. Your purples are so pretty.
Love those pretty purple blocks, thanks for the tutorial Connie!
Thanks for revisiting & sharing this pattern .. somehow l missed it first go around. Will be giving it a try soon … hopefully. Love that Mickey’s taking an interest in quilting .. he makes a great mascot. 🙂
That really is a pretty block, Connie. I think it’s a good project for “in between” sewing when I’m not feeling iike tackling anything bigger. Then I can just save them up until I have enough to do something. Mickey is looking quite adorable.