
Blue Table Topper Tutorial
This post may contain affiliate links which won’t change your price but will share a commission.If you are thinking about making a quilt project, this might be the perfect one! This makes me think of snow falling outside which I know we’ll be getting soon.
Once again, this is not only fast and easy…..it is the perfect quilt project for using up scraps.

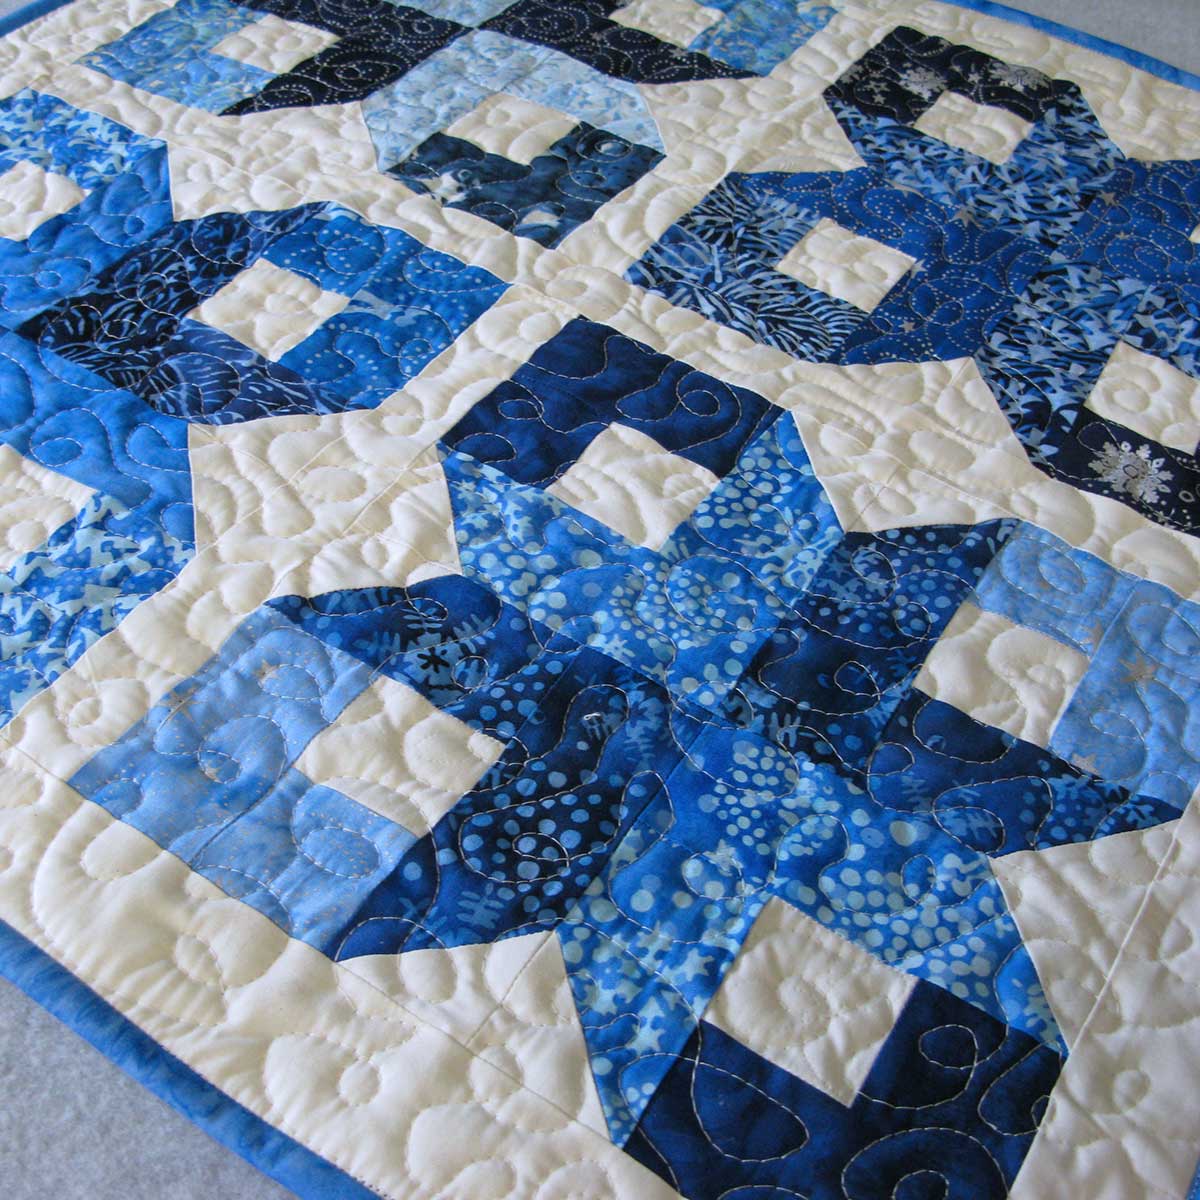
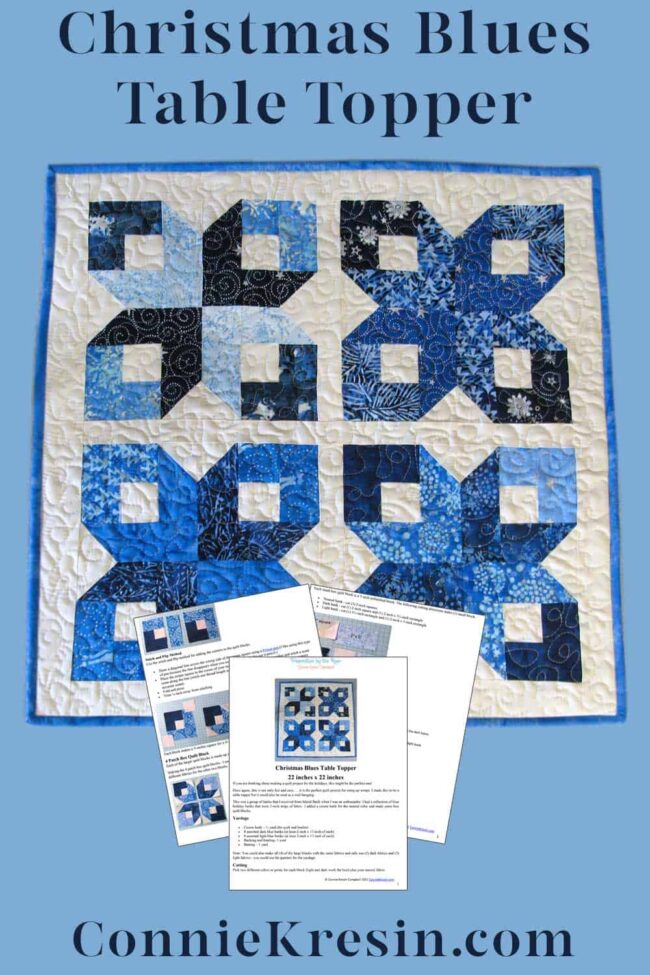
Blues Table Topper
22 inches x 22 inches
I made this to be a table topper but it could also be used as a wall hanging.
This was a group of batiks that I received from Island Batik when I was an ambassador. I had a collection of blue holiday batiks that were 2-inch strips of fabric. I added a cream batik for the neutral color and made some box quilt blocks.
Yardage
- Cream batik – ½ yard (for quilt and border)
- 8 assorted dark blue batiks (at least 2-inch x 17-inch of each)
- 8 assorted light blue batiks (at least 2-inch x 17-inch of each)
- Backing and binding- 1 yard
- Batting – 1 yard
Note: You could also make all (4) of the large blocks with the same fabrics and only use (2) dark fabrics and (2) light fabrics – you could use fat quarters for the yardage.
Cutting
Pick two different colors or prints for each block (light and dark work the best) plus your neutral fabric.
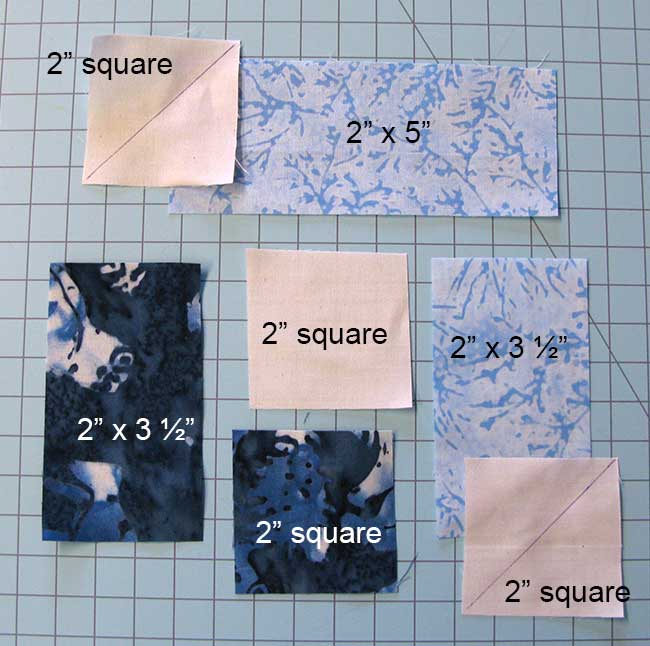
Each small box quilt block is a 5-inch unfinished block. The following cutting directions make (1) small block.
- Neutral batik – cut (3) 2-inch squares
- Dark batik – cut (1) 2-inch square and (1) 2-inch x 3½-inch rectangle
- Light batik – cut (1) 3½-inch rectangle and (1) 2-inch x 5-inch rectangle
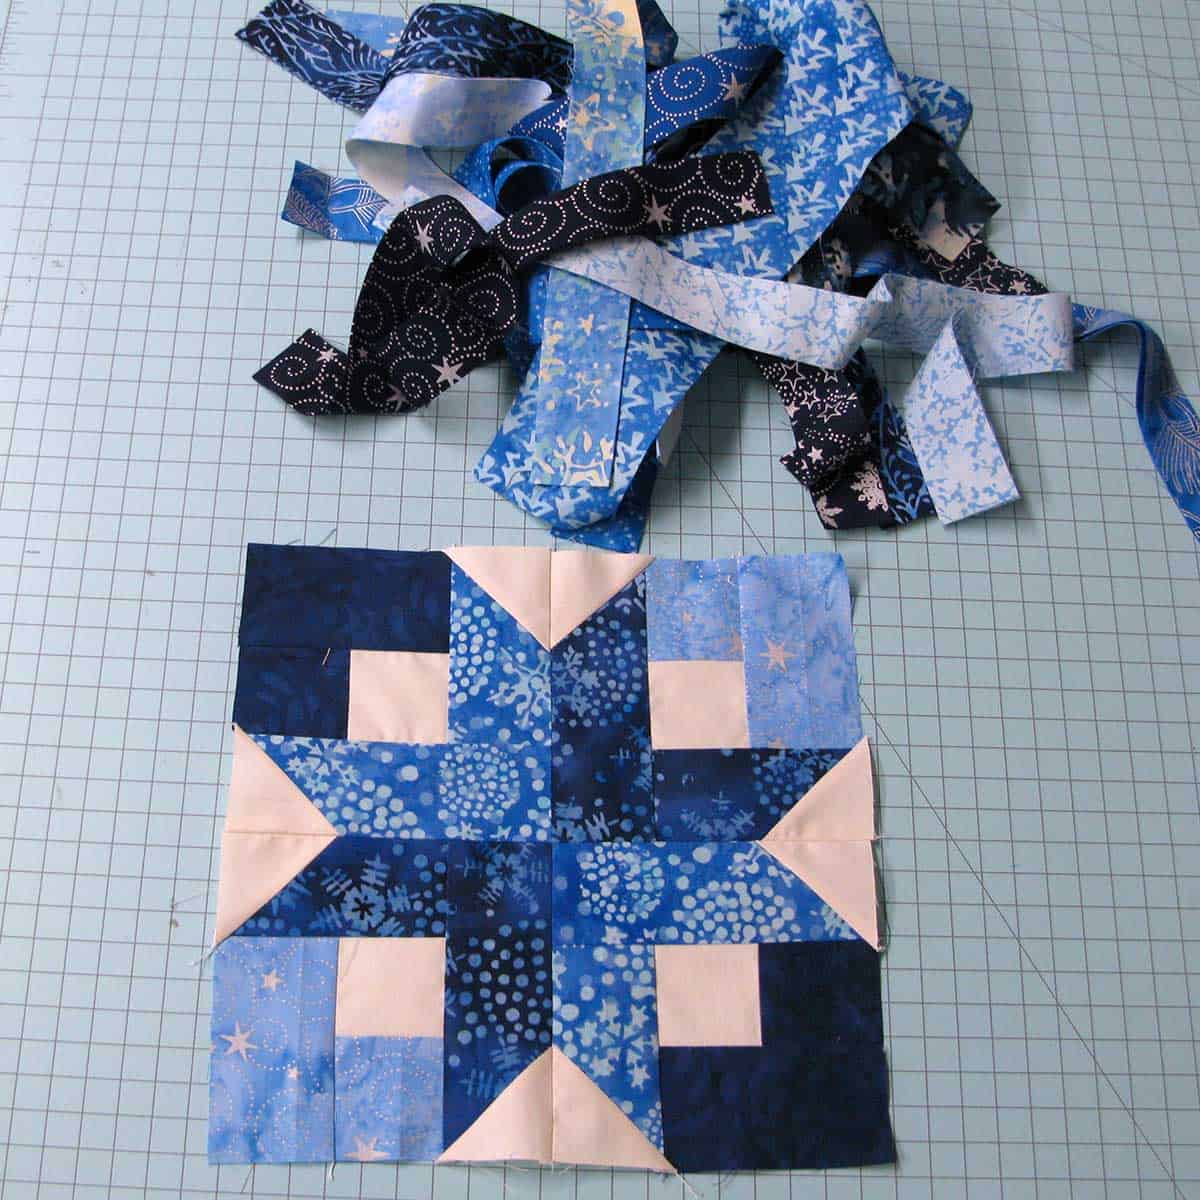
Sewing the Box Block
Sew the pieces together using a ¼” seam allowance.
- Sew the cream 2-inch square to dark batik 2-inch square, press your seams to the dark fabric
- Sew the dark batik 2-inch x 3½-inch rectangle to the squares
- Sew the light batik 2-inch x 3½-inch rectangle to the other side of the squares
- Sew the light batik 2-inch x 5-inch rectangle to the side with the 2 squares and light batik
- Your block will measure 5-inch x 5-inch


Stitch and Flip Method
Use the stitch and flip method for adding the corners to the quilt blocks.
- Draw a diagonal line across the wrong side of the cream square using a Frixon pen (I like using this type of pen because the line disappears when you iron it. You could also use a pencil.)
- Place the cream square in the corner of your rectangle block with right sides together and stitch a scant seam along the line (stitch one thread length away from the line toward the corner, this makes a more accurate seam)
- Fold and press
- Trim ¼-inch away from stitching

Each block makes a 5-inches square for a 4½-inch finished block.
4 Patch Box Quilt Block
Each of the larger quilt blocks is made up of (4) of the small box quilt blocks.
Making the 4 patch box quilt blocks – I used the same prints for two blocks and then repeated this step again with different fabrics for the other two blocks.

Sew the blocks together.
Sashing and border
Use the cream fabric to add sashing between the quilt blocks. It is always a good idea to measure your blocks before cutting the sashing and borders. If your measurements are different, adjust the length you cut your pieces.
Sashing
- Sashing – cut (2) 1½-inch x 9½-inch pieces and (1) 1½-inch x 19½-inch piece
- Sew a 1½-inch x 9½-inch sashing piece to the side of one of the blocks
- Add another block to the other side of the sashing to make a row
- Repeat this for the other (2) blocks
- Sew the 1½-inch x 19½-inch sashing between the rows
Border
- Cut the border pieces (2) 2-inch x 19½-inch and (2) 2-inch x 22-inch
- Add the 2-inch x 19½-inch border pieces to the sides of your table topper
- Add the 2-inch x 22-inch border pieces to the top and bottom

Add your backing and batting
Quilt as desired, I did my usual simple free motion stipple pattern. Add binding using my easy machine binding tutorial.
I hope you enjoyed this tutorial! This blog post has been converted to an optional PDF that’s optimized for printing.
Purchase an ad-free printable PDF version of the Blue table topper tutorial in my shop. The photos have been reduced in size and the tutorial is 5 pages long.
Get the Blue table topper PDF

I have several other tutorials for the box quilt block:
- Box quilt block
- Silent Night table topper made with just four blocks
- Box pillow
- Box table runner
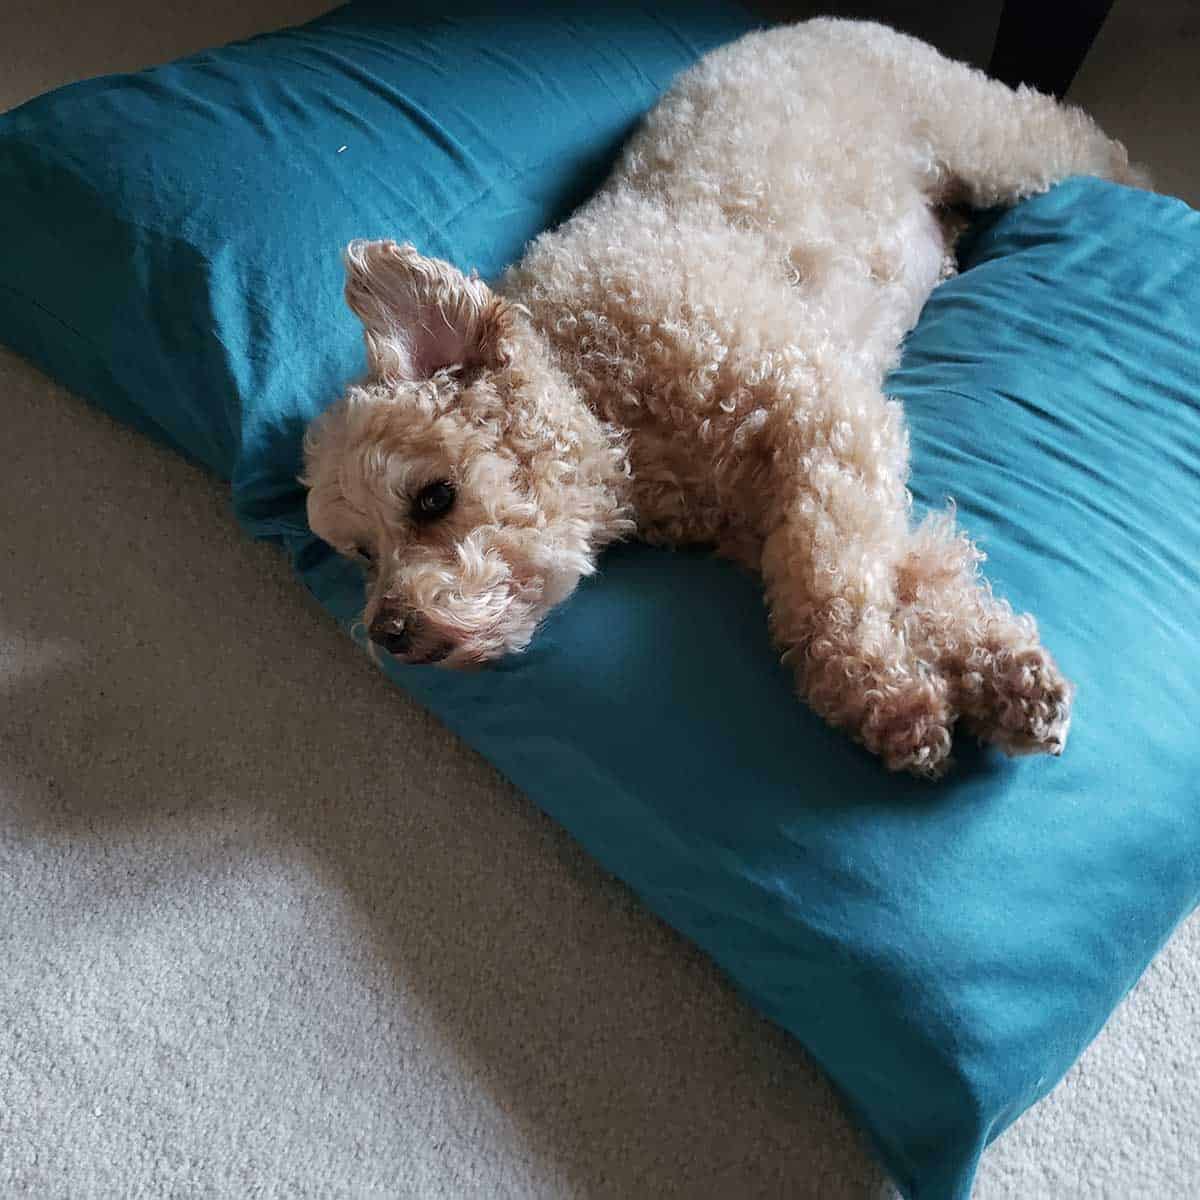
Mickey
I shared a photo of sweet Mr. Mickey in my newsletter and thought I should add it here as so many of you have commented on him.
The other day we took Mickey with us for a ride in the country to look at the fall leaves. He still shakes like crazy when we get in the car so the first thing we did was drive to the nearby park where I take him for walks. It is a stressful 3-minute drive for him. Now when we get back in the car he is fine. This time we drove around for a couple of hours (stopping every 15 minutes to keep him calm) and he did great as long as he could sit on my lap. It is a good thing he only weighs 20 pounds!
This is where he sleeps at night. He starts out in bed with me and then after about 5 minutes he is down on the floor. He won’t sleep in a dog bed but loves these full-size pillows. Sometimes he’ll take a nap during the day so….they stay on the floor all the time.
Please note that this post contains affiliate links, which means I’ll earn a small commission if you purchase through my link at no extra cost to you. Please see the full disclosure here. As an Amazon Associate, I earn from qualifying purchases.
Great deals for you!
Looking for great buys on fabric and things? Check out these links
- Connecting Threads
- AccuQuilt Deals
- Fat Quarter Shop Daily Deals
- Green Fairy Quilts – Daily Deals
- Missouri Star Quilt Co – Daily Deals
- Scrapbooking
- The Quilt Keeper
- SewingMachinesPlus
- Electric Quilt
- My Amazon Store for all the quilting things I use and more

About Connie
Hi, I’m Connie Kresin Campbell, the quilter, writer, and photographer behind Freemotion By the River. I enjoy inspiring others with my quilt tutorials and patterns. You’ll also see my sweet adopted dogs from time to time.
Be sure and subscribe to my newsletter for more free tutorials and printables.
Haven’t gotten to this blue quilt yet, but next week is looking good! So nice to see pictures of Mr. Mickey. Such a wonderful little guy. Thanks
Very nice, especially the hidden star. Thanks for sharing.
Thank you for sharing such a fun pattern! Mickey looks so relaxed and happy!
Mr. M looks so adorable, like a Young pup!
I actually have nothing started or calling my name so I finally get to make this (don’t tell the truck pattern – he’s next.) I used the truck on a kids quilt but now want to make another – the pattern went together so easily! Thanks.
Thanks Joan, Mickey still thinks he is a pup some of the time. It is so sad to see him want to play and then get exhausted so fast. Have fun making this table topper and I hope you will share a photo of it!
Thanks Connie for this neat pattern. Love the blue too. Its a gloomy,rainy night in Tulsa tonight and I would love to try this now if only I had some Blue batiks. I do have other things to sew tonight but this really peaks my interest. This will be a great gift for my sister-in-laws for Christmas. Thank you too for the other patterns you have shared that have me inspired. I’ve never made this box block before so always want to learn a new block. Thanks for sharing, say Hello to Mr. Mickey for me, he sounds like a great companion.
It is raining here in Iowa also and will be a gloomy day. If you don’t have blue batiks, make this in another color!
So nice to see this box pattern again. I’ve made it in other colors. Quick and easy. Never thought about making it in blue, but I like it. I have blues in my stash and now I know what I’m going to do with some of them. One of the nice things about your patterns is that they don’t take much fabric or time and they always turn out beautifully. Thank you so much. Thank you, too, for sharing your Mickey with us. You have a generous heart and you are loved for it.
Thanks Reberta, I love fast and easy small quilt projects…..as you can probably tell.
I’m definitely making this lovely table topper – in blue. It would also look great in other colour combinations. As usual your tutorial is so easy to follow.
Thanks Connie and lovely to hear about Mr Mickey. He’s precious.
Thank you Robyn!
Pretty table topper. When my shoulder heals enough, I am going to give this a try.
I’m hoping your shoulder heals fast Susan!
Thank you for your post today. Made me smile while reading about Mickey. Love the table topper using batiks. I am tempted to make it in gold and black batik as in your previous entry of a smaller table topper. Thank you for sharing.
Thanks Anne, this would be neat in any color combination, the Silent Night table topper is beautiful in the rich gold and black batiks and that tutorial is also fast and easy.
Ah, your sweet Mickey, we do all we can to make them comfortable. He is so sweet. I love your post today, nice quilt in blues.
Thanks Doreen!