
Easy Quilted Churn Dash Placemat Tutorial
This post may contain affiliate links which won’t change your price but will share a commission.
Once again I have a fast and easy placemat tutorial for you! This is super fast because you don’t have to add binding to them!
We use placemats all of the time to protect our dining room table. After a couple uses or….a spill, I just throw them in the washer and dryer. I even made matching napkins!

Easy Churn Dash Placemat Tutorial
13″ x 17½”

I used the Churn Dash quilt block again but this time I made 10 inch blocks. Since everything is a mess here after emptying out my quilt studio, I decided to just cut everything with my rotary cutter and ruler. I also have my 100% wool pad set up for ironing. It fits perfect on one of our end tables.
Make the quilt blocks:
I used three different batiks for my placemats. I am just giving directions for making one block.
Cutting:
- Light batik: cut two 4 7/8″ squares
- Print batik: cut two 4 7/8″ squares
- Teal batik: cut four 2½” squares
- Light batik: cut five 2½” squares
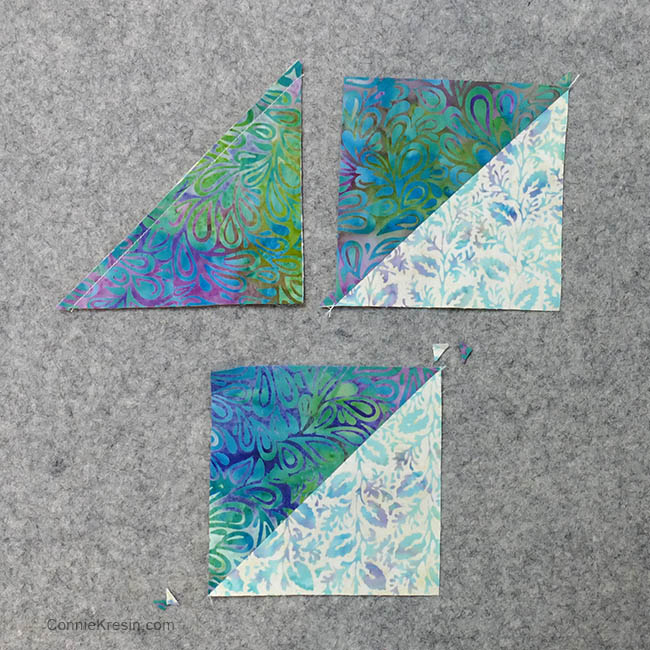
Piecing HST blocks:
- Use a ¼” seam allowance.
- Place the light batik square on top of the print batik square and then cut diagonally.
- Sew the two pieces together, your block should measure 4½”, trim off the dog-eared corners.
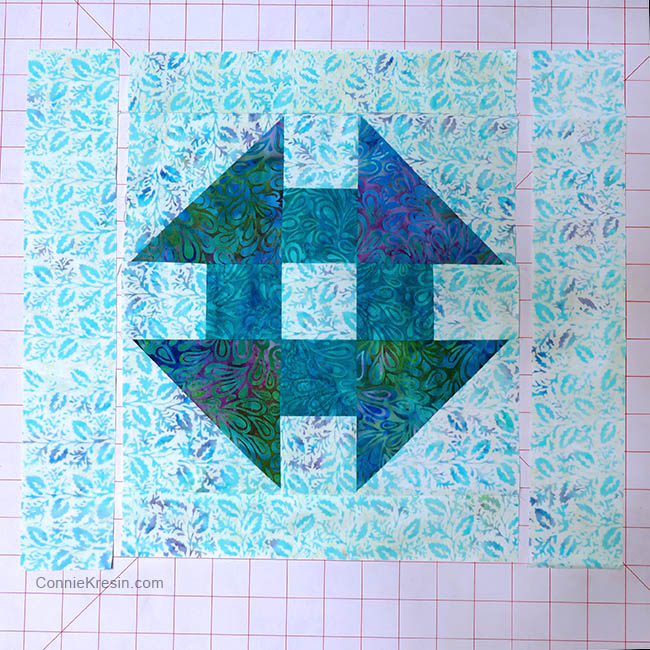
Piecing the block
- Sew the light batik and teal batik 2½” squares together as shown in the diagram below.
- Layout your block as shown.

Sew the blocks into rows and then sew the rows together to make a 10½” Churn Dash quilt block.

Borders
Next you want to add borders to make your placemat the size you want for your table. You can make this bigger or smaller if you like.

- Cut two 2″ x 10½” pieces of the light batik and sew to the top and bottom of your block.
- First side border: light batik which is 2¼” x 13½”
- Second side border: print batik which is 1½” x 13½”
- Third side border: light batik which is 1½” x 13½”
Adding the side borders
Finished placemat top

Finishing your placemat
Backing
- 1 yard of the light batik will give you backing for 4 placemats.
- Measure your placemat and cut the backing just a little big bigger.
Add batting
- I used Hobbs 80/20 batting, many times when I make placemats or mug rugs, I piece scraps of leftover batting.
- I also like to use Soft and Stable ByAnnie’s for a firmer look like my QAYG placemats.
- Cut your batting to the same size as the backing.
Layer your placemat like this:
- Batting
- Back fabric (right side up)
- Front of placemat (right side down)
Remember when I said this would be fast and easy to make? We aren’t going to add any binding!
Pin everything together and leave an opening on one side big enough to get your hand in so you can easily turn it right side out after stitching.
I like to backstitch at the beginning and end when I stitch using a ¼” seam allowance.

Turn your placemat right side out, press and then add a little quilting to hold everything together.
Island Batik Project for June
As many of you know, I am an ambassador for Island Batik and get to work play with their beautiful batiks every month. For June we could any technique and even though I have made placemats like this, believe it or not I don’t think I have ever made rolled hem napkins!

You don’t need a fancy sewing machine or specila foot to make them, here I am at my make shift quilt studio watching more rain come down.
Using batiks means the right and wrong side of the fabric looks the same and is perfect for napkins. They were super easy to make and took no time at all!

I made matching napkins after I watched this video from Jordan Fabrics. She shows you how to easily make placemats and napkins!
Doesn’t it look beautiful to have matching napkins! Teal seems to be my “goto” color this year, I have in our bathroom and kitchen.
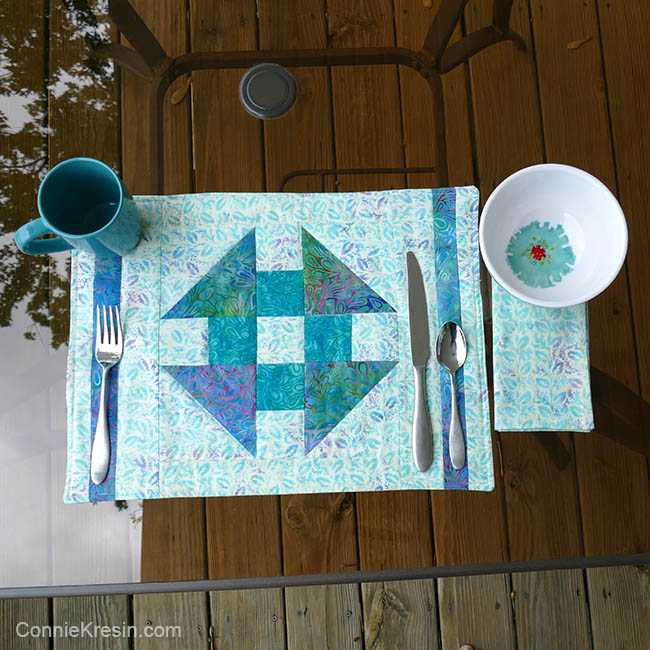
I only had enough fabrics to make two placemats and four napkins which will work perfectly for Builder Bob and me.
Can you see how easily it would be to use any quilt block in the center of your placemat? If you make some I would love to see them!
Binding
I still prefer the look of binding on placemats and if I were making these as a gift, I would definitely add pieced binding. I have a easy quilt binding tutorial that you might like to checkout.
More placemat tutorials I have shared
- Happy Summer
- Topper and Placemats
- Psycheldelic Placemats
- QAYG Placemats
- Churn Dash Christmas
- Tis the Season
- Wonky Tree


Connie,
I love your tutorials and want to download a few, however, I do not understand why I have to download a free browser. Please explain.
Thank you, lovely work!
You don’t need to download a browser, that might be an ad. All you have to do is go to my library for my downloads.
Can’t wait to make these lovely place-mats. The dark and lighter fabrics combine beautifully.
Connie your pillow and placemats are the best. Very inspiring.
Have always loved this pattern. Admire the colours you used, beautiful cool looking. Also a great idea for place mats. Thanks again Connie.
Beautiful!!! I love the colors and your tutorial is awesome!!
Love these, and love the colors! If you didn’t use a special foot, how did you do the rolled hem? I’ve been interested in trying a rolled hem but fiddly things like that often don’t turn out for me.
Lovely and simple!