
Easy Dish Rug Tutorial
This post may contain affiliate links which won’t change your price but will share a commission.
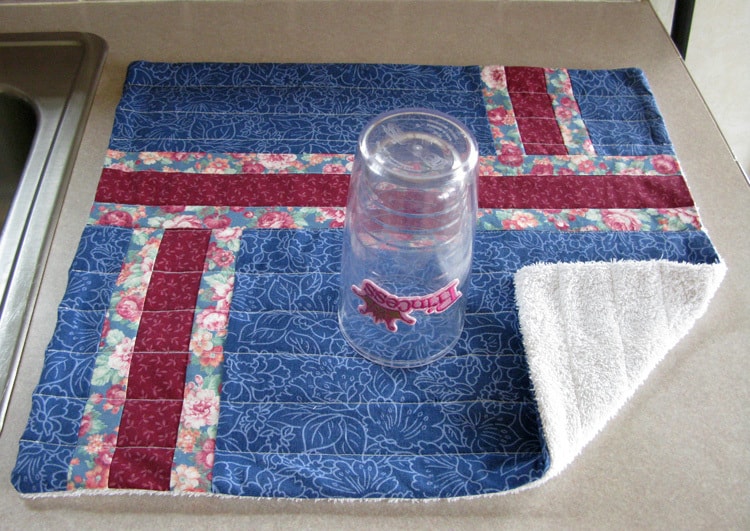
Let’s make a quilted dish rug with my dish rug tutorial! What is that? Maybe I should have called it a dish mat as you will use it when washing dishes as a mat to put the wet dishes on. I just love using one of these instead of a dish towel next to my sink. This is a great way to use up old towels that you have.
My quilt dish rugs are usually about 17 x 20 inches.
Measure the counter space that you want it to fit if you need a smaller or bigger one.
This is a great way to use up fabric in your stash that you don’t care for anymore. Your dishes won’t care what they are sitting on. Okay, let’s get started.
Quilted Dish Rug Tutorial
Fabrics
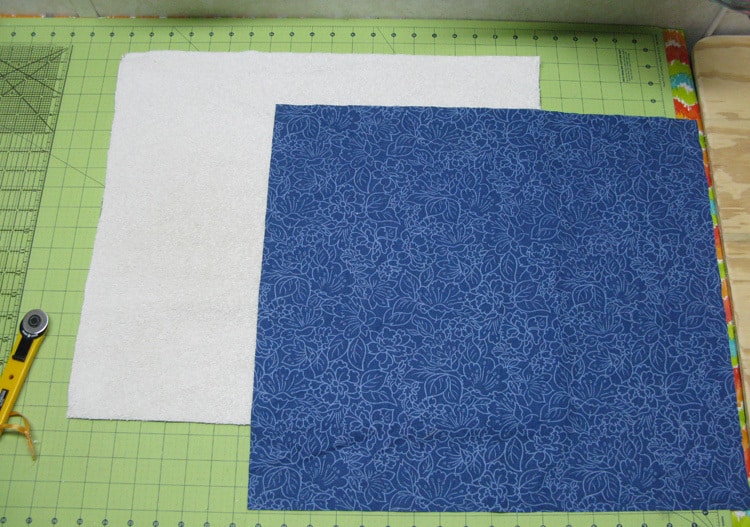
- Main fabric – blue – 1 fat quarter or a piece of fabric 18″ x 22″
- Accent fabric – wine – ¼ yard or a fat quarter
- Accent fabric – floral print – ¼ yard or a fat quarter
- Towel – use an old towel you have that is at least 18″ x 22″
Cutting
- Main fabric – blue – cut the fabric 18″ x 22″
- Towel – cut to 18″ x 22″
- Accent fabric – wine – cut (1) 2″ strip the width of the fabric
- Accent fabric – floral print – cut (2) 1½” strips the width of the fabric
I am using an old white towel for my backing.
Piecing the Quilted Dish Rug
Stitch together with a 1/4 inch seam allowance.
Sew a 1½” floral strip to one side of the 2″ wine strip, and add another 1½” floral strip to the other side. If you are using fat quarters, you will have to repeat this step.
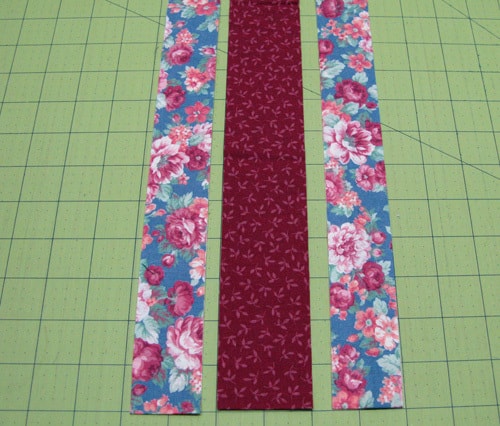
Press the seams to the floral print.

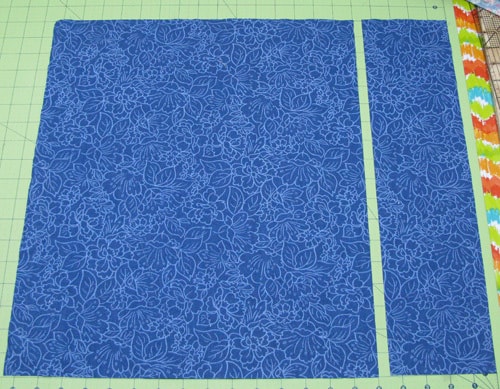
Place your 18″ x 22″ blue fabric on your cutting table with the 22″ side as the width and cut 4½” off of the 22″ width so you have 2 pieces. One is 15½” x 18″ and the other is 4½” x 18″. Don’t throw away the 4½” x 18″ piece.
Take your coordinating fabric strip and stitch it to one side of the larger piece as shown. The three sewn fabric strips will be longer than needed.
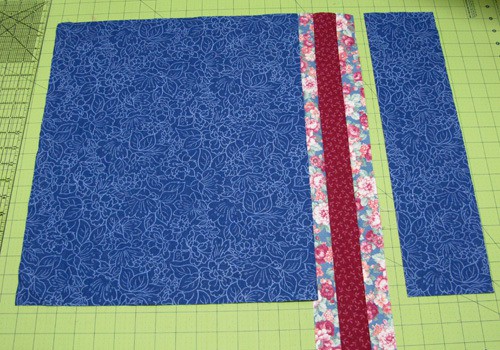
Add the 4½” x 18″ blue piece to the other side. Press the seams toward the blue fabric.
Cut the three sewn fabric strip section off so we have it for the next step.
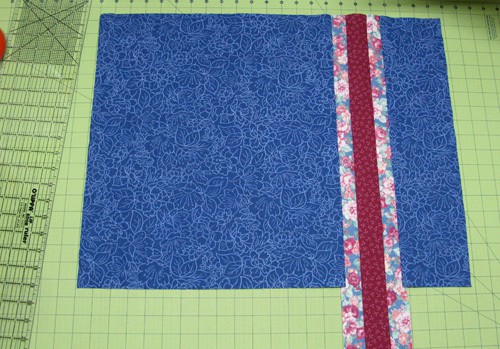
Turn your fabric – like this so the pieced sections are all running horizontally.
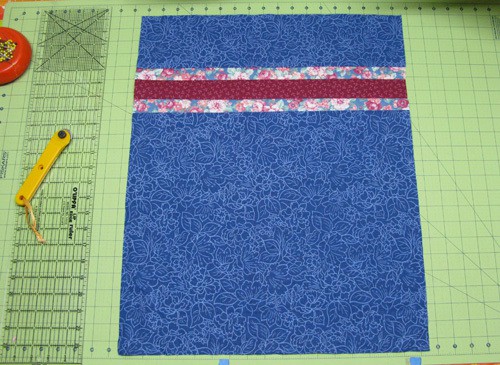
Cut 6″ off of one side – don’t lose it.

Take your coordinating strip and sew it to one side. (I bet you already figured that out).
Before you sew the other side, turn the coordinating strip so it is on the opposite side. This makes it simple as you don’t have to match the strips.


Next, get a dish towel or what I used was an old towel that I had, and cut it to 18″ x 22″.
Once it is all pressed get your towel. Your fabric will be bigger. Lay the right side up and place the towel on top and trim it even with your fabric. You have plenty of room to move it around.

Trim the dish rug to the size you want
Now trim your dish rug to 18″ x 22″.
The pieces you trim off can always be used for other projects like a mug rug.

Pin all around your fabric and sew with a 1/2-inch seam. I used a ½-inch seam allowance because the towel was bulky and it would have been difficult to sew the normal ¼-inch seam allowance.
I was able to use a Schmetz Universal 80/12 needle on my vintage 15-91 Singer but if your towel is really thick you might need a Schmetz Jeans Denim Sewing Machine needle size 90/14.
Sew all the way around the dish rug – don’t leave a opening.

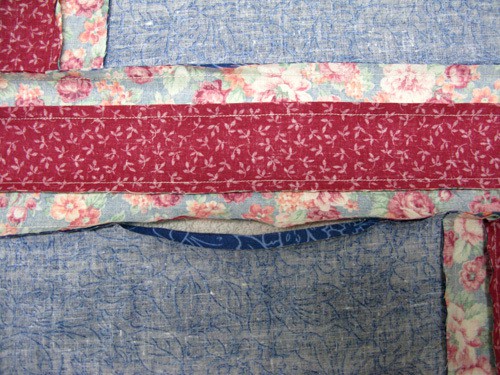
Trim the corners. You are probably thinking I goofed……how can I turn it right side out….what we are going to do is use our seam ripper and open up a section in one of the strips.

I opened the seam up about 3½ to 4 inches to make it easy to turn the piece right side out.

Here is a closer view so you can see how I opened up the seam.
See the opening, now carefully turn your dish rug right side out. Try not to stretch your opening. You may want to go back and back-stitch the sides of the opening. Press your dish rug.

Press and pin closed the opening. Now top-stitch and catch the opening in your stitching.

Quilting the Dish Rug
This is a great quilt project to do some straight stitching lines. On this one, I just stitched straight lines about 1½-inches apart. I just back-stitched at the beginning and end of each line.

Finished! Now is it a dish rug or a beer rug????? Builder Bob couldn’t resist putting empty beer cans on it. I hope you liked this tutorial. I think I will have to make a trip to Goodwill and look for towels as I’m going through our old ones pretty fast making these for everyone. Find old towels at Goodwill, give them a good washing and bleach and they would be perfect for dish rugs.
My fabrics weren’t washed before I sewed them and I have already washed and dried my dish rugs. They feel so much softer and didn’t shrink very much at all.
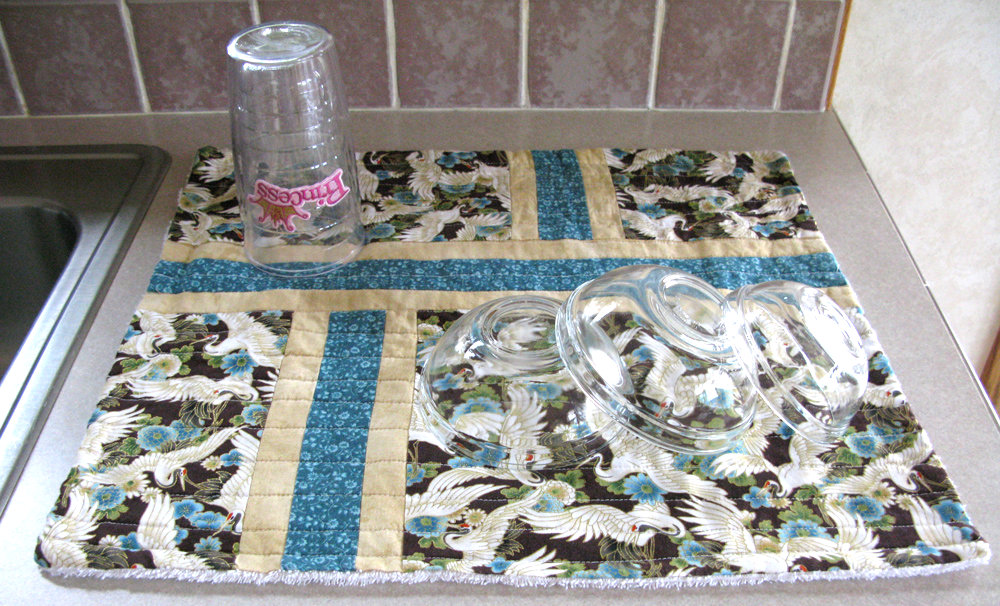
Dish Rug Tutorial
Here is another quilted dish rug that I made. I hope this gives you some ideas!
You could use any orphan quilt blocks to make quilted dish rugs. Just add borders to get the block to the size you want.
Here is a dish rug made with leftover blocks from my Petunia Strings quilt. Sometimes a square dish rug will work better on your counter.
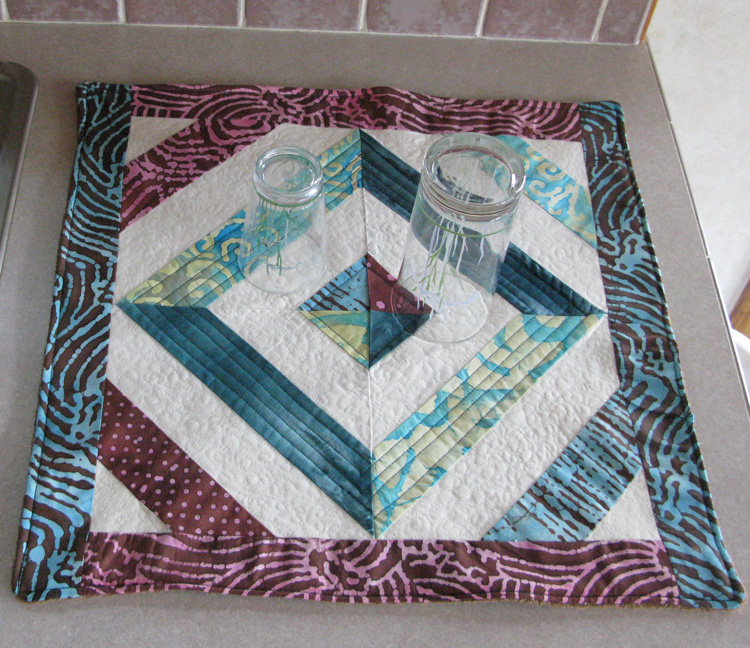
Quilted Dish Mat
Get a PDF of this quilted dish rug tutorial.
Please note that this post contains affiliate links, which means I’ll earn a small commission if you purchase through my link at no extra cost to you. Please see the full disclosure here. As an Amazon Associate, I earn from qualifying purchases.
Great deals for you!
Looking for great buys on fabric and things? Check out these links
- Connecting Threads
- AccuQuilt Deals
- Fat Quarter Shop Daily Deals
- Green Fairy Quilts – Daily Deals
- Missouri Star Quilt Co – Daily Deals
- Scrapbooking
- The Quilt Keeper
- SewingMachinesPlus
- Electric Quilt
- My Amazon Store for all the quilting things I use and more

About Connie
Hi, I’m Connie Kresin Campbell, the quilter, writer, and photographer behind Freemotion By the River. I enjoy inspiring others with my quilt tutorials and patterns. You’ll also see my sweet adopted dogs from time to time.
Be sure and subscribe to my newsletter for more free tutorials and printables.
Love this idea. Thank you for this tutorial. This way we get the right size and use up scraps.
Love this! Definitely going to make some.
NICE !! I’m going to have to make me a couple to use when I wash crystal etc. Good gift idea too. Thanks
I have already added these to my Christmas list to make as gifts. Have so many old and new towels and some really pretty fabric. Home made gifts are so nice to receive!
Looks like a fun project, I was looking for the pdf version,
Amen to everything everyone is saying! Great idea – few things just shouldn’t go in the dishwasher and this is lovely! Thanks!
Great idea! Looks much nicer on the counter than the flour sack dish towels I use.
What a great idea! And love the reminder that the towels don’t care! This is going on my to do list for Christmas stocking stuffer ideas. Thanks for sharing.
GREAT IDEA!! I have a lot of old towels that are too nice to throw out but they will get a new life with these dish rugs! Thank you!
That is a very clever idea!
What a great idea! Neat way to use scraps and old towels. Thank you so much for sharing with us.
Capital idea, Connie! You read my mind. Earlier this evening, I was hoping for something nice to replace the dreadful paper towel or the dish towel I use for this purpose. A dish mat!! Who would have thunk? On tomorrow’s first-project list.
I will also use your unique design and pull out my older bath towels to make bathmats. I love the easy-to-make design. Should turn out very nice. Thanks for the money saving, upcycle tips. I admire your never-ending talent and creativity. Thanks for your generous sharing. The mat is so nice and beautiful.
Good idea! They’ll be way nicer than store bought bath mats that make a mess in the washer when the foam inside dries out. Guess i’m going to be making those too.
Connie this a really great idea. I use a dish drying mat under my watercolors and this would be a very pretty way to combine my love of sewing and painting.
A great idea Thank You Connie I guess I will have to make a couple.
Love😊 ♥️
I really like this tutoriel. and a fab idea. I had some towels stashed away from out trailer camping days. Even old Tea Towels would work. Or an old table cloth. Hey it got me into my sewing room again, I thank you for that. Hubby was sleeping to I made the escape. Also found some quilt blocks I can incorperate into the rug. This is 2023/01/07. thank you Connie.
So much nicer than a store-bought mat with thick padding – or an old towel.
This lovely design can be colour matched to kitchen decor. Fine glasses won’t topple over and the mat can be washed when necessary.
I’m going to make a couple for myself and more for gifts.
Thanks Connie for another imaginative and useful project.
LOVE IT! There are so many things I can’t put in the dishwasher and I put them on towels, but this is so pretty! Thanks!
I also have some old hand painted dishes that I use and can’t go in the dishwasher… After reading this (REALLY reading not scanning) I saw how you opened a seam in the quilting! Brilliant (as always) so the edge doesn’t get the bumpy look!!!!!! And I have “several” test blocks that didn’t become “real” quilts that will be perfect for this. Thanks again!
Love your dish mat i plan to make one just like it Ive been using any thing thats handy it would be nice to have a pretty one Ha.
Hi Connie,
Thank you for the dish rug tutorial. I have made a bath mat and wondered if I could do the same for the dishes. You confirmed my suspicion! Thank you so much!
Hope you have a wonderful day!
Yay! One more excuse to quilt something around the house. Will also share with my quilt group. (Will credit you)
Thanks so much
Love the dish mat idea. You are so cleaver. Thanks for all the ideas you sent
Hello Connie! Thank you for such a great idea. I could use more dish mats and maybe even a dish mat for my dog’s water bowl. Love your newsletter and I hope Rusty is doing well. I missed if he had to have eye surgery again, but hope he is doing well.
Thank you again for great projects.
Judy – Michigan
Connie, this is SUCH a clever idea!! Thank you. 🙂
Wow love the dish rug I have several thick towels that are looking yukky and since I’m having recoup day bad knees and hip I am going to use up some qiult pieces and make a pretty dish rug thanks again for sharing
I am making this today. Getting rid of that ugly drain tray. Thanks
What a lovely tutorial and such a great idea. I've got to make one. Thanks
What a great idea, Connie! I always think I'm going to use some of my frayed towels to make potholders–my mom and aunt constantly made them with scrap fabrics–but I don't get around to it. I like your idea–and then maybe I could make some matching potholders!
I finally got around to making this as a gift – it turned out great. Wonderful tutorial. I showed it to my mom and she made a whole bunch for Christmas. Everyone liked the idea. I'll be blogging about this on Applique Thursday as I put some applique on it – hehe, and I'll share your link then. Thanks, Connie!
Oh, what a great way to put the good parts of old towels to use. Thank you!
What a great idea! I just use an old dish towel. This is sooo much cuter! Thanks for sharing!!!
I LOVE this!! I always drag out a bathroom towel which looks sooo tacky! Can't wait to make this! I need to stop blogging- my list of projects seems to never end! GREAT post! Thanks a ton! Hope you can stop by sometime~ Your newest follower~ Yolanda
This is a great tut. I have been digging through my stash and found towels I had cut up. I have no memory of what I thought I was going to do with them and this looks like an adorable option. It looks much neater than my dish towel on the counter. Thanks for sharing!
This idea is just amazing. Oh of those, "Some people are so clever!" ideas! And the beer cans … the perfect touch! 😉 jules
Good idea! Thanks for the tutorial.
Fantastic tutorial. I will definitely give this a go. This is so much better than just using a tea towel. I will be giving that a go!
Great tutorial, Connie! I especially like the fact that it is Left-Handed! We need more of those! ;))
And you need my button – hint – hint!!
^..^
Great idea & Tute! Whoop Whoop!
Wow, who would have thought? Neat idea and thanks for sharing the tutorial. Even better with the PDF button!
What a great idea! Thanks for sharing your tutorial, too!! Whoop whoop!!
Cute Idea!
Wanting to make something like this for awhile!! Love yours with the beer cans on top
nice ideas….I am going to have a look at the photo editing program eventually…lol. I have too many thing on the go right now..but it did a great job on your garden pic
Thanks for the Tut. I will have to try make one of these as I need one badly. Thanks!
Thank you for sharing the tutorial for a clever idea.
Ahhh – now that's a good idea! We just use old, odd placemats, but they don't match the decor. . . 😀 Thanks for a tutorial
What a clever idea. You could match the decor in your kitchen. I'm adding this to my to-do list. Thanks for the tutorial.
What a fab idea!!