
Diamond Stars Quilt Tutorial
This post may contain affiliate links which won’t change your price but will share a commission.I have a beautiful Diamond Stars quilt tutorial to share with you. This could easily be a wall hanging or a table topper on your table.

Today I’ll show you a beautiful batik star quilt that can be used as a table topper or a wall hanging using this fast and easy quilt block and the AccuQuilt GO! dies.
If you have the new AccuQuilt GO! 10″ Qube Mix & Match set, you can make this in no time at all! This is another one of my favorite sizes of blocks to make and there is a lot you can do with this set!
Other sizes of the AccuQuilt GO! Qube will work and either make a smaller or bigger Diamond Stars quilt.
I have received many emails from quilters saying they have bought the AccuQuilt GO! cutter but really don’t use it much, I use mine all the time! I can cut half-square triangles (HST) in no time at all and they are exact.
I hope you enjoy this tutorial!

Diamond Stars Tutorial
24-inch square
GO! Fabric Cutter:
- GO! Cutter (55100S)
- GO! Big Electric (55500)
- GO! Cutting Dies: GO! 10-inch Qube
Below are the dies in the 10-inch Qube that I used.
- #2 Square – 55804
- #4 Quarter Square Triangle – 55806
- #5 Half Square Triangle – 55807
- #6 Square on Point – 55808
GO! dies that were used for the sashing and binding
Fabrics: I used batiks from Island Batik.
Tan Batik – 1 yard – includes cutting binding and backing
- Cut one strip 6 3/4″ by the width of fabric
- Sub-cut (4) sets #4 Quarter Square Triangles (16 pieces total)
- Cut one strip 3 1/4″ by the width of fabric
- Sub-cut (16) #2 Squares
Orange Batik – 1/4 yard or fat quarter
- Cut one strip 4 1/2″ by the width of fabric
- Sub-cut (4) #6 Square on Point
Dark Brown Batik – 1/4 yard or fat quarter
- Cut two strips 3 3/4″ by the width of fabric
- Sub-cut (32) #5 Half Square Triangles
Cream Batik – 1/4 yard or fat quarter
- Cut one strip 3 3/4″ by the width of fabric
- Sub-cut (16) #5 Half Square Triangles
Rotary Cutting:
If you don’t have an AccuQuilt GO! cutter, you can rotary cut your fabric in the following sizes.

One block:
- A – Tan batik – cut (4) 3″ squares
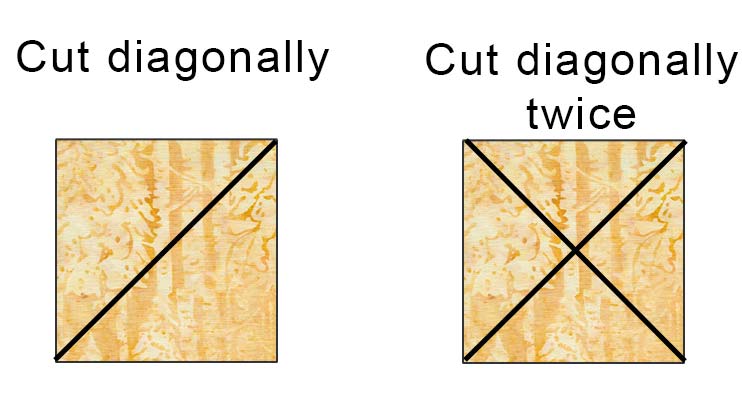
- B – Tan batik – cut (1) 6¼” square and sub-cut diagonally twice
- C – Cream batik – cut (2) – 3 3/8″ squares and sub-cut diagonally once
- C – Dark brown batik – cut (4) – 3 3/8″ squares and sub-cut diagonally once
- D – Orange batik – cut (1) 4″ square for the center
Wall Hanging – four blocks:
- A – Tan batik – cut (16) 3″ squares
- B – Tan batik – cut (4) 6¼” squares and sub-cut diagonally twice
- C – Cream batik – cut (8) – 3 3/8″ squares and sub-cut diagonally once
- C – Dark brown batik – cut (16) – 3 3/8″ squares and sub-cut diagonally once
- D – Orange batik – cut (4) 4″ squares for the center
Use a 1/4″ seam allowance throughout.
- Pin and sew 2 cream Half Square Triangles to opposite sides of the orange Square on Point. Press toward the dark fabric.
- Pin and sew the last 2 cream Half Square Triangles to the other sides of the orange Square on Point and press.
Make 4

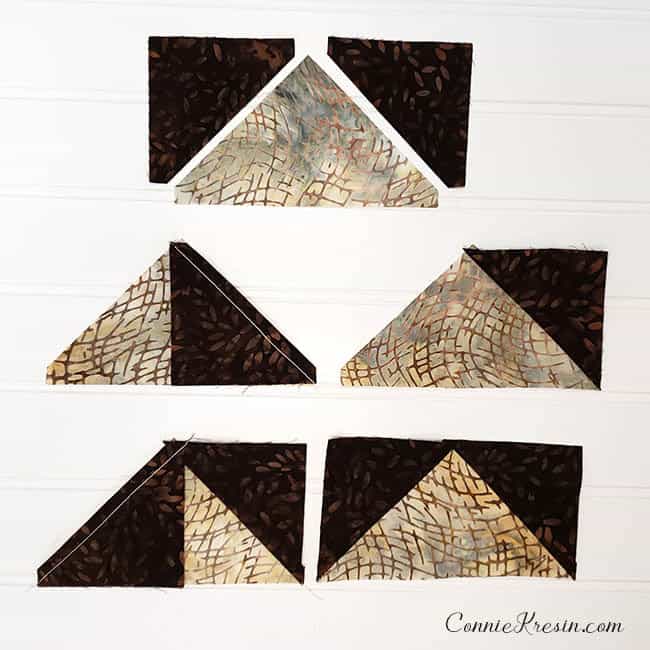
Next, make some flying geese blocks using the Quarter Square Triangles and the Half Square Triangles.

Make 16 flying geese units.
Pin and sew one tan batik quarter square triangle and two half square triangles together as shown in the following diagram. Press toward the dark fabric.
Arrange the sections as shown below.
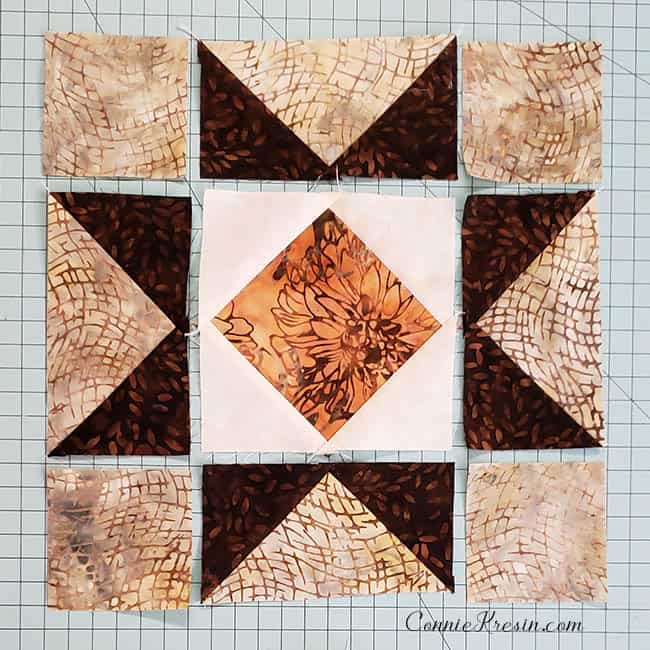
Sew the pieces together in three rows and then sew your rows together to make the block. It will be a 10½” unfinished block.
You can get an ad-free printable PDF version of this tutorial in my shop. The photos have been reduced in size.

Make 4 Diamond Star blocks.

Tan Batik – sashing
- Cut three strips 2″ by the width of fabric
- Sub-cut two 2″ x 24 1/2″ pieces
- Sub-cut three 2″ x 21 1/2″ pieces
- Sub-cut two 2″ x 10 1/2″ pieces

Add the 2″ x 10 1/2″ sashing strips between the blocks. Do this twice.
Sew one 2″ x 21 1/2″ sashing strip between the two rows of star blocks.

Add the other two 2″ x 21 1/2″ sashing strips to the top and bottom of your quilt.
Add the two 2″ x 24 1/2″ sashing strips to the sides of your quilt.

Add batting and backing and quilt. I did some free motion straight stitching using my vintage 15-91 Singer sewing machine.
Cut 2 – 2 1/2″ strips width of fabric for the binding and sew them together. Add the quilt binding by machine, or hand-stitch it down.
Diamond Stars Quilt Tutorial
You can get an ad-free printable PDF version of this tutorial in my shop. The photos have been reduced in size.

I hope you have enjoyed this fast and easy Diamond Stars quilt made with the AccuQuilt GO! Fabric Cutter and the new GO! 10″ Qube dies. If you are looking for more ideas for table accessories, you might enjoy some of my other AccuQuilt tutorials.
Here are some other posts that will inspire you:
Please note that this post contains affiliate links, which means I’ll earn a small commission if you purchase through my link at no extra cost to you. Please see the full disclosure here. As an Amazon Associate, I earn from qualifying purchases.
Great deals for you!
Looking for great buys on fabric and things? Check out these links
- Connecting Threads
- AccuQuilt Deals
- Fat Quarter Shop Daily Deals
- Green Fairy Quilts – Daily Deals
- Missouri Star Quilt Co – Daily Deals
- Scrapbooking
- The Quilt Keeper
- SewingMachinesPlus
- Electric Quilt
- My Amazon Store for all the quilting things I use and more


About Connie
Hi, I’m Connie Kresin Campbell, the quilter, writer, and photographer behind Freemotion By the River. I enjoy inspiring others with my quilt tutorials and patterns. You’ll also see my sweet adopted dogs from time to time.
Be sure and subscribe to my newsletter for more free tutorials and printables.
Very pretty! Seeing the pelican statue I’m betting you miss being on the Mississippi River at times.
I just love this pattern!! I have AccuQuilt and love it until my car accident, so ended up trading up to the Go Big and very happy with it.
I love this pattern. I made a similar pattern in queen size. I use my two AccuQuilt cutters all the time. For this quilt I needed 2000+ pieces because I used the 6″ Cube. If I had to cut them with a rotary cutter, I probably would not have made it. I made it in red, white and blue, but I like the browns.
That’s one of my favorites! Of course I’m in love with star blocks.
Thank you for such a beauty stars, your colors are beautiful. You & Bob keep getting better. Lots of prayers
This is a pretty table topper. Thanks for the rotary cutting directions. Love the pelican.
My, my. This quilt is beautiful and the colors are luscious, Connie. It hard to keep my eyes off it. Lovely. Thanks for sharing and the “cutting without Cutter” instructions and much-needed illustrations.
Hi Connie!
This is a beautiful table topper or small quilt! Stars are my favorite! I’m glad to hear that your streets are clear. That’s always good! So Rusty has his “niece” over for a visit? I bet they will both enjoy each other’s company. Have fun and enjoy sewing today!
Priscilla
Hi Connie! I love the bright & sassy newsletter! 👍🏻👍🏻😃😃
I saw Rusty & another dog & thought you got another dog! Good thing I read about it! 😜
I don’t like browns usually, but I love this star quilt & the colors are stunning. Thank you for sharing. 🤎😊🤎
Another amazing quilt project. These batik colours are lovely. The black and white triangles add a nice contrast.
I visualise this as a table topper for my dining room that has coffee and cream colourd drapes (curtains).
Thanks, Connie, for all the work you put into providing easy-to-follow instructions.
So beautiful! Warm colors for a nasty rainy/snow day here. Stars are so sharp and elegant. Love seeing you and “The Boys”. Stay warm and dry! QUILT!!!
What a wonderful quilt tutorial. Thank you so much. Is there a PDF version to print out?
Not at this time Carletta, but I’ll add it to my TO DO list.
I love the star block and would like the rotary cutter instructions. Don’t have all the dies for cutting. Thanks and love your work and instructions.
Thanks Carol, I will add that to this post soon!
I would love to see rotary cutter instructions.
I would love to have the rotary directions for this diamond star quilt. It’s beautiful.
Thank you
Elaine
Hello Connie, This is a beautiful quilt project! Connie, you are so talented when it comes to picking out fabrics, these brown batiks are such a brilliant match. Lately, it seems like I have been wanting to make Star Quilts and this new pattern you have designed is going to be so much fun to make. I will have to check the dies I have to see how they match yours, but I am learning how to make the Go Cutter work for me, even when I do not have all of the dies needed in a project. All of the CHEAT SHEETS that so many quilters have written for us help tremendously. Thank you for sharing this beautiful quilt project! Have a fantastic day!
Love both of the quilts you are showing here! HSRs aren’t used often but I love them! I also love your Pelly statue…I still miss reading about him!!
Beautiful table topper! I especially love that background fabric.
Oh boy this is just so pretty!! And it matches Pelly so perfectly. Hey I got lots of scrap stash to cut, I’ll just come to your house and cut, hehehe, I might have to stay a few weeks, LOL
cute! I love these star blocks!