
Crossroads Block Tutorial in 3 sizes
This post may contain affiliate links which won’t change your price but will share a commission.

Crossroads Quilt Block Tutorial
Last Saturday I showed a couple of the Crossroads blocks that I had made for this month’s Rainbow Scrap Challenge after seeing the block that Teresa showed.
This is a old block pattern that was called Patience Corner.
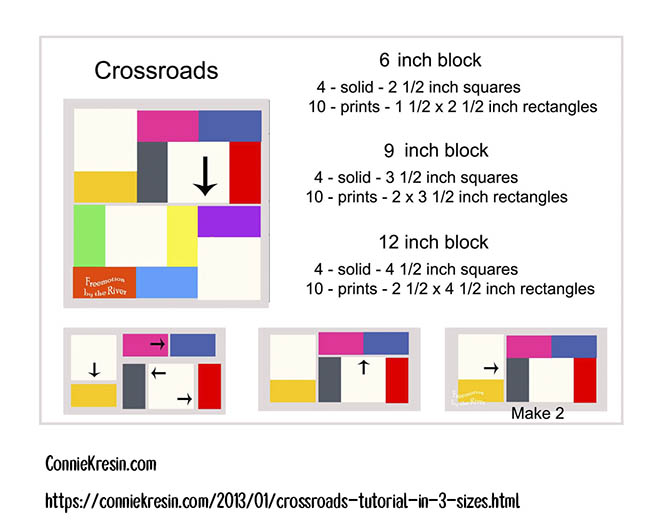
I made a couple small ones and then thought…..why not make it in different sizes. At the end of this post there is a reference card you can print with the sizes on it.
6 inch block (finished size)
- 4 – 2 1/2 inch squares – background fabric
- 10 – 1 1/2 x 2 1/2 inch rectangles – assorted prints
9 inch block (finished size)
- 4 – 3 1/2 inch squares – background fabric
- 10 – 2 x 3 1/2 inch rectangles – assorted prints
12 inch block (finished size)
- 4 – 4 1/2 inch squares – background fabric
- 10 – 2 1/2 x 4 1/2 inch rectangles – assorted prints
Here is a diagram for putting the pieces together.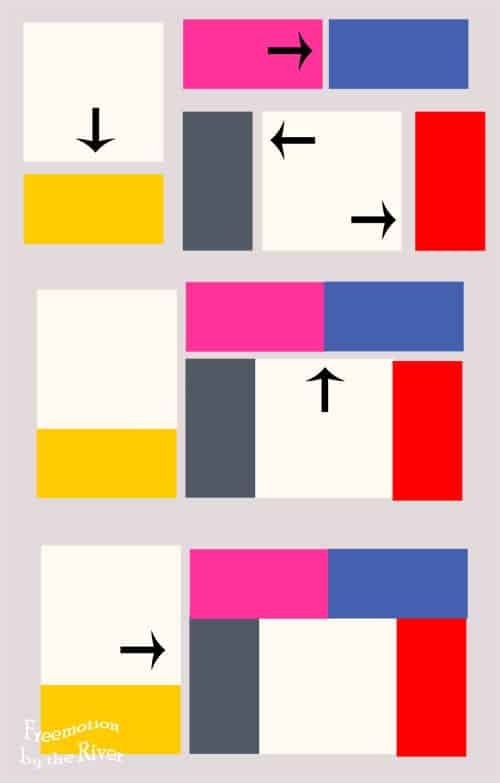
That completes half of the block, now use the rest of the pieces to make another one the same way, turn it and sew together.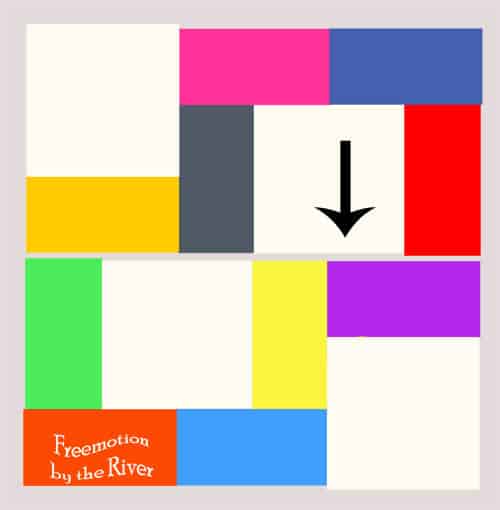
Here is a photo with my pink scraps.
I made a little reference card that you can print out. Click on the image and save it.
I’ve been playing in Electric Quilt with the block in different sizes to come up with with quilt ideas. Do you like the idea of a printable block card and would you like to see more?
Be sure to checkout my other Crossroads tutorials
Looking for another free pattern?
Get this one
Pieced Heart Quilt

Some of the links on this site are affiliate links and I may be compensated a small commission when you make a purchase by clicking on those links. I only promote products and services that I use and love myself. Your support enables me to maintain the content of this blog and I am truly grateful!
Just recently found your site…so glad I did! Your directions are clear and love the pictures. The block card is a great idea. Also, having different sizes is fantastic, all the thinking is done!! I enjoy any history on the quilts. Good luck on your move, can’t think of anything worse. Thanks for all your ideas.
Nuna in Waterford, Pa
I Love your blog ad all the patterns. I thought that you also had Free PFD’s for the tutorials. I cant seem to “copy” them so I can save and view later. Please advise.
Nark
Thank you for this block. I would like to see more.
Personally, I think a printable block card would be fantastic.
Thanks for the great idea of the card! I love handy little tips like that, and I think I'll make some up with my favourite blocks.
this is a wonderful block. thanks for the tutorial. yes I really appreciate the card with the different sizes. thank you. oh and yes I would love to see more. thanks
I love the idea of block cards. Thanks so much and I would LOVE to see more!
Thanks, Connie. Yes… this is a great idea!
Duh!!! I figured it out. Thanks again, Connie. You know what they say: if all else fails, read the instructions! lol. I forgot to SAVE first and just printed from the webpage. I feel kinda dumb this morning.
What a grand idea! I love it. Thanks for all your hard work. I'd like to know where i goofed b/c I had to print in landscape and it filled the page. Puzzeled. Thanks.
That is a slick way to print out the needs for this block. It is a cute block and works for all those precut scraps! Thanks for this.
What a neat block! Thank you.
Thank you, thank you. I think this will work perfectly for at least one of this year's teacher quilts.
This is such a fabulous tutorial! I really like the addition of the printable cards. Neat idea 🙂 and thank you!
Did you make out the card on your EQ? Ellyx
Thanks for the tutorial, it's a really nice block. I'd like to see a quilt made with these blocks. I don't have EQ, could you post a photo please?
Love the printable quilt card. Thanks for sharing. Also, love this scrappy pattern.
Thanks for another very helpful tutorial! I really liked this block when I first saw it and I like it even better now with what you’ve done with it.
How fun is this! Thanks for the great post! Love your blocks!
Thanks Connie! That's awesome!
The answer is YES, love the idea of a 4 x 6 block directions card! Thanks for your great work!
Very nice block! Thanks for the tutorial. I think the larger blocks could be cute with some embroidery. Thanks so much for sharing.
Love the quilt card idea! These blocks are so much fun to make :*)
Thanks for tutorial on the block!
Thank you, Connie! You were so sweet to do this. I have all my pink scraps out on the cutting table. I must try this to make this block in pink : )
Sure! Just love this block and your pink scraps. Thanks so much. I know how much work it can be to put this all together and share on your blog.
Thanks, Connie. This is a great idea.
I love this Connie! Thank you so much… your diagrams with the arrows are exactly how I look at blocks. Sometimes less really is more!
Thanks for sharing!
Beatrice.
Thanks for the easy directions Connie. Pink looks lovely in that square
Fabulous idea with the quilt card! Even with a simple block it is so easy to sew the wrong pieces together when doing it leader / ender style. This is a quick and handy reference idea that I will put to use. Thanks for sharing it.
By the way, the block is great.
I really like this Connie and the index card is a wonderful idea . Thanks for the tutorial , will print this for the future .
Thanks for the printable block card and tutorial! Would love to see more!
Great idea, Connie, and a terrific use of scraps. Thanks for the card. Yes, I would love to see more.
Very Cool! Thank you,
Sweet! And thanks for the project card. I keep all of my favorite go-to projects on index cards. Makes life so much easier!