
Box Quilt Block Tutorial
This post may contain affiliate links which won’t change your price but will share a commission.
I thought I would share a quick tutorial for a block that I have been making for a project or two that are coming up. I have always thought of this block as some kind of flower or cactus or a star when you put 4 blocks together. It is a fast and easy block to make.

I used some batiks from Island Batik to make my blocks. The tan dot batik I picked up this summer along with some other goodies when I went to visit Red-Roxy Quilt Co. in Decorah, IA. I had originally used that fabric in my Country Birds quilt and still really like it.
6½-inch unfinished block
The directions are for one 6 ½”-inch unfinshed quilt block that is 6-inches finished.
- Cream – 3 – 2 ½” squares
- Dark Brown – 1 – 2 ½” squares
- Dark Brown – 1 – 2 ½” x 4 ½” rectangle
- Medium Brown – 1 – 2 ½” x 4 ½” rectangle
- Medium Brown – 1 – 2 ½” x 6 ½” rectangle
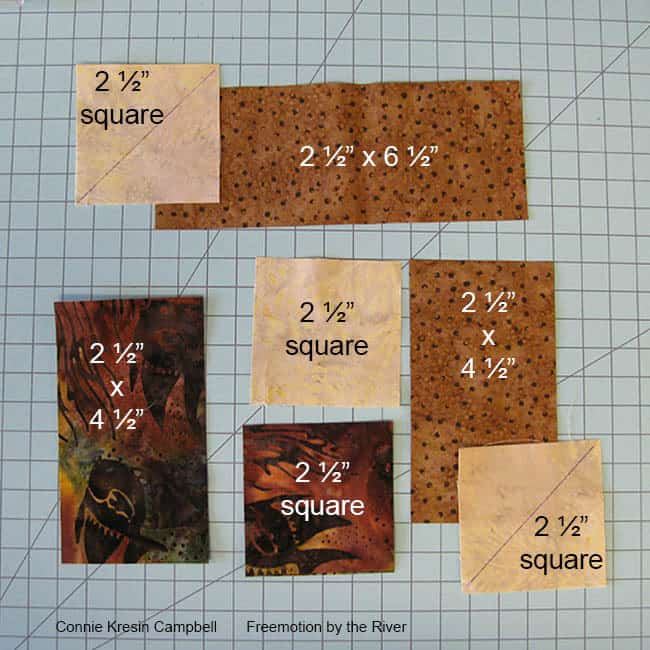
I have the pieces laid out in the diagram below.
Sew pieces together with a 1/4″ seam allowance.
- Join a cream and dark brown 2 ½” squares together.
- Press to the dark brown fabric.
- Stitch the 2 ½” x 4 ½” dark brown rectangle to the left side.
- Press to the dark brown fabric.

- Draw a line diagonally on both of the 2 ½” cream squares.
- Following the diagram – stitch on the line.

This diagram may show it a little better (even though the colors are wrong).
- After you stitch on the line and fold over the cream fabric – you will trim off the corner leaving a 1/4″ seam allowance. You can always make a small half-square triangle with the leftovers.


Sew the pieces of the block together as shown below.
This is a great block to make and it is easy! I’m hoping my next post will show you how to make a neat table topper by just switching the colors in a couple of the blocks!
The size of the block is 6½” x 6½”

I had forgotten all about making a table topper with this block until someone emailed me about it.
Purchase an ad-free printable PDF version of the Box quilt block tutorial in my shop that also includes the table topper and pillow directions. The photos have been reduced in size and the tutorial is 10 pages long.

I made another batik topper called Silent Night back in 2014 and even gave a link to where I found the block pattern but……I spent the day making the block based on how I “thought” I had made it.
I even made the block in a smaller size that I’ll be sharing as a Christmas project.

Be sure to check out my post Box Quilt Pillow Tutorial.
Great deals for you!
Looking for great buys on fabric and things? Check out these links
- Connecting Threads
- AccuQuilt Deals
- Fat Quarter Shop Daily Deals
- Green Fairy Quilts – Daily Deals
- Missouri Star Quilt Co – Daily Deals
- Scrapbooking
- The Quilt Keeper
- SewingMachinesPlus
- Electric Quilt
- My Amazon Store for all the quilting things I use and more

About Connie
Hi, I’m Connie Kresin Campbell, the quilter, writer, and photographer behind Freemotion By the River. I enjoy inspiring others with my quilt tutorials and patterns. You’ll also see my sweet adopted dogs from time to time.
Be sure and subscribe to my newsletter for more free tutorials and printables.
Thank you for your beautiful patterns
very well explained – thanks!
Just made the block and loved it I made mine into a star.
Thank you so much for your tutorial.
I’m so glad you liked it Yvonne!
Thanks Connie, It’s a keeper.i love when it is joined together.
I agree!
Connie, I am so enjoying your site.I can’t wait till i can get back to sewing.
Thank You for your kindness .
I’m so glad you are enjoying my site Betty!
Thank you for this tutorial!!! I’ve copied and saved it so I can make some now!!!
This has to be my all time favorite block! I’ve made table runners and lots of table mats. I choose colors for a plant I found or a tri-colored candle and it looks great every time! Thank you Connie, I love your creations and easy to follow tutorials!!
I am pinning this block!
Connie, I have wanted to do this block for a while after seeing it on Bonnie Hunter’s blog. What I can’t figure out is the color placement to make the boxes stand out instead of the star. I know there most be a trick to it. I guess I will just have to play with the blocks to figure it out. Thanks for the tutorial. You always explain things so clearly with lots of photos.
What a great block! I love how it looks when you put them together.
That looks fabulous. Great fabric choices too.
By playing with an additional fabric and color placement, one becomes a flower bud, three are a bouquet with a stem bundle appliqued on or pieced into the fourth square. An applique bow ties the stems into a festive nosegay. Optical illusions can be created. It’s a fun, versitile block.
This block is one of those that we non-quilters wonder why fabrics are cut up into small pieces and then sewn back together! Because those rearranged pieces of fabric become a beautiful quilt block! Island Batiks are always so gorgeous.
Aaaahhh, that’s how it’s done! Makes perfect sense when you break it down like that, but looking at these blocks in the past, I always wondered.