
River Espresso Ohio Star Block Tutorial
This post may contain affiliate links which won’t change your price but will share a commission.Have you ever wanted to make the Ohio Star quilt block with a strip pieced border? Learn how to easily make this beautiful River Espresso Ohio Star quilted wall hanging with this tutorial.
This has to be one of my quilt favorite blocks. I have added a fun border to create the River Espresso wall hanging.
You’ll find rotary cutting directions for this wall hanging and if you have an AccuQuilt GO! cutting machine, I have info on the die I used.
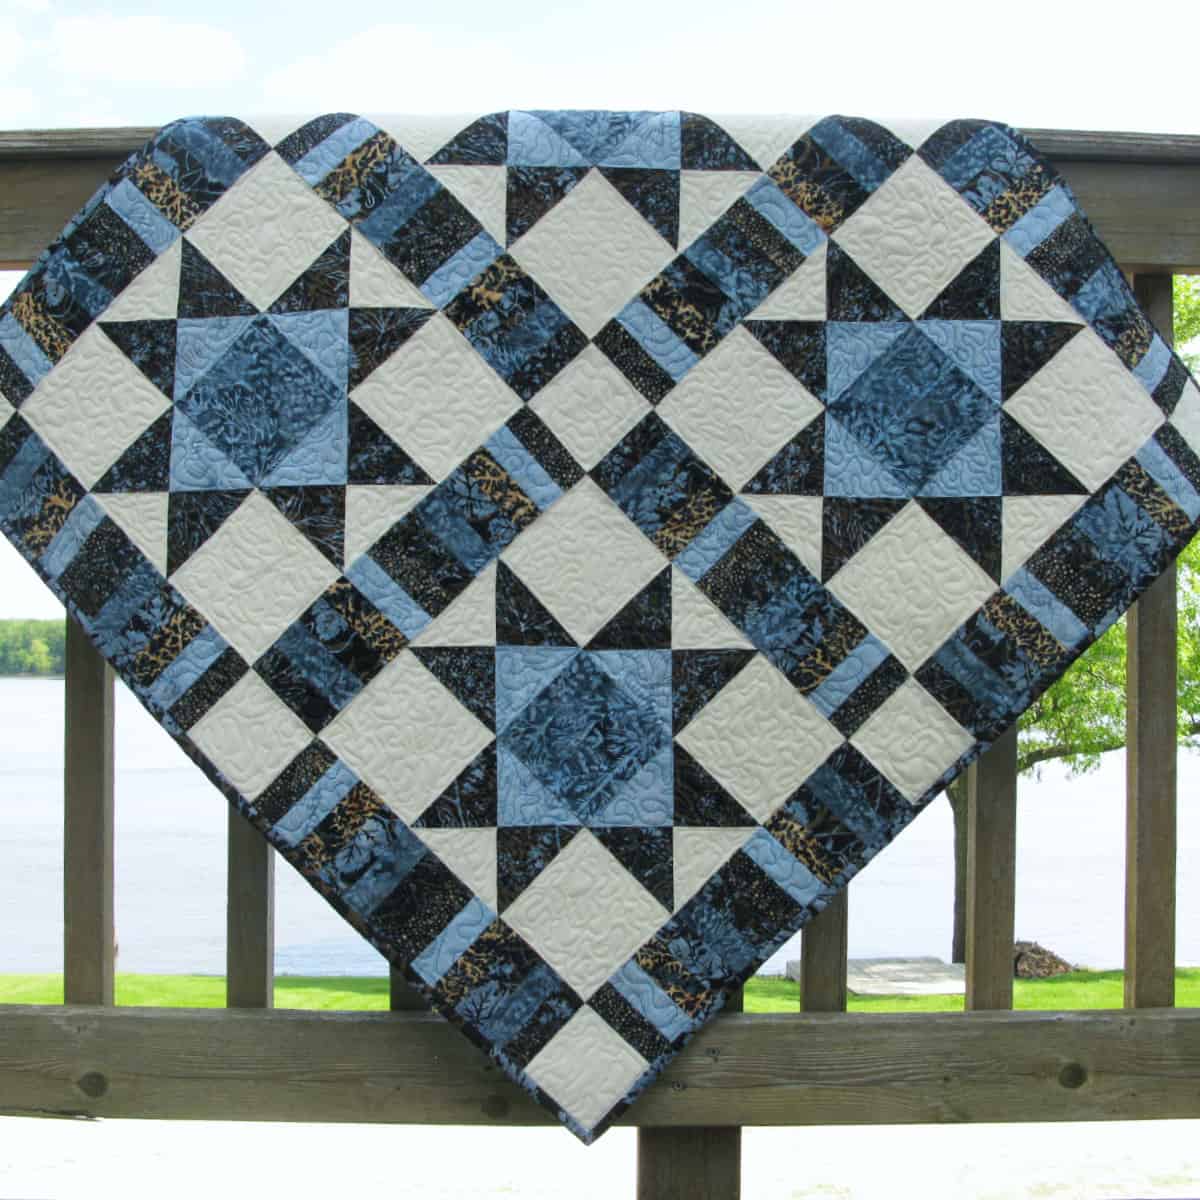
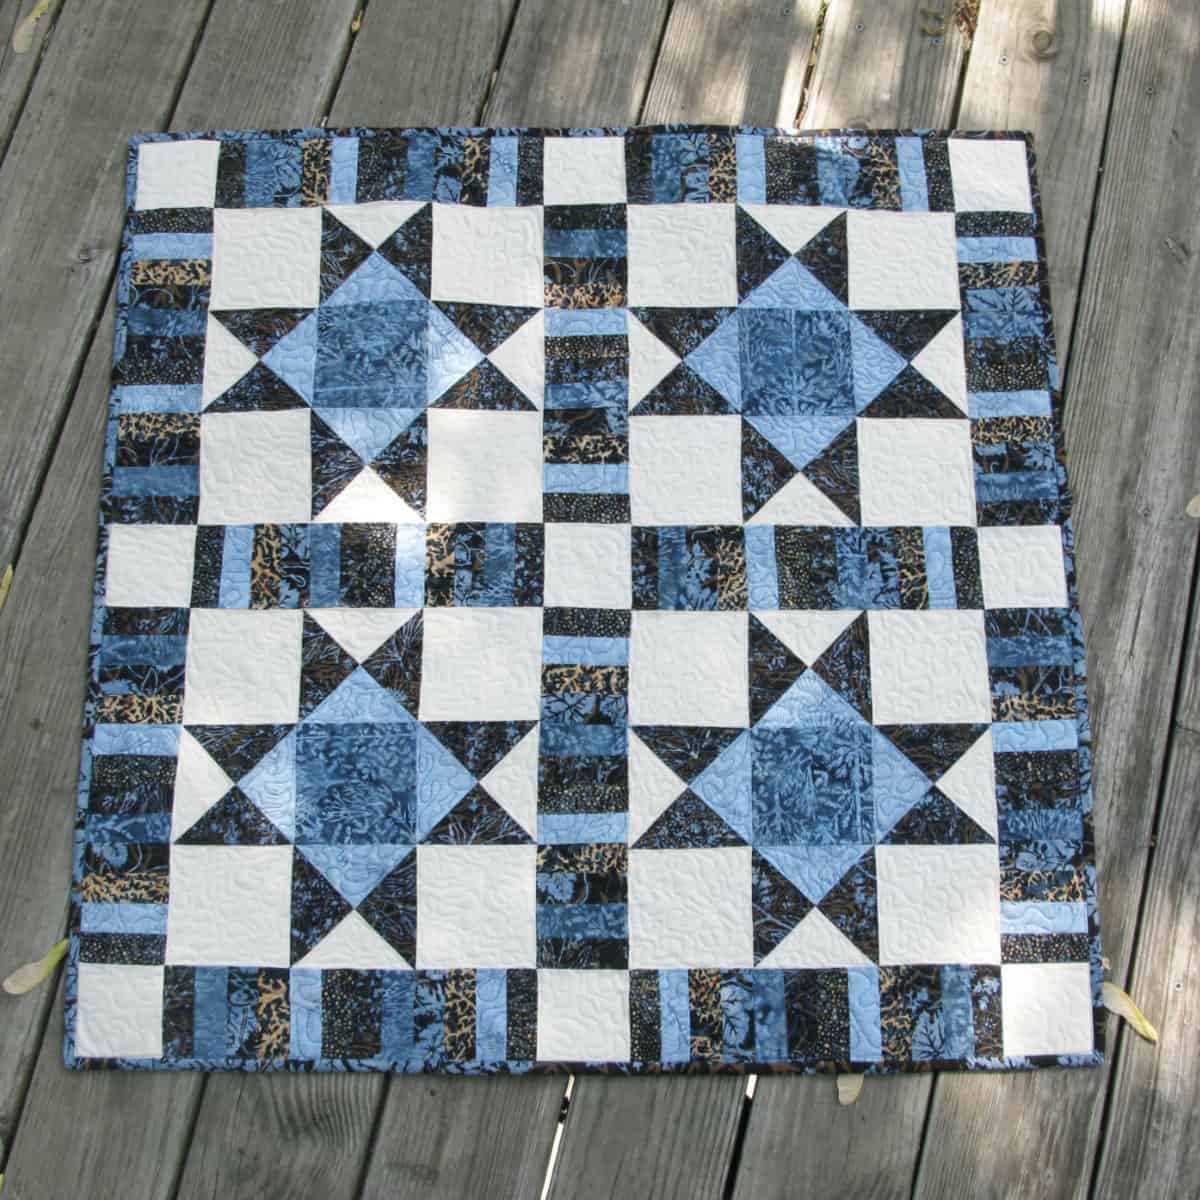
Ohio Star River Espresso Wall Hanging
33½” x 33½”
AccuQuilt has a 12″ Ohio Star die that is perfect for this quilt project. If you have their GO! cutting machine you’ll be able to cut out the blocks in no time with this die.
The Ohio Star die can be used on the GO! Baby or any of the AccuQuilt GO! cutting machines. The pieces really go together easily with the dog-eared corners.
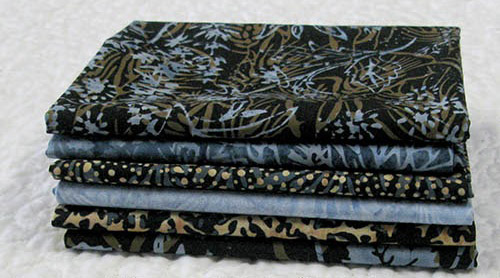
The fabrics I used are called Espresso by Island Batik, this is a beautiful batik collection that was sent to me. It is no longer available but using coordinating fabrics like these you can make a quilt that looks beautiful and coordinated.
- Equipment
- Sewing Machine
- Basic Sewing Tools
- Thread
- Quilt Ruler
- Rotary Cutter
- Cutting Mat
- Binding Clips
- Clapper – excellent for setting seams
- Lighting
Fabrics needed
Pick six different coordinating blue batiks:
- A (medium blue) – 3/8 yard
- B – (light blue) 3/8 yard
- B – (dark blue) 3/8 yard
- C – Cream 5/8 yard
- 3 more blues 1/4 yard each
- Binding 1/2 yard
- Backing 1 yard
- Batting 1 yard
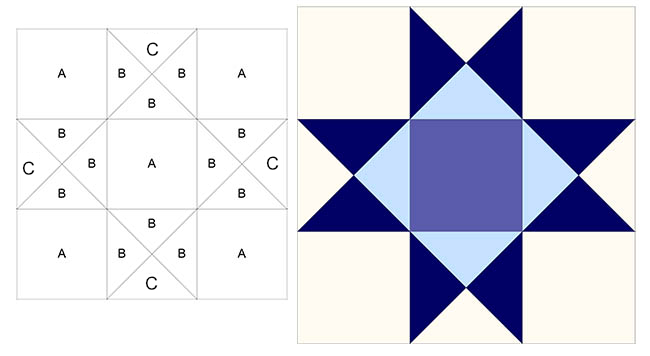
Cutting the blocks:
- A (blue) cut 4 – 4½” squares
- B (light blue) cut 4 – 5¼” squares – sub-cut diagonally as shown below
- B (dark blue) cut 8 – 5¼” squares – sub-cut diagonally as shown below
- C (cream) cut 4 – 5¼” squares – sub-cut diagonally as shown below
- A (cream) cut 16 – 4½”- squares

Piecing:
Use a ¼” seam allowance.
After you sub-cut the 5¼” squares you will make quarter square triangle blocks. Many times you’ll see this abbreviation for them – QST in quilt patterns.
It really helps if you lay out the pieces before you start sewing them together.
You will notice that my pieces have dog-eared corners, that is because I used my AccuQuilt die to cut them.

Building the sections
- Make 4 – quarter square triangles for each Ohio Star quilt block

River Espresso Ohio Star Block Tutorial
Here is the first Ohio Star quilt block sections ready to be sewn together.

Each Ohio Star block should measure 12½”
Make 4 Ohio Star blocks.
Borders:
- Cream – cut 9 – 3½” squares
- Assorted Blues – cut 144 – 1½” x 3½” rectangles
Sew 12 of the 1½” x 3½” rectangles together on the long sides. Your piece will measure 3½” x 12 ½”.
Make twelve of these.
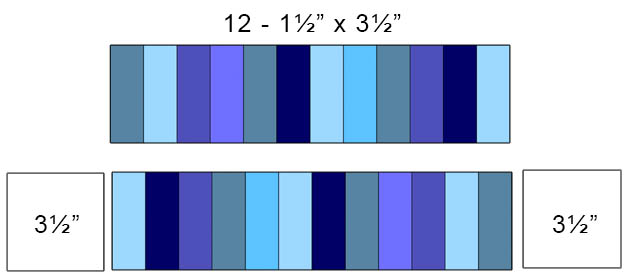
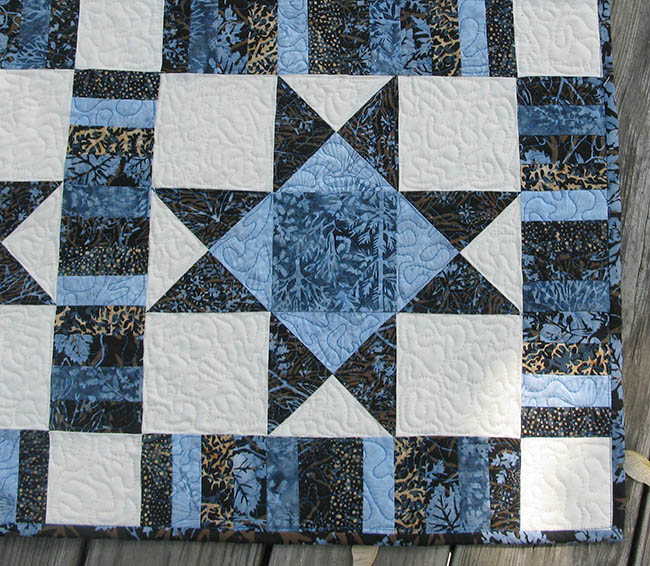
Use the following diagram to add the 3½” squares to the sections, also add sections to the Ohio Star blocks as shown.

This quilt tutorial post has been converted to a printable PDF which you can find here.
Here is my wall hanging all pieced and ready to quilt.

Finish your quilt
Sandwich your quilt with the backing and batting and quilt as desired. I chose to do a simple meandering free-motion quilting.
Quilting makes such a difference
All my quilting was done on my 15-91 vintage Singer, even the binding is done by machine using my simple machine binding tutorial.

Cut your binding fabric into 2½” strips and then join the strips together. Fold the binding in half lengthwise and press with the wrong sides together.
I am always in a hurry to get to the next quilt project so sewing my binding on by machine is what I always do.

Purchase an ad-free printable version of the Ohio Star River Espresso Quilt Here
I always like to include a photo of the back. I used two different colors of thread for my quilting, can you see the Ohio Star design on the back of my quilt?
I even put a label on the back…..nothing fancy but it is there.

I hope you enjoyed my River Espresso quilt using the Ohio Star quilt block. I also made the Fiery table runner that you will like.
If you enjoyed this tutorial, you should check out my Spinning Star quilt block tutorial.
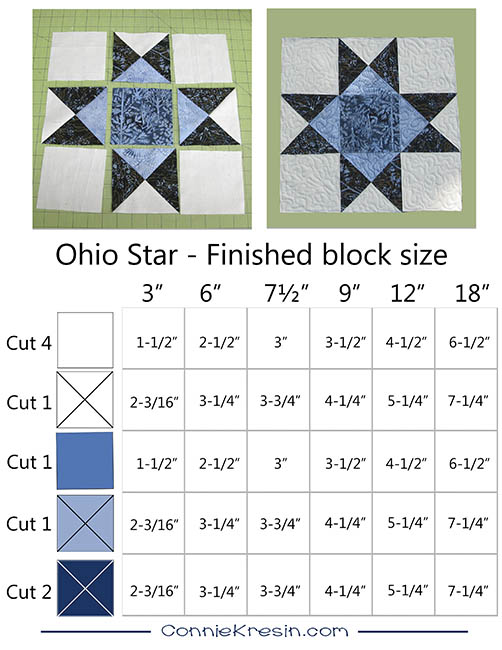
Different sizes of Ohio Star blocks
Would you like to make the Ohio Star quilt block in a different size? Here are some cutting directions for several different sizes of blocks. Enjoy!
This quilt tutorial post has been converted to a printable PDF which you can find here.
Please note that this post contains affiliate links, which means I’ll earn a small commission if you purchase through my link at no extra cost to you. Please see the full disclosure here. As an Amazon Associate, I earn from qualifying purchases.
Great deals for you!
Looking for great buys on fabric and things? Check out these links

About Connie
Hi, I’m Connie Kresin Campbell, the quilter, writer, and photographer behind Freemotion By the River. I enjoy inspiring others with my quilt tutorials and patterns. You’ll also see my sweet adopted dogs from time to time.
Be sure and subscribe to my newsletter for more free tutorials and printables.


I have a question for you regarding the Ohio Star block pattern. When you quilted it, did you first stitch in the ditch in one color and then do the meander in another color. I love your patterns and hope to make this one soon.
Gloria Ellis
Hi Gloria, no I didn’t stitch in the ditch, I actually don’t do very well at that. I can’t remember for sure but I probably quilted the cream blocks with cream thread and then went back and did blue on the rest. I always start in the center of my quilt and quilt outward.
In your layout diagram you labeled the 4 corner cream colored blocks as A rather than C. The A blocks are light blue if I’m not mistaken. Maybe I am😀🥴. Just want to clarify. Thank you for all the lovely quilt patterns.
You are correct Judy and I just updated it. Thanks for catching it.
Connie,
I’m new to quilting, when you make 1/4″ seams to put your blocks together, what keeps the edges of the seams from raveling?
What stitch count do you use to join your blocks?What size needle?
I have a Singer Precision machine. I’d like to upload a picture of the block, but there doesn’t seem to be a place to do that.
M G
Hi Connie,
I’m from Ohio and this is my all time favorite pattern of yours. Always my go-to for Ohio friends and family gifts. Thank you so much!
Another beautiful little quilt. A river of expresso might give me the needed energy to make it. Thanks for the tutorial.
Oh, Connie – Fabulous hardly describes this amazing wall hanging. I purchased this design ages ago. Now I’ll have to chase down some batik fabrics similar to what you’ve used. My sewing shop has a lot of batiks on display, so that shouldn’t be difficult. I love the borders as they blend well with the Ohio Star squares.
Connie,
I can see why the Ohio Star quilt block is one of your favorites! And with the beautiful blue batiks that you chose, the quilt is lovely. I definitely want to make this quilt!
Have fun!
Priscilla
Oh, so beautiful!! Thanks for sharing the cutting size and direction for those of us without the cutter. Really helpful, Connie.
I love pieced borders. They add such a lot of interest to a quilt and, if scrappy, can use up a good bit of smaller bits of fabric.
Thanks for the tutorial. And the block size chart!
Stunning! Love the blues for anything but this one really pops! I really need to change over to batiks – so deep, rich colors. Even the “pale” colors seem alive.
Thanks
I have become a complete nut case for triangles lately – I used to shy away from them but with your directions and these wonderful patterns, it’s just so easy! Thanks
As always Connie, thank you for this tutorial. The Ohio Star is a favorite of mine for sure. I actually have a large block cut out for a wall hanging in the queue. I am thinking of using your information here to do a single lay out for a table runner to coordinate. Have a wonderful Thanksgiving, and again, thank you for all you do to prepare and publish this information. Hugs to the pup too!
I do not have an ACCUQUILT GO, so is it possible to do your patterns without that? Is there a place on your site that would be better suited for me. I love your table runner and would love to make one, but the directions are for Accuquilt, is there a pattern for free cutting it? Thanks.
Really nice. All of those batiks play great together.
Your fabrics look wonderful in this pattern, Connie … 🙂 Pat
Definitely going to have to check out the new dies! Love those batiks and how you put them to good use!
Looks great Connie with the Batiks.I just bought some dies and wouldn't you just know the very next day after they released the new dies. LOL
I love the colors you used. Another die for my wishlist and those umbrellas will definitely be on my list
Love the sneak peek at your other project with the little umbrellas! Those are really cute! I don't have an AccuQuilt GO! or GO! Baby but I sure think that one is cute!
Wow, beautiful with the batiks. Love the die too.
It turned out just lovely. Your color choices looks stunning on this quilt.
You just know how to pic the right fabrics-just beautiful!!
Your River-Espresso Quilt is stunning. Those Island Batiks are beautiful. Looks like fabric cutting is much faster and more accurate with GO! Creative Quilting Bliss…
Very pretty. I love hearing about quilting done on those old machines. I have an old singer in good looking condition and one of the things I want to do this summer is see if I can make it work. It needs a new belt and some oil before I can try anything. 🙂 I can definitely see how a die would be very useful for those umbrellas. Those look tricky to cut out otherwise! Very pretty though.
Very cool die. And of course I love your Island Batik fabric.
So beautiful! Love the batiks! So wonderful with the Ohio star 🙂
Hi Connie, Wow I really love your quilt. The Island batiks are just beautiful. You really used them in a beautiful project! Thanks again for sharing.
Hi!!!! That is a beautiful quilt!!!! I love love these batiks!!!!! I would love to have a cutter!!!! It would be so much easier!!!!
How lovely. I've been thinking about investing is a fabric cutter for a long time, and this beautiful project is just one more reason that I should. Wonderful job!
Very pretty. That's a cute little umbrella, too.
Love the sashing!
Connie – your Ohio Star quilt is GORGEOUS – I love how the white sets off the beautiful batik fabrics…and the quilting is the "icing on the cake". I'm looking forward to seeing your Ohio Star tutorial.
Hi Connie, I just love the quilt, the fabric looks wonderful together. I wish I had a fabric cutter maybe one of these days!
Great little quilt! I love the back where you can actually see the Ohio star because of the thread colors you used when quilting. Those umbrella squares are really cute too!
The Ohio Star is one of my all time favourite blocks, Connie, and your version with that stripey sashing really makes those stars shine! What gorgeous batiks! Looking forward to your tutorial.
Love the batik fabrics! Your Ohio Star is really lovely… do I need to send my address?
Janeen 😉
janeenvn@gmail.com
Love these colors and the white background! can't wait to see more….
btw you can steal my island batik logo, I asked for the plain one the other day……
I need to use up some purple batiks now….hmmmmm
I do have SOME ideas.