
Island Flower Wall Hanging
This post may contain affiliate links which won’t change your price but will share a commission.My Island Flower wall hanging is my first project as an ambassador for Island Batik.
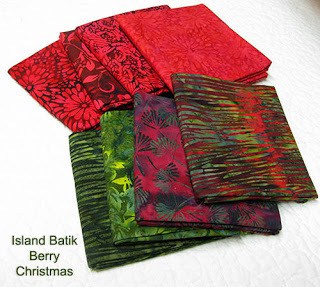
Have I told you how much I love working with batiks! This collection of batiks would be perfect for a Christmas project but this wall hanging could be used anytime.

Island Flower Wall Hanging
20″ x 28″
I had fun working with this beautiful group of batiks that I received from Island Batik called Berry Christmas but any red and green fabrics would work for this wall-hanging.
If you missed my post about it you can read about it here.

I created the Island Flower wall hanging using the AccuQuilt cutter and dies but this could easily be made by rotary cutting.
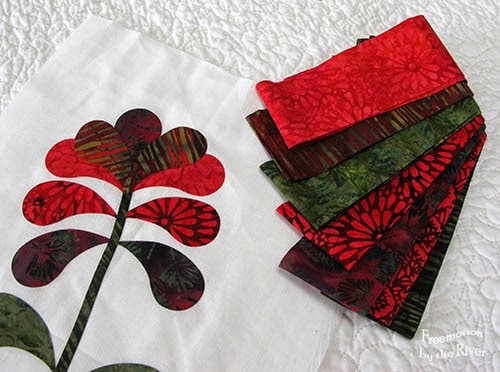
I used my AccuQuilt GO! Baby (which is now the Me) and the Feathers die to create the Island Flower. I put Heat n Bond Lite on the back of the fabric before I cut the feathers out.

Applique center
Cut a piece of premium muslin 8½” by 16½” for the background fabric that the flower will be appliqued to.
Borders
I also cut 2½” strips of all seven of the beautiful batiks and then sub-cut them into 2½” squares for the borders.
First Border: 2½” squares
Cut 22 – 2½” squares for the first border.
Sew four 2½” squares together two times and add to the top and bottom of your center piece.
Sew eight 2½” squares together two times and add to the sides of your center piece.

2nd and 3rd border: 1½” strips
Measure your piece and then cut 1½” strips of the red border. Do the same thing to add the 1½” strips of the green border.

Final border
Cut forty-two – 2½” squares for the final border.
Sew eight 2½” squares together two times and add to the top and bottom of your center piece.
Sew thirteen 2½” squares together two times and add to the sides of your center piece.

I used my vintage 15-91 Singer sewing machine to do all my piecing and quilting. I always like showing a picture of the free motion quilting before it is all done.
Do you see how the fabric really gets a beautiful texture with the quilting? The foot I am using is an old darning foot but a free-motion foot works just as well.

Using a AccuQuilt GO! cutter and dies made it fast and easy to make this wall hanging. When I made this wall hanging I used the GO! Me but now I used the electric cutter which really saves on the wrists as there is no more cranking to send the dies through the cutter.
For the applique, I just did some free-motion quilting around the flower pieces and then some thread painting.

Here it is with the quilting all done in the center and also on the red and green blocks.

Here is a closeup of the stitching on the leaves.

Since this is a wall hanging I cut 6-inch squares of muslin and folded them on the diagonal before attaching to the top corners. Now I can add a small dowel to hang this up. I did the raw edge applique before I added the back.
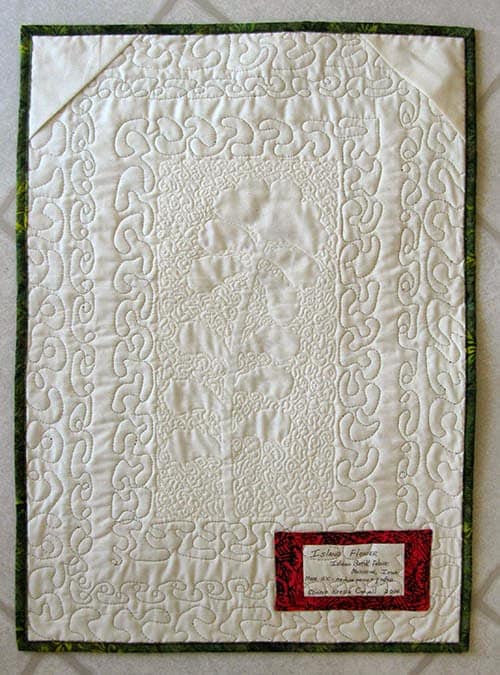
I made a little label and I have to laugh as the information on it is kind of mixed up…..but it is a label! Afterward, I realized…..I could have written the info on one of the corners.

Info on what I used for the Island Flower wall hanging.


I also gave away a bundle of Berry Christmas when I visited the Friendship Guild in Elizabeth, IL last week.
I still have a little bit of the batiks left for another small project.
Update: I used the leftovers for a couple of fun projects!
- Strippy Basket Tutorial with Somerset
- Batik Strippy Baskets
- Coasters from the corners
- Somerset Coasters
Great deals for you!
Looking for great buys on fabric and things? Check out these links


Would you consider making a pattern for the flower & leaves for those of us who don’t own a Cricut??
Your wall hanging is beautiful , I just love those Colors !
Beautiful job….I want to freemotion like you when I grow up. Heehee! Seriously, I love this project. Bravo!
Love it! The colors are fabulous!
What a lovely flower and wonderful tutorial
I really love this one Connie and how the Red flower just pops.
I always love your work Connie.
I love this explosion of greens and reds. Island Batiks are beautiful and they are very smart for selecting you to showcase in your amazing talented stitching ways. Creative Gorgeous Bliss…
Connie that is beautiful! I have a question for you if I may ask. I have made an applique wallhanging with a tree, birds and leaves. I would like to quilt a phrase on it. Do I do this before or after freemotioning the background? Val
Lovely quilting and the fabulous are gorgeous.
Love your quilting! And the fabrics are awesome!
Lin
One word – GORGEOUS.
That is gorgeous! I love the fabrics.
Simply beautiful Connie! I really love the way you quilted it!
Beautiful!
Have a great day.
Always, Queenie
not enough adjectives to describe this beauty. Well done.
Really neat. You did an awesome job blending the batiks on the flower petals.
The colors are beautiful, and kudos with the label. I am trying to label all my projects too.
Beautiful way to use your red and green Island Batiks! It was almost a tutorial with all your details. Thanks and happy Easter to you and Builder Bob and Kimberly!
It's beautiful!
That turned out absolutely gorgeous! Very pretty! 🙂
Very pretty. What are you using to write on your labels?
Very pretty!
gorgeous! love it
This is very pretty! As you make more labels, you will get all that down pat.