
Rainbow Table Toppers
This post may contain affiliate links which won’t change your price but will share a commission.
Are you looking for a fast and easy table topper that would be perfect for Easter or any time of the year? These are so easy to make that it took no time at all the make up two of the Rainbow table toppers.
Yesterday I decided I had to sew something….. so I made a couple fast centerpieces. I used a template but you can make yours with a ruler.

Fast and Easy Rainbow Table Toppers
I used eight – 2 1/2 inch strips of fabric, sewing 2 groups of 4 together using these beautiful fabrics which were fat quarters. The length of them was 22 inches.

I have a Starmaker 6 ruler from Kaye Wood that I bought years ago. I lined it up on my fabrics and then cut out the pieces.
Creative Grids has a 60 degree ruler that you can use. I use it to make all kinds of triangles and octagon blocks and just love it.

Depending on your ruler, you may have 60 degree markings on it.
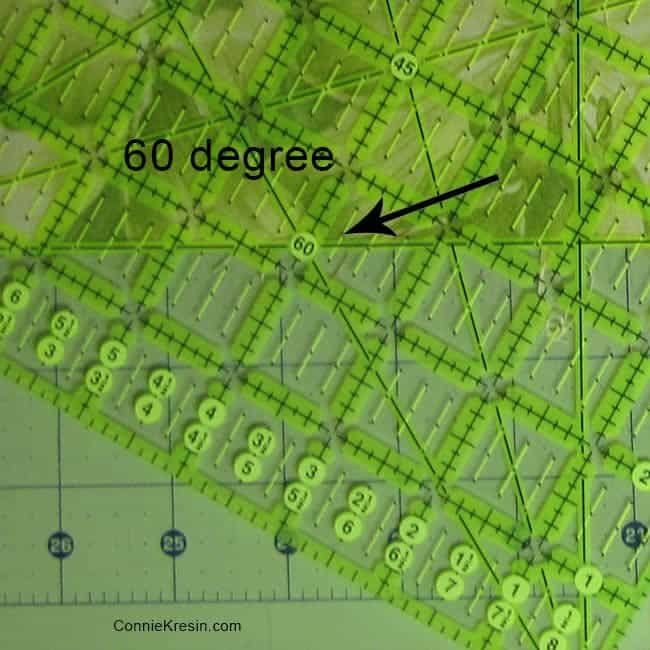

I even have the 60-degree markings on my cutting mat.
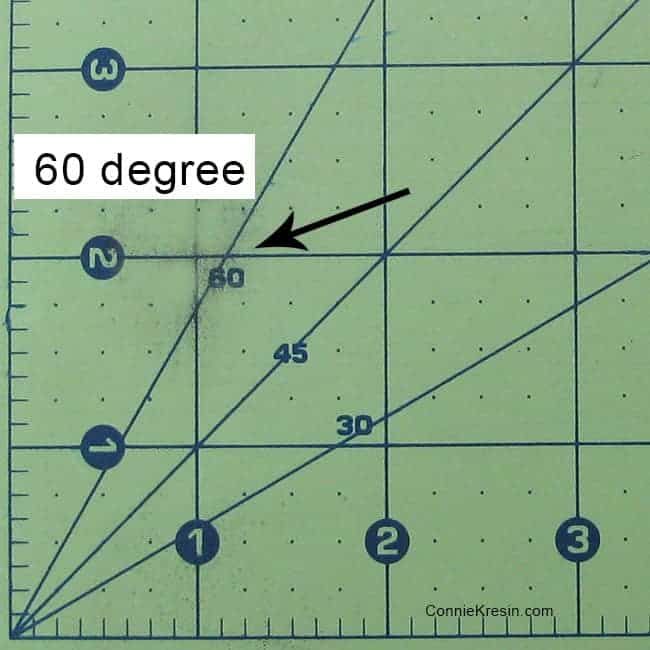
Most cutting mats also have this measurement on them. Sorry for the messy cutting mat. This is a closeup of my cutting board. The markings are on one corner…check yours.

I also have several Olfa rulers that have the 30, 45, and 60-degree markings on them. I put the 60-degree line along the bottom of my fabric.
I could use the ruler to cut the triangles. The size of your strips really doesn’t matter, I have made teeny tiny blocks and big ones. Whatever is the width of the strip determines the size of the triangle.

I laid one of the 4 strip lengths on top of the other one and cut my shapes.
From one length of fabric, I was able to cut 12 triangles and make 2 centerpieces. I even have a little piece leftover.

I used Warm & Natural cotton batting and some yellow stripe fabric from my stash for the back. I decided to use up some more of my cotton Cluny lace to finish the edges of the rainbow table topper. You could also add fabric binding to them.

I did a zig-zag stitch around the edges first and then carefully top-stitched to add the lace to the edges. I used Bottom line thread in an Oatmeal color for the quilting and it really blended in well.

Here are the two rainbow table toppers that I made. Notice how the green and purple fabrics are on the outside edges.

On this rainbow table topper, green and purple are used in the center of the table topper.

They are pretty bright and colorful and so cute with the Easter baskets and bunny dogs. I hope everyone has a wonderful Easter!


Rainbow Table Toppers
Please note that this post contains affiliate links, which means I’ll earn a small commission if you purchase through my link at no extra cost to you. Please see the full disclosure here. As an Amazon Associate, I earn from qualifying purchases.
Great deals for you!
Looking for great buys on fabric and things? Check out these links

About Connie
Hi, I’m Connie Kresin Campbell, the quilter, writer, and photographer behind Freemotion By the River. I enjoy inspiring others with my quilt tutorials and patterns. You’ll also see my sweet adopted dogs from time to time.
Be sure and subscribe to my newsletter for more free tutorials and printables.


These little table toppers are adorable….and I love your little puppy friends that are sitting on them!
Connie another beautiful project! I’ll have to give this one try also!
Thank you for the inspiration 🙂
Really cute – love the colors. Do you have a suggestion for a stippling pattern to use when you first attempt free motion quilting? Thank you.
those are lovely! How do you keep it from getting to bulky in the middle where they meet? Do trim the points?
Cute, cute, cute…
love it Mon, 🙂 you need too sell your stuff 😀 $$$$$$
So very pretty and perfect for spring!
Beautiful colors and I like the lace too.
Thank you for another fabulous tutorial Connie 🙂 Your table toppers are so pretty! and I just love the puppies with the bunny ears on them, LOL… Happy Easter! Elly
Connie, these are just darling!! I love how you just whip stuff out!
I just love your blog. You are so full of inspiration and so helpful too!
Beautiful colors Connie and thank you for the great tute on using the 60 degree angle.
Delightful colors! Happy Easter.
Pretty table toppers. Love how you finished the edges with lace.
Your puppy-bunnies are cute!
Thank you for explanation about the 60 degrees. Good info.
Happy Easter!
Love your little mats Connie – they are so pretty especially with the lace edging. I had a jelly roll with those fabrics in – it is now a top waiting to be quilted.
thanks a lot
un grand bonjour de France
Love the colors and the lace around it. Happy Easter to you, too!
Love the colors you chose. Very nice table toppers. Happy Easter!
very pretty Connie,have a safe and happy easter.xx
I love the simplicity of the pattern, and I'm completely gaga over the fabric!!!!!
I really like that. Will go on my must do list. Thanks.
So bright and spring like. Thanks for sharing the tutorial! Happy Easter!
Very pretty!
Beautiful pieces. Thanks for the tute.
Love how colorful these are Connie! Happy Easter :o)
~Terry~
these are so cute Connie….Happy Easter.
OOOOOO I can see that as a quilt. Thanks for the tut.
Hugs!